This Ham and Cheese Quiche recipe guarantees a flawless, stress-free dish readers call: “Out of this world delicious!” and “Wonderful creamy and delicious.” As a culinary enthusiast, I’ve perfected this quiche to be adeptly seasoned, rich, creamy, and perfectly balanced while also being easy to make and endlessly versatile. Follow along for a masterclass in quiche making so you can join readers in saying: “I finally made a quiche that didn’t have a soggy bottom- I’ll never buy store bought crust again!!”
Savory breakfasts are always a win to start off the day or make a fun breakfast-for-dinner option. Some must try breakfast winners include: sweet potato frittata, sausage breakfast casserole, ham and cheese breakfast enchiladas, eggs Benedict casserole breakfast tacos, breakfast quesadillas, chilaquiles, and now this ham and cheese quiche!
PIN THIS RECIPE TO SAVE FOR LATER


Ham and cheese quiche recipe
I whipped up this ham and quiche recipe in anticipation of leftover Christmas ham, but really, this quiche recipe is so spectacular, you will be craving it year-round. I’m only slightly embarrassed to admit my husband and I downed the entire quiche in two days, in two sittings – it’s just SO GOOD. We love this quiche, crave this quiche, dream about this quiche – and now I want more of this quiche!
I’m going go into detail all about quiche – what is quiche, quiche ingredients, how to make quiche, recipe variations, etc. so you can read on or use the “jump to recipe button” at the top of the page.

What Is a Quiche?
Now let’s talk quiche. If you’ve never made a homemade quiche before, you’re in for a real treat! Quiche is a savory French tart made with a creamy, soft egg and cheese custard filling. Quiche can be loaded up with any combination of meat, seafood, cheese, and veggies.
You’ve likely heard of a Quiche Lorraine, which is made with cheese and bacon. This ham and cheese quiche recipe is a spinoff of that classic. I’ve used cooked ham instead of bacon and used both Gruyere and Gouda cheeses for the most flavor and gooeyness!
Difference Between Quiche vs Frittata
You might be tempted to think of quiche as a frittata with a crust – it is not. There are three main differences between French quiche and Italian frittatas, the first obvious being crust:
•Quiches are considered a savory egg pie due to their buttery, flaky crust. Frittatas do not have a crust.
•Quiche filling is more of a creamy egg custard due to the use of heavy cream. Frittatas also use heavy cream, but far less than quiche recipes.
•Quiche filling is less “eggy.” There are about ⅓ less eggs in quiche than frittatas (12 eggs in a frittata to ⅘ eggs in a quiche). The lack of eggs in a quiche is made up of cream and cheese. This means quiche is softer and melts in your mouth and frittatas are sturdier.
•Quiche is 100% baked in the oven whereas frittata is cooked briefly on the stove, then finished in the oven.


Ingredients in This Ham and Cheese Quiche Recipe
You want to know a secret about this homemade quiche recipe? It looks impressive, but it uses pantry friendly ingredients! This is an absolute show-stopping breakfast recipe, but you can practically prep it with your eyes closed!
Can you use milk instead of heavy cream or half and half in Quiche?
No, please DO NOT use milk or your quiche will not set.
Do I have to use homemade pie crust?
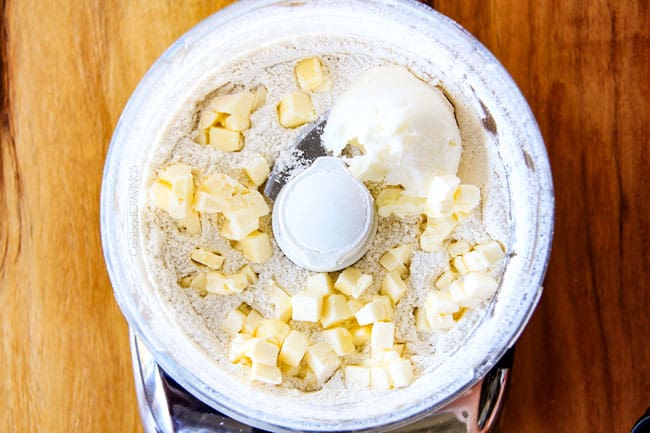
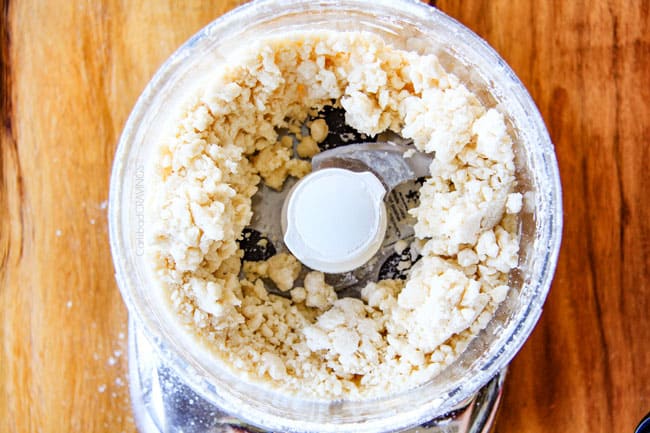
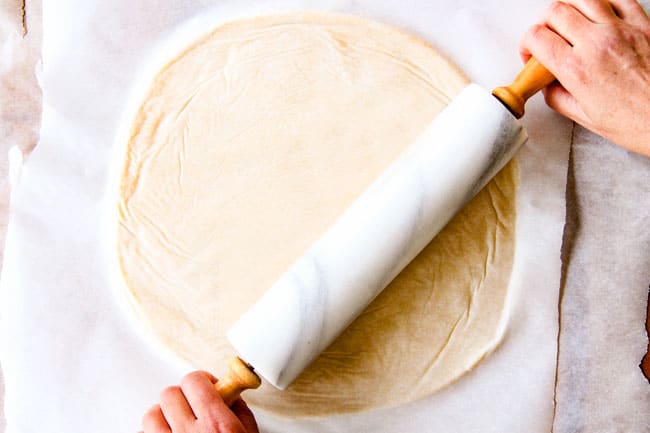
Nope! If you’re short on time, you can use a store-bought pie crust but if you do have the time, homemade is 100% worth the time and effort – it’s buttery and flaky in ways store-bought can only dream of. In addition, homemade pie crust is SO easy to make in your food processor. Just pulse flour, butter, shortening salt and water, together, chill, then roll!
How to use store bought pie crust
When buying frozen pie crust, make sure to purchase a 9-inch deep-dish pie crust, a regular pie crust will not work because it is not deep enough.
If you unpackage the pie crust and it’s cracked, make a smooth paste by mixing 1 tablespoon of flour with 1 tablespoon of water and use it to fill any cracks. You can use this same trick if your crust cracks after pre-baking as well.
You will still need to blind-bake store-bought pie crust to prevent a soggy bottom. Here’s how:
1. Remove the pie crust from the freezer and thaw for about 10 minutes or until just soft enough to easily prick with a fork.
2. Prick the bottom and sides all over with a fork (about an inch apart to prevent crust from puffing up).
3. Bake until lightly golden, about 10 minutes. You do not need to fill store-bought pie crust with weights.

Why Blind Bake (Prebake) Quiche Crust
This ham and cheese quiche recipe requires you to blind bake the homemade pie shell first. Blind baking might sound complicated but it simply means partially pre-baking the empty pie crust before you add the filling. Blind baking is important for a flakey crust because it allows the sides to set and the bottom to crisp up, something that can never happen if immediately filled and baked with a wet filling.
When blind baking, there are four keys to success:
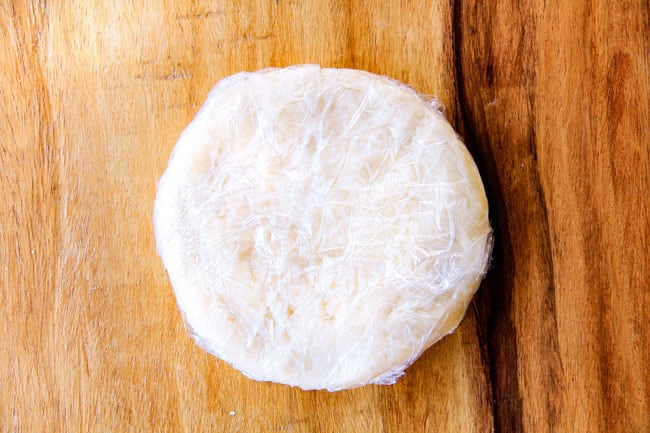
1. Chill your pie shell before blind baking. The pie shell should be chilled for 45 minutes (or longer) before blind baking. The colder the crust before baking, the crispier and flakier it will be. You want the fat to be firm going into the oven so it melts in the oven – not on the counter – this creates pockets of steam resulting in flaky layers. Equally as important, chilling the pie shell lets the strands of gluten relax which helps prevent constricting and shrinking.
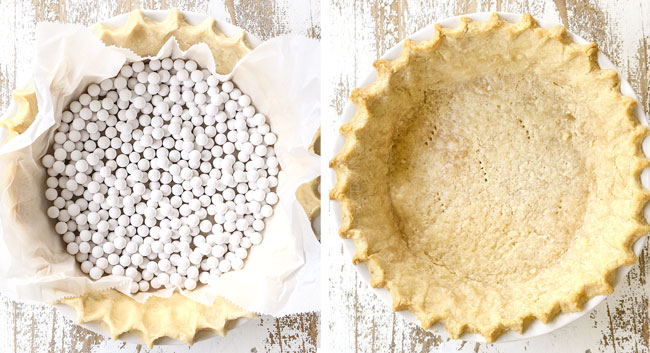
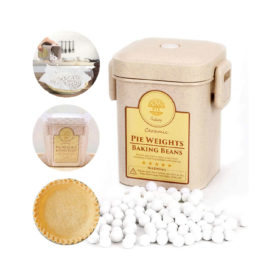
2. Use pie weights to prevent shell from shrinking. As the pie dough bakes, the fat melts and shrinks which causes the bottom to shrink and therefore the sides to slide down. Melting fat also creates steam which causes the dough to puff up if not weighed down with a filling. To remedy both of these problems, you need pie weights, rice, or beans – any oven proof weight – to fill the bottom of the pie shell. Now your center won’t puff up and the sides won’t shrink.
3. Bake without pie weights to brown the bottom. You’ll bake the pie crust for 20 minutes with pie weights which bakes the edges and secures them in place but since the bottom was covered with parchment and weights, it doesn’t brown up. To remedy, you’ll simply remove the parchment and pie weights and bake an additional 10 minutes.
4. “Dock” the pie crust before popping it back into the oven. This means pricking holes in pie crust with a fork which will allows steam to escape. And no, your filling will not escape through the holes!

How to Make a Ham and Cheese Quiche
Don’t be intimidated by how beautiful this quiche looks! It’s so incredibly easy to make, it just requires some hands-off dough chilling time. Here’s a breakdown of the basics steps to making a ham and cheese quiche at home:
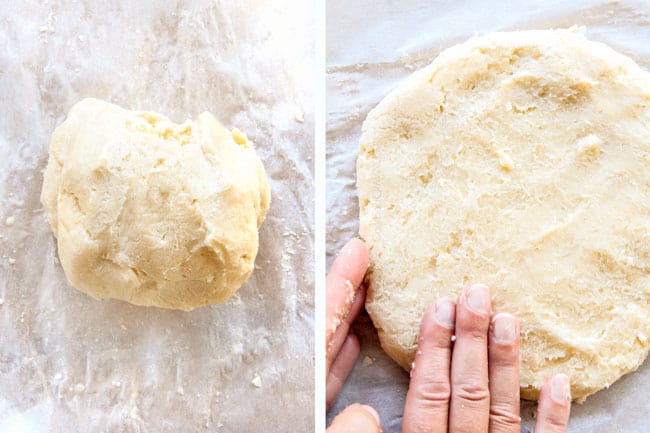
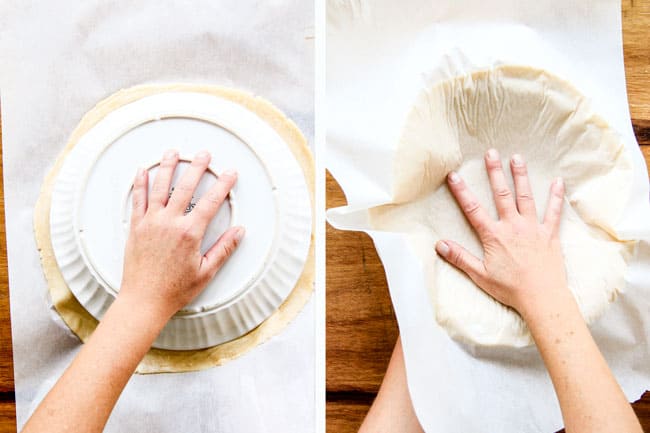
Step 1: Make the Pie Crust
Step 2: Pre-Bake (Blind Bake) the Pie Crust

Step 3: Make the Quiche Filling

Step 4: Bake the Quiche

How to tell when my Ham Quiche is done
It is important not to cover-cook your homemade quiche to achieve light, fluffy, creamy perfection. Cook the quiche until the cheese is melted and the center is set but jiggles ever so slightly. Your quiche center should be soft and custardy, this means it is mega creamy. If you cut into your crust and it’s liquidly, then simply pop it back in the oven for another 5-10 minutes.

Ham Cheese Quiche Tips
BASIC ham and cheese quiche FORMULA
If you want to skip my veggies and add your own, or swap cheeses here is the basic ham and cheese quiche formula to follow:


Ham Quiche Recipe variations
Now that you know the basic ham and quiche recipe formula, you can make a quiche using pretty much any combination of cheeses, veggies, and protein that you like! Here are a few ways you can switch up this simple ham and cheese quiche recipe:

Quiche Recipe Ideas
Here are some tasty ham and cheese quiche recipe variations to try (all should have some sort of onion and garlic):
• Ham, spinach, Gruyere and feta cheese.
• Ham, spinach, cherry tomatoes, Gruyere and feta cheese.
• Ham, spinach, artichokes, red bell peppers, mozzarella and feta cheese.
• Ham, broccoli, chives and Gouda.
• Ham, broccoli, sweet potatoes, chives, Gouda and goat cheese.
• Ham, cherry tomatoes, zucchini, mushrooms, spinach, basil, mozzarella and goat cheese.
• Ham, roasted bell peppers, broccoli, mushrooms, Gouda and Gruyere.
• Ham, asparagus, tomatoes, spinach, mozzarella and Gruyere.
• Ham, Brussels sprouts, sweet potatoes, mushrooms, mozzarella and Gruyere.
• Ham, potatoes, carrots, mushrooms, Gouda and Gruyere.
how to make mini quiche
This ham and cheese quiche recipe will work great to make mini quiche as well, but you will need TWO pie crusts (double the homemade pie crust recipe):
1. Preheat the oven to 375 degrees. Spray two nonstick 24-cup mini muffin tins with cooking spray.
2. Working with one chilled pie dough at a time (store-bought or homemade), roll out onto a floured surface into a 12-inch circle. Using a 2.5-inch cookie cutter, cut out 24 circles, rerolling the scraps as needed. 3. Work quickly as the dough becomes more delicate and tears more easily the longer it’s at room temperature. Repeat with 2nd chilled pie dough for a total of about 48.
4. Transfer the dough rounds into greased pans and press the dough flat into the bottom and sides. Evenly pour filling into each unbaked crust.
5. Bake the mini quiches until the center is just about set and the edges are lightly browned, about 25-28 minutes. Allow them to cool for 5 minutes before removing them from the pan.

What to Serve with Ham and Cheese Quiche?
Quiche is typically served as a main dish for breakfast or brunch. It’s already a very hearty dish, so I like to keep the sides simple. A few ideas of what to serve with quiche include:

How to store Quiche Ham and Cheese
Quiche reheats very well so it’s fabulous to make ahead.
• To store: Let the quiche cool to room temperature on your countertop before covering it with foil and refrigerating it. It will last up to 4 days in the fridge.
• To reheat in the microwave: Warm individual servings on a microwave-safe plate in the microwave for about a minute or until warmed through. I like to cut my slice in half before microwaving so it warms evenly.
• To reheat in the oven: Transfer whole quiche to the oven and reheat for 20 minutes at 350 degrees F or until heated through. For quiche slices, transfer them to an oven-safe baking dish, then cover with foil and bake for 10 minutes, or until heated through.
• From frozen: Defrost a slice for 2 minutes on high in the microwave then bake for 10 minutes.

Can I Prep Quiche in Advance?
Yes! You have a few options when it comes to making this quiche recipe in advance:
• Pie crust: Make the pie dough in advance and chill in the fridge for up to 5 days OR make further in advance and freeze for up to 3 months, then thaw overnight and use. You can also partially pre-bake the pie crust in the pie plate up to 3 days in advance. Let cool, cover and refrigerate.
• Egg filling: You can whisk together the eggs, heavy cream, seasonings, ham and cheeses, cover, and store in an airtight container (NOT the pie shell) for up to 24 hours. Give the mixture a stir before using to make sure the ingredients are evenly distributed.
• Whole quiche: You can assemble and bake the entire quiche before serving it. Quiche will last up to 4 days in the fridge, but it’s best within the first 24 hours of making it. It’s delicious served cold, room temperature, or warm, but I’m partial to warm.
Can You Freeze Quiche?
Yes! This ham and cheese quiche freezes like a dream! Here’s how to freeze a quiche:
• For slices: slice into individual servings. Wrap each slice in plastic wrap then seal inside a freezer-safe plastic bag.
• For whole quiche: wrap quiche in a double layer of plastic wrap followed by a double layer of foil.
• Freeze for up to 3 months.
• When ready to eat, you can reheat quiche slices from frozen per method above but it is best to thaw a whole quiche in the refrigerator for 24 hours before reheating. Reheat for 20 minutes at 350 degrees F or until heated through.

Ham Cheese Quiche FAQs
For this ham and cheese quiche, we use 4 large eggs and 1 egg yolk to 1 cup of heavy cream. This produces luxuriously rich and creamy quiche.
Yes, you must pre-bake the crust (called blind baking) before adding the filling or it will be soggy instead of flaky. Homemade pie crust should be baked for 30 minutes total (20 with weights, 10 without) and store-bought pie crust should be baked for 10-15 minutes (less time because it is thinner).
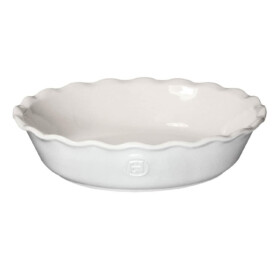
Crustless quiche is exactly that – quiche without a crust! You can make a ham and cheese crustless quiche by following the recipe for the filling and pouring into 9-inch pie dish generously greased with cooking spray. Bake at 375 degrees for 35 -42 minutes.
According to the United States Department of Agriculture (USDA), egg dishes are safe to eat at 160 degrees F. At this point however, the quiche will still be liquid in the middle. Instead, bake the quiche until an instant read thermometer inserted into the center registers between 170 and 175 F. Above 180 and it is definitely overcooked and runs the risk of curdling. If it’s under 160, continue baking it until it reaches 170 degrees F.
More Breakfast Recipes for a Crowd:
- The Best Frittata
- Eggs Benedict Casserole
- Breakfast Enchiladas
- Breakfast Pot Pie
- Sausage Breakfast Casserole
- Pecan Praline French Toast Bake
- Breakfast Tacos
- Breakfast Burritos

WANT TO TRY THIS RECIPE?
PIN IT to your recipe BOARD TO SAVE FOR LATER!
FIND ME ON PINTEREST FOR MORE GREAT RECIPES! I AM ALWAYS PINNING :)!
©Carlsbad Cravings by CarlsbadCravings.com


Quiche Ham and Cheese
Save This Recipe To Your Recipe Box
You can now create an account on our site and save your favorite recipes all in one place!
Ingredients
- 1 Homemade Pie Crust Recipe see notes to use store-bought pie crust
- 4 large eggs
- 1 egg yolk
- 1 1/4 cups heavy cream
- 1/2 tsp EACH dried parsley, dried oregano, dried thyme, paprika, ground mustard, pepper
- 1/4 teaspoon salt
- 1 cup chopped ham
- 3 oz. (about ¾ cup) shredded Gruyere cheese
- 3 oz. (about ¾ cup) shredded gouda cheese may sub cheddar
- 1 tablespoon olive oil
- 1 tablespoon unsalted butter
- 1/2 onion chopped
- 1 cup asparagus cut into 1/2-inch pieces
- 1 red bell pepper chopped
- 3-4 cloves garlic, minced
Instructions
PIE CRUST
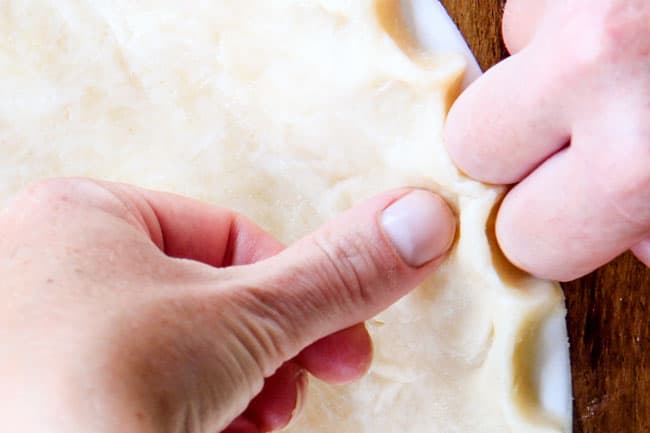
- Prepare pie dough according to recipe directions through fluting the edges (or whatever edge design you prefer) and refrigerating for 45 minutes. Cover the pie crust with plastic wrap if refrigerating longer than 45 minutes (can be refrigerated for up to 5 days). It is helpful to complete this step the day before then just pull the pie shell out of the fridge the next day. At the very least, I suggest making the pie dough the night before.
- When ready to make the quiche, preheat oven to 375 degrees F. Line the chilled pie crust with parchment paper then evenly fill with baking beads, dry beans or rice – anything oven proof that will weigh down the pastry (prevents it from shrinking while baking).
- Bake at 375 F for 18 minutes. Remove pie crust from the oven and carefully lift the parchment paper with the weights out of the pie. Prick holes around the bottom crust with a fork.
- Return the pie crust to the oven and bake an additional 10 minutes. Remove from the oven (crust can still be warm when you add the filling). You can complete partially pre-baking the crust up to 3 days ahead of time then let cool, cover, and refrigerate until ready to use.
QUICHE
- In a large bowl, whisk the eggs and egg yolk until lightly beaten. Whisk in heavy cream and seasonings then stir in the ham and cheeses; set aside.
- Melt butter in oil in a large skillet over medium-high heat. Add onions and asparagus and sauté for 3 minutes. Add peppers and cook an additional 2 minutes or until onions are softened; add garlic and sauté 30 seconds. Transfer vegetables to egg mixture and stir until evenly combined (it will look cheese heavy – yum).
- Pour the egg mixture into the crust. Bake uncovered at 375 degrees for 35 to 45 minutes, or until set but the center jiggles slightly. Let cool 15 minutes before serving. (Your quiche center should be soft and custardy, this means it is mega creamy. If you cut into your crust and it’s liquidly, then simply pop it back in the oven for another 5-10 minutes).
Notes
How to use store bought pie crust
When buying frozen pie crust, make sure to purchase a 9-inch DEEP-dish pie crust, a regular pie crust will not work because it is not deep enough. If you unpackage the pie crust and it’s cracked, make a smooth paste by mixing 1 tablespoon of flour with 1 tablespoon of water and use it to fill any cracks. You can use this same trick if your crust cracks after pre-baking as well. Which brings me to my next point, you will still need to blind-bake store-bought pie crust to prevent a soggy bottom. Here’s how:
- Remove the pie crust from the freezer and thaw for about 10 minutes or until just soft enough to easily prick with a fork.
- Prick the bottom and sides all over with a fork (about an inch apart to prevent crust from puffing up).
- Bake until lightly golden, about 10 minutes. You do not need to fill store-bought pie crust with weights.
Tips and Tricks
- Heavy Cream: Also called “heavy whipping cream” at the grocery store. Heavy cream makes the quiche filling ultra velvety and rich. If you want to substitute with half and half, it will still work but won’t be as luxurious – more of a frittata texture.
- Ham: You can use leftover Christmas, Easter or Thanksgiving ham or ham from the deli counter. If using leftover ham, you will need to take into account any additional ham seasonings. If purchasing ham from the deli counter, have them slice it ¼-inch thick then all you have to do at home is slice it the other direction to produce cubes. Don’t use thinly sliced ham because it doesn’t stand up as well to the thick egg filling.
- Cheese: My favorites are Gruyere and Gouda used in this recipe but you can use 1 ½ cups (6 ounces) of your favorite freshly shredded cheese. I recommend 1 cup soft melting cheese (see section on cheeses) and then you can use another cheese such as Parmesan, feta or sharp cheese that add flavor but don’t melt quite as well for the remaining ½ cup.
- Vegetables: Pick your favs or omit altogether. You can use 3 cups vegetables or less, but don’t use more. If starting with cooked vegetables, use slightly less than 3 cups because raw vegetables cook down. Fully cook vegetables before adding to the filling. See recipe post for variation ideas.
- Prep ahead. I suggest making your pie dough or go one step further and blind bake the pie shell so all you have to do is pull it out of the fridge and fill when ready.
- Chill the crust! The pie crust will shrink if you don’t chill it before blind baking. Chill for at least 45 minutes.
- Keep an eye on the crust. Don’t forget to keep an eye on the quiche as it bakes. If the crust is becoming too dark, cover the outside ring of the crust with foil or I love my pie shield.
How to Make Ahead
You have a few options when it comes to making this quiche recipe in advance:- Pie crust: Make the pie dough in advance and chill in the fridge for up to 5 days OR make further in advance and freeze for up to 3 months, then thaw overnight and use. You can also partially pre-bake the pie crust in the pie plate up to 3 days in advance. Let cool, cover and refrigerate.
- Egg filling: You can whisk together the eggs, heavy cream, seasonings, ham and cheeses, cover, and store in an airtight container (NOT the pie shell) for up to 24 hours. Give the mixture a stir before using to make sure the ingredients are evenly distributed.
- Whole quiche: You can assemble and bake the entire quiche before serving it. Quiche will last up to 4 days in the fridge, but it’s best within the first 24 hours of making it. It’s delicious served cold, room temperature, or warm, but I’m partial to warm.
How to Store and Reheat
- To store: Let the quiche cool to room temperature on your countertop before covering it with foil and refrigerating it. It will last up to 4 days in the fridge.
- To reheat in the microwave: Warm individual servings on a microwave-safe plate in the microwave for about a minute or until warmed through. I like to cut my slice in half before microwaving so it warms evenly.
- To reheat in the oven: Transfer whole quiche to the oven and reheat for 20 minutes at 350 degrees F or until heated through. For quiche slices, transfer them to an oven-safe baking dish, then cover with foil and bake for 10 minutes, or until heated through.
- From frozen: Defrost a slice for 2 minutes on high in the microwave then bake for 10 minutes.
How to Freeze
Yes! This ham and cheese quiche freezes like a dream! Here’s how to freeze a quiche:- For slices: slice into individual servings. Wrap each slice in plastic wrap then seal inside a freezer-safe plastic bag.
- For whole quiche: wrap quiche in a double layer of plastic wrap followed by a double layer of foil.
- Freeze for up to 3 months.
- When ready to eat, you can reheat quiche slices from frozen per method above but it is best to thaw a whole quiche in the refrigerator for 24 hours before reheating. Reheat for 20 minutes at 350 degrees F or until heated through.
Want To Make This Recipe?

Did You Make This Recipe?
Tag @CarlsbadCravings and Use #CarlsbadCravngs
Leave a Review, I Always Love Hearing From You!
Carlsbad Cravings© Original


Kate Roed says
I need the ham and cheese quiche the other night. It was wonderful creamy and delicious. Are used a 9 inch deep dish premodern crust which proved to be too small for the amount of the quiche.So I also made a crustless quiche with the third of the ingredients that did not fit. It to turned out wonderfully. Next time I will make my own crust that’s the only thing I would change.
Jen says
I’m so pleased you loved the quiche Kate but I’m sorry it didn’t all fit in the store-bought crust! What a great idea of yours to make a crustless quiche with the leftovers!
Wendy says
Out of this world delicious!!! I made this 2 days ago and have enjoyed leftovers ever since. The flavor was perfect and the cheeses really made this shine. I had to use broccoli instead of asparagus because the asparagus didn’t look that good. Thank you for this recipe and I will definitely make this again-soon!!
Jen says
Thank you so much for your awesome review Wendy! I’m so pleased it was a winner and it sounds fabulous with broccoli as well!
B says
Can I adjust the amount of ingredients to fit in a regular ( not deep dish) pie pan?
Jen says
Yes! I would adjust the servings to 4 and the ingredients will automatically scale.
B says
Hi Jen. I have a few questions regarding making your crust. I’m making the crust today & baking the quiche tomorrow. I place cold dough in pan, brush with egg wash, refrigerate 45mins, place parchment paper on dough, add weights,bake 20mins, remove parchment paper & weights , dock bottom of crust, then bake 10 more minutes. Is this the correct order?
Jen says
Yes, that is correct! I hope you love it!
B says
We loved it!! Next time I’ll use smoked Gouda or Gouda with bacon in it, yum!
Jen says
Thanks so much, so glad you liked it!
B says
Update: Yay, success! Finally made a quiche that didn’t have a soggy bottom or a filling that somehow managing to seep through the crust & bake underneath it. All thanks to you! I ended up buying a stoneware deep dish pan since I was afraid my Pyrex would shatter from thermal shock; thanks for that information! I made the recipe as is except I used jarlsberg instead of Gruyère (it’s so expensive) & shallots instead of onions because I love them. It was delicious. Your homemade crust was buttery & flaky & so easy to make. I’ll never buy store bought crust again!! Thanks again Jen for your recipe & your help.
Jen says
YAY! I really appreciate you taking the time to leave a review B! I’m so pleased your quiche was a huge success and you found the info helpful!
Katie says
Love this recipe, but each time I make it, it seems to take significantly longer to get cooked through the middle. Like an additional 25-30+ minutes. And in turn then the top and crust get pretty burnt. Suggestions? I I’m using the pie dough recipe from this site.
Jen says
I’m so glad that you love it! I would suggest covering the top of the quiche with tin foil when it starts browning. Hope this helps!