I am so excited to share my favorite easy Homemade Pie Crust Recipe! I’ve included step by step photos, tips and tricks so even if you have never made homemade pie crust before, yours will turn out beautifully buttery, tender, flaky and delicious! And if you have never made pie crust before, let me assure you it really is “easy as (eating) pie!”
Hello Fall and Hello Pies! In less than a month, everyone will be gathering around/drooling over a Thanksgiving spread of pies. What a beautiful sight. I love that many pie recipes can be made ahead of time so pie making can truly be stress free, if you have the right pie crust recipe in your back pocket. And THIS is the BEST Pie Crust recipe!
PIN THIS RECIPE TO SAVE FOR LATER
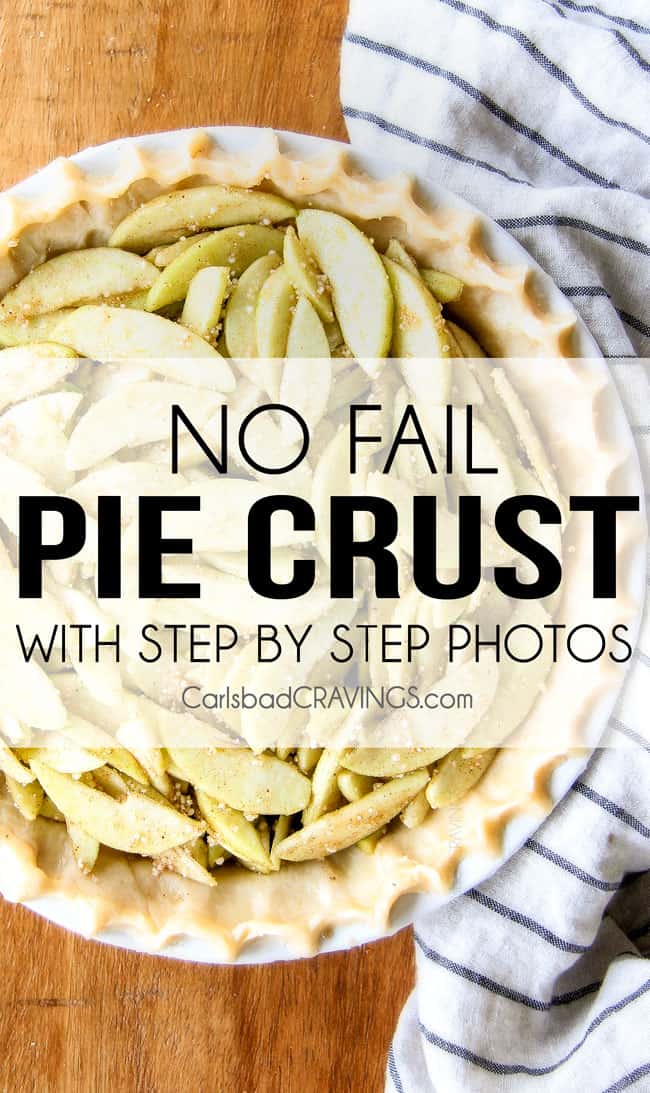
Easy Homemade Pie Crust Recipe
There are different schools of thought when it comes to butter pie crust recipes or shortening pie crust recipes. Although butter crusts are delicious, they are not as flaky as those made with shortening. Shortening pie crusts, on the other hand, have wonderful texture but lack in flavor. BUT when you use BOTH butter and shortening you have both flavor and texture – AKA the best pie crust in your back pocket!
So let’s get started!
Homemade Pie Crust Ingredients
This truly is a no fail pie crust recipe. The ingredients list is minimal, as you don’t need much to make a perfectly flaky pie crust!
Here’s what you’ll need to make this pie crust with shortening AND butter:
- Butter: Always use unsalted butter in baked goods.
- Flour: I’ve only tested this homemade pie shell recipe with all-purpose flour, so I can’t speak to how using a gluten-free flour would work.
- Granulated sugar: Just 1 tablespoon adds flavor and sweetness to the crust.
- Salt: Enhances the flavor of the crust.
- Vegetable shortening: Make sure to buy unflavored shortening.
- Water: Needs to be ice cold.
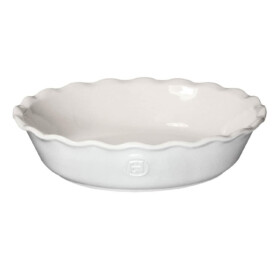
What pie pan is best?
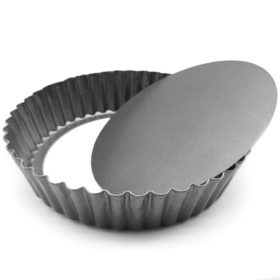
This recipe makes enough dough to fill a standard 9-inch pie pan or a 2-inch deep 9-inch pie pan or a 2-inch deep 9-inch tart/quiche pan. The reason I love a quiche pan for both pies nd quiche s it has a removable bottom. This allows you to bake the pie, then push up the bottom and the sides drop away from the pan. This feature is amazing because:
- It allows you to easily transfer the pie to a plate or cake stand for beautiful presentation
- The pie is easier to slice, and more importantly, it’s easier to remove the slices from the pan without losing any crust
- It allows the pie to cool to golden perfection out of the pan so the crust stays soft and flaky and doesn’t overcook

How to Make Homemade Pie Crust Perfectly Every Time
- First, place shortening in the refrigerator and fill a glass with ice water and refrigerate. Next, chop your butter into 1/4“ pieces and refrigerate.
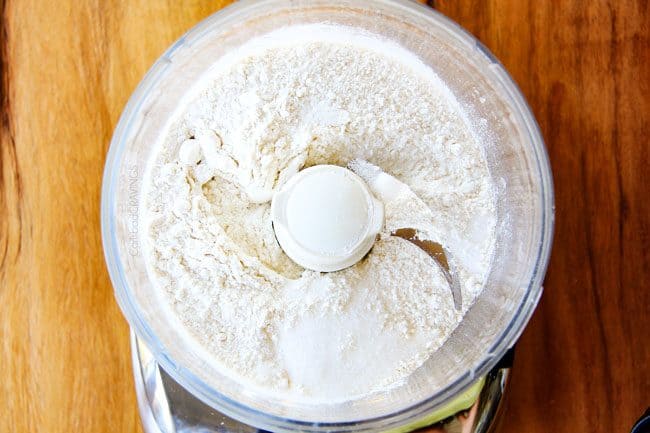
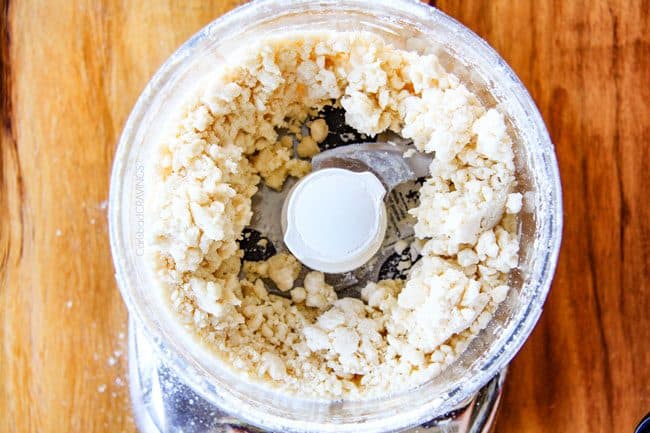
- Next, place flour, sugar and salt in food processor fitted with a steel blade and pulse a few times to mix (or mix by hand in a large bowl).
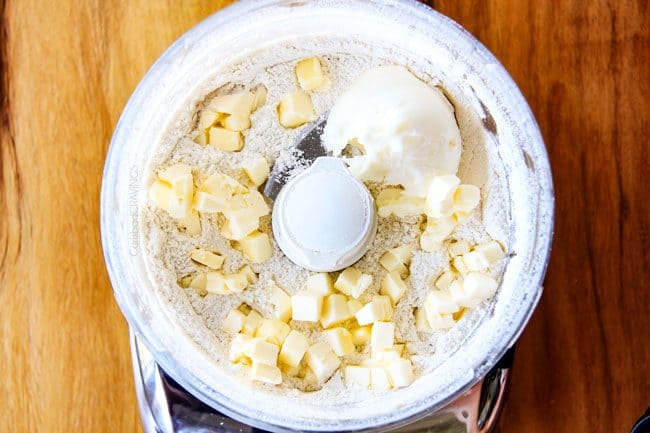
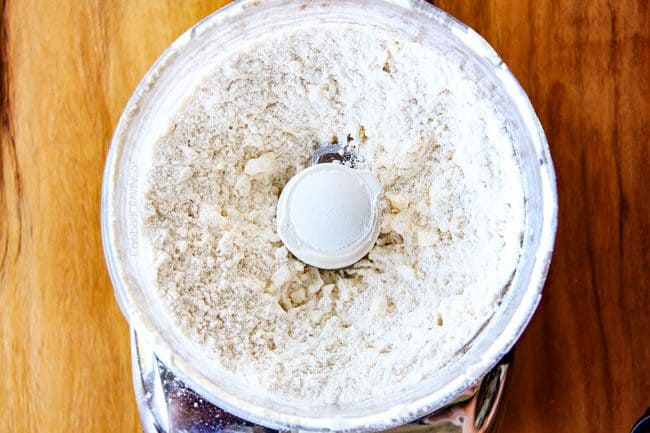
- Add COLD shortening and COLD butter. Pulse 8-10 times, until the mixture like coarse crumbs and the butter is about the size of peas, with a few larger pieces scattered throughout. (If mixing by hand, cut in butter with two forks or a pastry cutter.)
- Measure out ¼ cup ice water from your chilled water and pour the ice water down the feed tube while it’s running then pulse until the dough is moistened and sticks together. (If mixing by hand, us a spatula to fold the water into the dough)
- Dump dough out onto parchment paper and press together until it sticks together into a ball, adding an additional teaspoon water at a time (up to one tablespoon) if dough will not come together.
- You want the dough to be moist but not wet. You only want to use additional water if the dough is not coming together because extra water means a less tender dough.
- You also want to work the dough AS LITTLE AS POSSIBLE or you will get a crumbly rather than flaky dough.

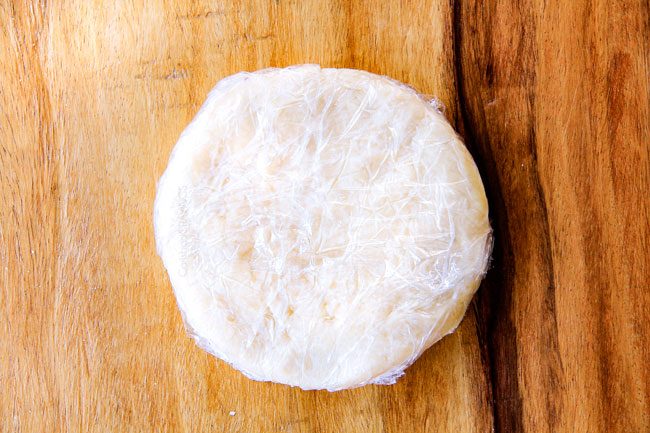
- Press dough into an even disc, about 8” around (it does not need to be perfect). Wrap in plastic wrap and refrigerate for at least 2 hours up to 2 days (best if overnight).
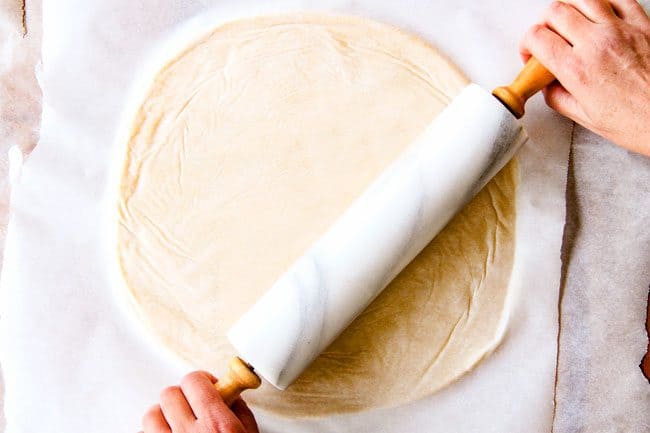
- Line a counter with parchment paper, at least 16 inches wide. We want to use parchment as opposed to a floured surface because adding flour to the surface will be absorbed by the dough and too much four will cause the dough to be tough.
- Add dough to the center of your parchment and place another piece of parchment on top. Roll dough out onto parchment paper, rolling from the center to the edge, to form a 12” circle (for a 9” crust).
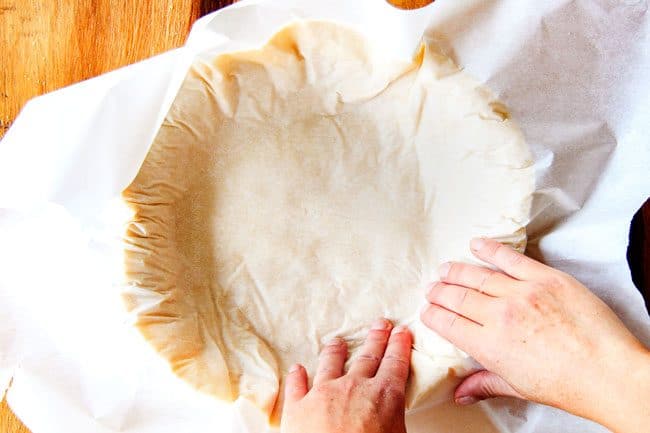
- Remove top piece of parchment. Place your dominant hand under the dough and hold the pie plate (or quiche pan) with your other hand on top. Quickly flip the pie plate over in order to place the dough into the pie pan, parchment side up.
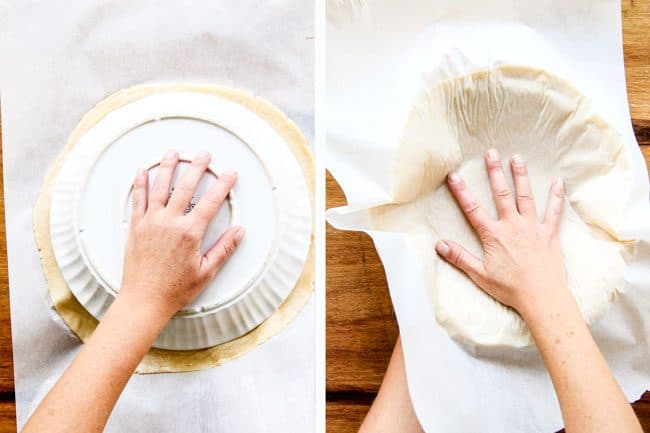
- Before removing parchment, press dough evenly into the pie pan – it’s much easier to do this before removing the parchment because it keeps your hands from sticking. Remove parchment and smooth dough up the sides of pie pan. Cut off any overhanging dough around the edges.
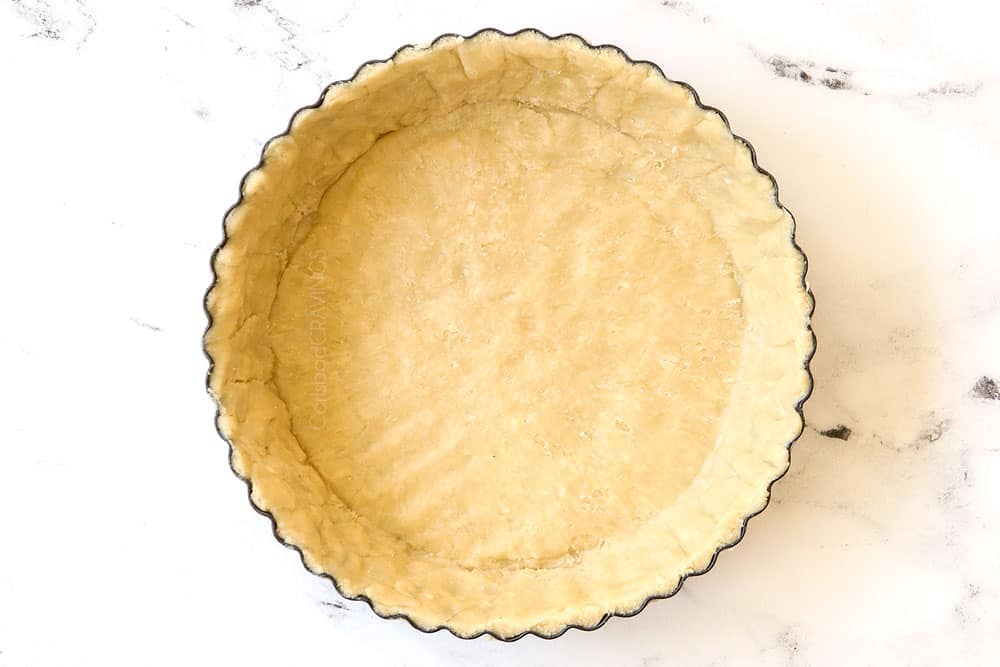
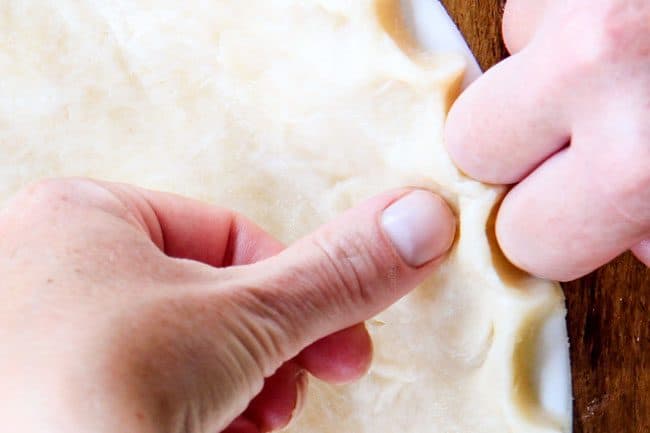
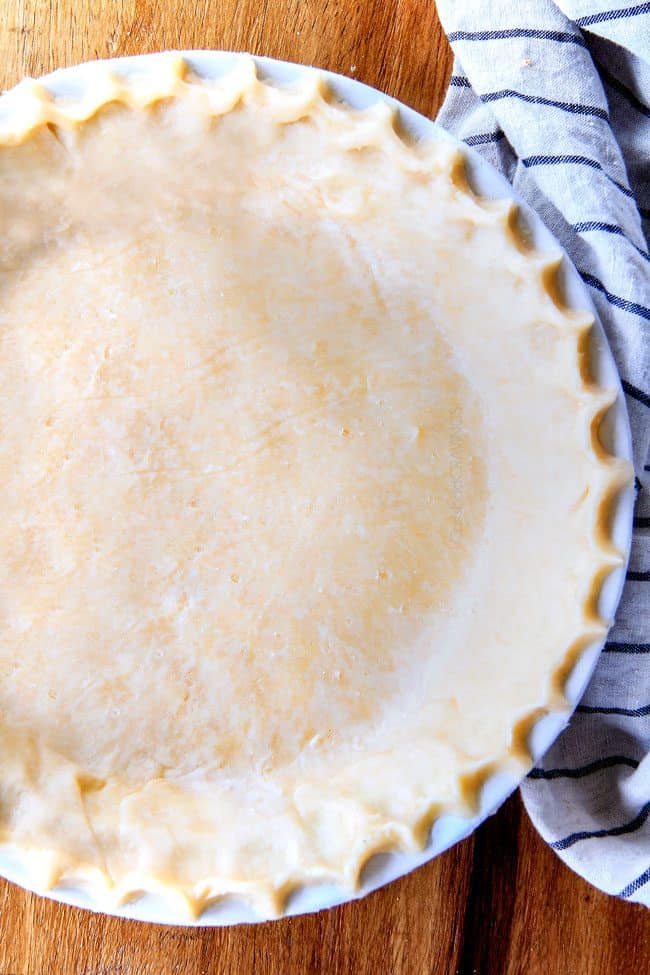
- Finally, flute the edges or create whatever edge design you prefer. Cover the pie with foil or plastic wrap and refrigerate for 45 minutes. This refrigeration helps firm up the dough and prevent the dough from shrinking when baked.
- Lightly brush the entire crust (bottom and sides) with egg wash (helps prevent soggy crusts and promotes a beautifully golden crust). Immediately cover the pie with foil or plastic wrap and refrigerate for 45 minutes or freeze for 20 minutes.
- Blind bake (pre bake for cold fillings) or bake with the filling according to your recipe directions. Then, proceed to eat flaky, tender buttery crusted pie!
WHAT IS BLIND BAKING PIE CRUST?
Blind baking might sound complicated but it simply means partially pre-baking the empty pie shell before you add the filling. Blind baking is used when you are going to add a cold filling that doesn’t bake with the crust such as strawberry pie, lemon meringue, pudding pie, etc. It is also used when baking quiche, but the crust is blind baked for less time because it finishes baking with the quiche.
how to BLIND BAKE THE PIE CRUST
- Chill your pie shell before blind baking. The pie crust should be chilled for 45 minutes (or longer) after it’s transferred to the pan before blind baking. The colder the crust before baking, the crispier and flakier it will be. You want the fat to be firm going into the oven so it melts in the oven – not on the counter – this creates pockets of steam resulting in flaky layers. Equally as important, chilling the pie crust lets the strands of gluten relax which helps prevent constricting and shrinking.
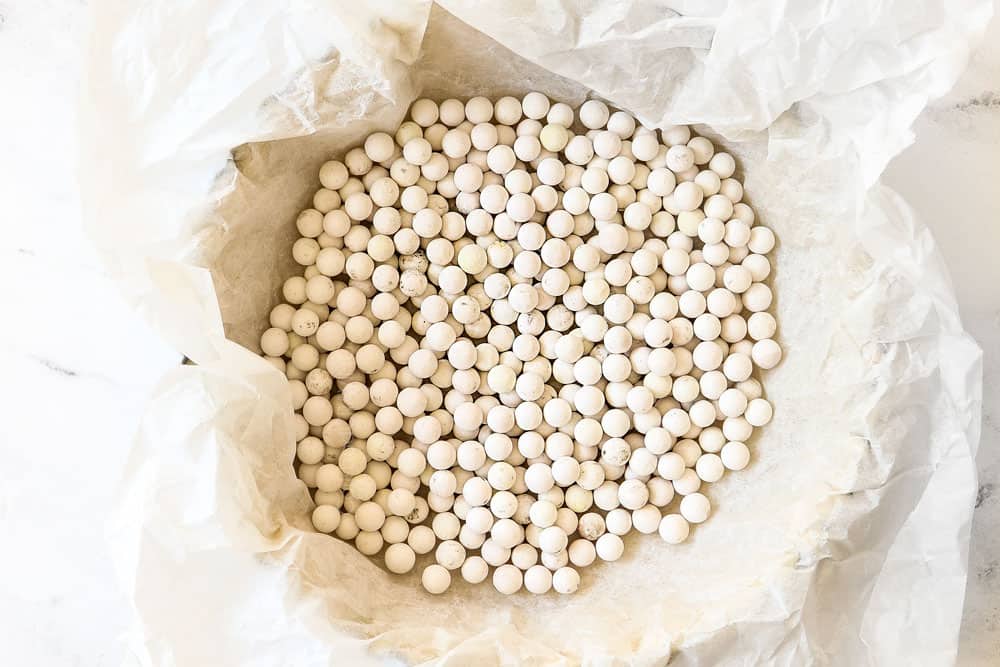
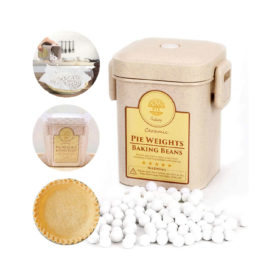
- Use pie weights to prevent the pie crust from shrinking. As the pastry bakes, the fat melts and shrinks which causes the bottom to shrink and therefore the sides to slide down. Melting fat also creates steam which causes the dough to puff up if not weighed down with a filling. To remedy both of these problems, you need pie weights, rice, or beans – any oven proof weight – to fill the bottom of the pie crust. Now your center won’t puff up and the sides won’t shrink as much (some shrinkage is normal).
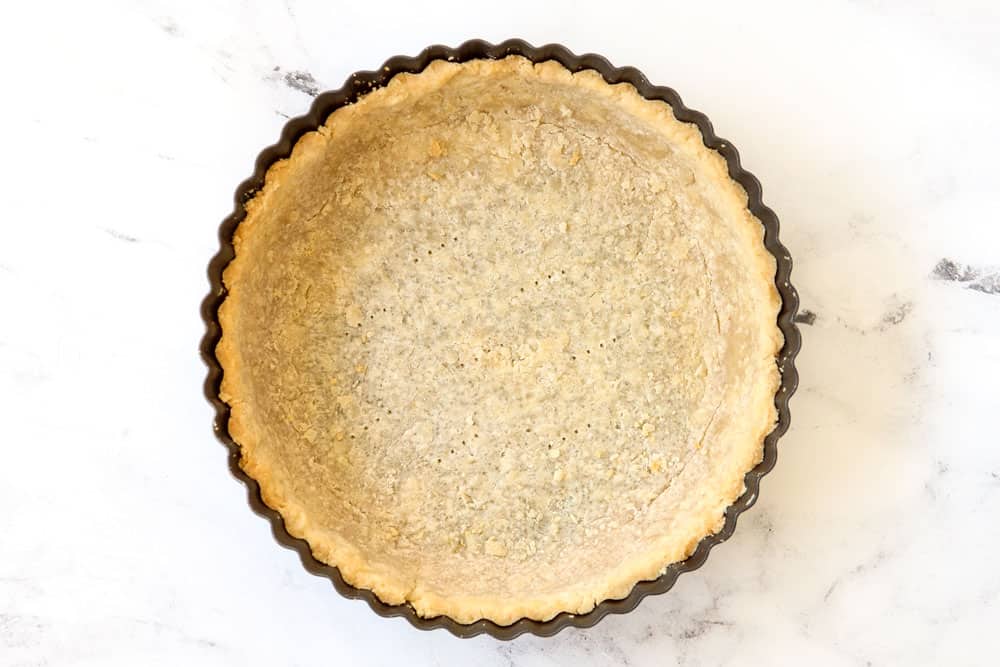
- Bake without pie weights to brown the bottom. You’ll bake the pie crust for 25-30 minutes with pie weights which bakes the edges and secures them in place but since the bottom was covered with parchment and weights, it doesn’t brown up. To remedy this, you’ll simply remove the parchment and pie weights and bake an additional 12-18 minutes.
- “Dock” the pie crust before popping it back into the oven. This means pricking holes in bottom of the pie crust with a fork which will allows steam to escape. And no, your filling will not seep through the holes!
Tips for Making This Easy Homemade Pie Crust
This is the BEST pie crust recipe, in my humble opinion. It’s a very easy pie crust that’s tough to mess up. However, there are a few key things to keep in mind:
- Use cold ingredients. It is important that our shortening, butter and water are very cold because keeping the fat cold until it enters the oven is what ensures a flaky crust as opposed to a crunchy one. According to Baking Illustrated, as the fat pellets melt during baking, steam is produced which creates pockets in the dough resulting in flaky layers – so we need our fat to not melt before the oven.
- Handle the dough as little as possible. After you’ve blitzed the ingredients together in a food processor, try to handle the pie dough as little as possible. This will prevent the flour from being over worked, and it will keep the butter cold — both of which will ensure a flaky pie crust.
- To make a pre-baked pie crust. Line the the dough with parchment paper; fill with pie weights or dried beans (this keeps crust from shrinking). Bake until the dough looks dry and light in color, about 25-30 minutes. Remove the parchment paper and weights and continue to bake until the pastry dries out and turns a golden brown, about 12-18 additional minutes. Cool completely on a wire rack before filling.
Can I Prep Homemade Pie Crust in Advance?
Yes, you can make the pie dough, shape it into a disc, cover it with plastic wrap, and refrigerate for up to 2 days before using. You can also assemble and pre-bake the pie crust, if your recipe says to do so.
How to Store Homemade Pie Crust
This simple pie crust should be refrigerated or frozen. It will keep up to 2 days in the fridge and 3 months in the freezer.
Can I Freeze This Simple Pie Crust?
Yes, the raw dough can be frozen in a disc or it can be frozen once it’s been rolled out and pressed into the pie plate. Either way, it will need to be covered in multiple layers of plastic wrap. You can also freeze pre-baked pie shells.
To thaw raw pie dough, place in your fridge overnight. To thaw a baked pie shell, place on your counter overnight.
LOOKING FOR MORE EASY PIE RECIPES?
- Mini Chocolate Peanut Butter Pie
- Best Ever Pecan Pie
- Nutella S’mores Pie
- Ultimate Mud Pie
- Banana Coconut Pie
- Million Dollar Cookie Pie
- Pear Pie
- Praline Pumpkin Pie
- Pecan Pie with Graham Cracker Crust
Want to try this homemade pie crust recipe?
Pin it to your Dessert, Thanksgiving or Baking Board to SAVE for later!
Find me on Pinterest for more great recipes! I am always pinning :)!
©Carlsbad Cravings by CarlsbadCravings.com


Homemade Pie Crust Recipe
Save This Recipe To Your Recipe Box
You can now create an account on our site and save your favorite recipes all in one place!
Ingredients
- 6 tablespoons cold unsalted butter
- 1 1/2 cups all-purpose flour
- 1 tablespoon sugar
- 1/2 teaspoon salt
- 1/3 cup cold vegetable shortening
- 1/4 cup ice water
Egg Wash
- 1 large egg beaten with 1 Tablespoon milk or heavy cream
Instructions
- GLASS PIE AN WARNING: I suggest a ceramic pie dish or HIGH QUALITY glass made from borosilicate glass and not soda-lime glass which seems more prone to thermal shock and shattering. Newer Pyrex is not to be trusted.
PLAN AHEAD
- Place shortening in the refrigerator until very cold. Fill a small glass with ice water and refrigerate. Chop butter in to ¼ “ pieces and refrigerate.
MAKE DOUGH
- When shortening is cold, line a counter with parchment paper. Set aside.
- Place flour, sugar and salt in food processor fitted with a steel blade. Pulse a few times to mix. (If mixing by hand, place ingredients in a large bowl.)
- Add chilled shortening and cold butter. Pulse 8-10 times, until the mixture looks like coarse crumbs and most of the butter is the size of peas with a few larger pieces. (If mixing by hand, cut butter and shortening into dry ingredients with a pastry cutter or 2 forks.)
- With the machine running, pour ¼ cup (NO MORE) chilled water down the feed tube then pulse just until the dough is moistened and sticks together. (If mixing by hand, sprinkle water over mixture and fold in using a rubber spatula.)
- Take care to handle the dough as little as possible in this step and the following. Dump dough out onto prepared parchment paper and press together until it sticks together into a ball, adding up to one additional tablespoon water if dough will not come together. (I gather the parchment paper all around the dough and push it together.)
- Press dough into an even disc, about 8” around (it does not need to be perfect). Wrap in plastic wrap and refrigerate for at least 2 hours up to 2 days (best if overnight).
ROLL DOUGH
- Line counter with parchment paper, at least 16” wide. Add dough to center of parchment and place another piece of parchment on top. Roll dough out onto parchment paper, rolling from the center to the edges to form a 12” circle.
- Remove the top piece of parchment. Place your dominant hand under the dough and hold the pie plate (or quiche pan) with your other hand on top. Quickly flip the pie plate over so that the dough is placed into the pie pan, parchment side up (see above photos). Before removing the parchment, press the dough evenly into the pie pan. Remove the parchment and smooth the dough up the sides of the pie pan. Fold any overhanging dough up onto the edges of the pan (don't trim) to make them nice and thick.
- Flute the edges, or create whatever edge design you prefer. (If making a lattice top, you will flute the edges after adding an egg wash to the bottom and sides of the dough, adding the filling, then the lattices, then fluting the edges, and then brushing the lattices with egg wash.)
- Egg wash: I find it easiest to add the egg wash after the pie dough has firmed up a bit, so I place the pie in the freezer for 20 minutes (optional). Lightly brush the bottom and sides with the egg wash. NOTE: I don't add egg wash to the fluted edges when baking the pie with filling, as they tend to get very brown due to the extended baking time. If baking without filling, then I also brush the fluted edges because the pie doesn't bake as long.
- Chill: Immediately cover the pie with foil or plastic wrap and refrigerate for 30-45 minutes up to 5 days before baking, or for ceramic pie dishes (not glass!) you can freeze for 30 minutes. This prevents the pie crust from shrinking.
TO BAKE PIE WITH FILLING
- Proceed to fill the unbaked pie shell and bake the pie according to your recipe directions. I cover the edges with a pie shield for about 30 minutes of the baking time because pie edges bake more quickly than the rest of the pie.
TO BLIND BAKE (PRE-BAKE) PIE WITHOUT FILLING
- Blind baking is traditionally used to pre-bake the pie shell when it's not baked with the filling such as strawberry pie, lemon meringue, etc.
- Preheat oven to 375 degrees F. Line the pie shell with parchment paper; fill with pie weights or dried beans (this keeps crust from shrinking). Bake until the dough looks dry and light in color, about 25-30 minutes.
- Remove the parchment paper and weights. Prick holes all around the bottom crust with a fork. Continue baking until the pastry dries out and turns golden brown, about 12-18 additional minutes. Cool completely on a wire rack before filling.
Want To Make This Recipe?

Did You Make This Recipe?
Tag @CarlsbadCravings and Use #CarlsbadCravngs
Leave a Review, I Always Love Hearing From You!
Carlsbad Cravings© Original


Marsh says
Such great tips! Thanks!
Jen says
You are so welcome Marsh, I’m happy you found them helpful!
Karen says
I do not see what temperature to bake the pie shell and how long do I bake it?
Jen says
Hi Karen! For a pie you are baking with filling, then bake according to the recipe instructions. For a prebaked pie crust, I have just added the instructions: PREBAKED pie crust: Prick the bottom of the dough all over with a fork. Line the the dough with parchment paper; fill with pie weights or dried beans. Bake until the dough looks dry and light in color, about 25-30 minutes. Remove the parchment paper and weights and continue to bake until the pastry dries out and turns a golden brown, about 12-18 additional minutes. Cool completely on a wire rack before filling.
Glenda says
Hi Jen. After chilling the pie dough, do you suggest rolling the chilled dough or letting it come to room temperature? Thanks.
Jen says
Hi Glenda, you want to roll it chilled and then chill it again.
Karen says
I made this a few weeks ago following the recipe exactly as printed. The detailed instructions are much appreciated even for this seasoned cook/baker. This is definitely the best and easiest pie crust I have ever made. I pitched all my other recipes in favor of this one and am thrilled I no longer have to keep lard in my fridge. I’m getting ready to make the recipe again but need a double crust this time. Is there any reason not to just double the ingredients? —or would it be better to make the single recipe twice? Thanks!
Jen says
Thank you so much Karen, I’m so pleased this is your to-to recipe! I like to make the single recipe twice because I find it mixes more evenly in the food processor.
B says
Yummy crust! Super easy to make. Buttery, flaky, delicious! I had almost given up on making my own crust because they’ve never turned out & in my opinion, homemade is ten times better than store bought. So glad I took the plunge and tried yours. Winner!! Excited to try making my own pies this summer.
Jen says
I’m so sorry for the late reply B! We moved around the time of your comment and I’m still playing catchup. Thank you so much for the glowing review, I’m so excited for you that you finally found a winner!
B says
I have a technical question about this crust. I have baked this crust several times, always comes out buttery flaky & delicious. However, when I do the blind bake with the pie weights, then remove the parchment paper with the weights, the crust always sticks to the parchment. Should I flour it or does this have to do with the paper?
Jen says
This is the first I’m hearing about this problem, sorry B! I would try a different paper and make sure to crinkle it up first. I hope that helps!
Cheryl L. says
I had the same problem. Is it because we apply the egg wash before putting the weights and parchment paper? Not sure if I misunderstood the directions. Did I apply the egg wash at the wrong time? Do we apply the egg wash after the first 25-30 min bake and after removing the weights?
Thank you for all of the great tips! The crust didn’t shrink! Yay!
Jen says
Hi Cheryl! I’m sorry to hear that you had a problem with the parchment paper sticking. You do the light egg wash and then chill or you can even freeze the dough for at least 30 minutes before baking. I hope that helps!
Christina K. says
Hi! Looking to make this for a no fuss Thanksgiving meal with my husband. Curious if I just double the recipe then split in half for pie crust top? and slit it for venting? New to pies so fingers crossed. Thanks so much!
Jen says
Yes, that would definitely work!