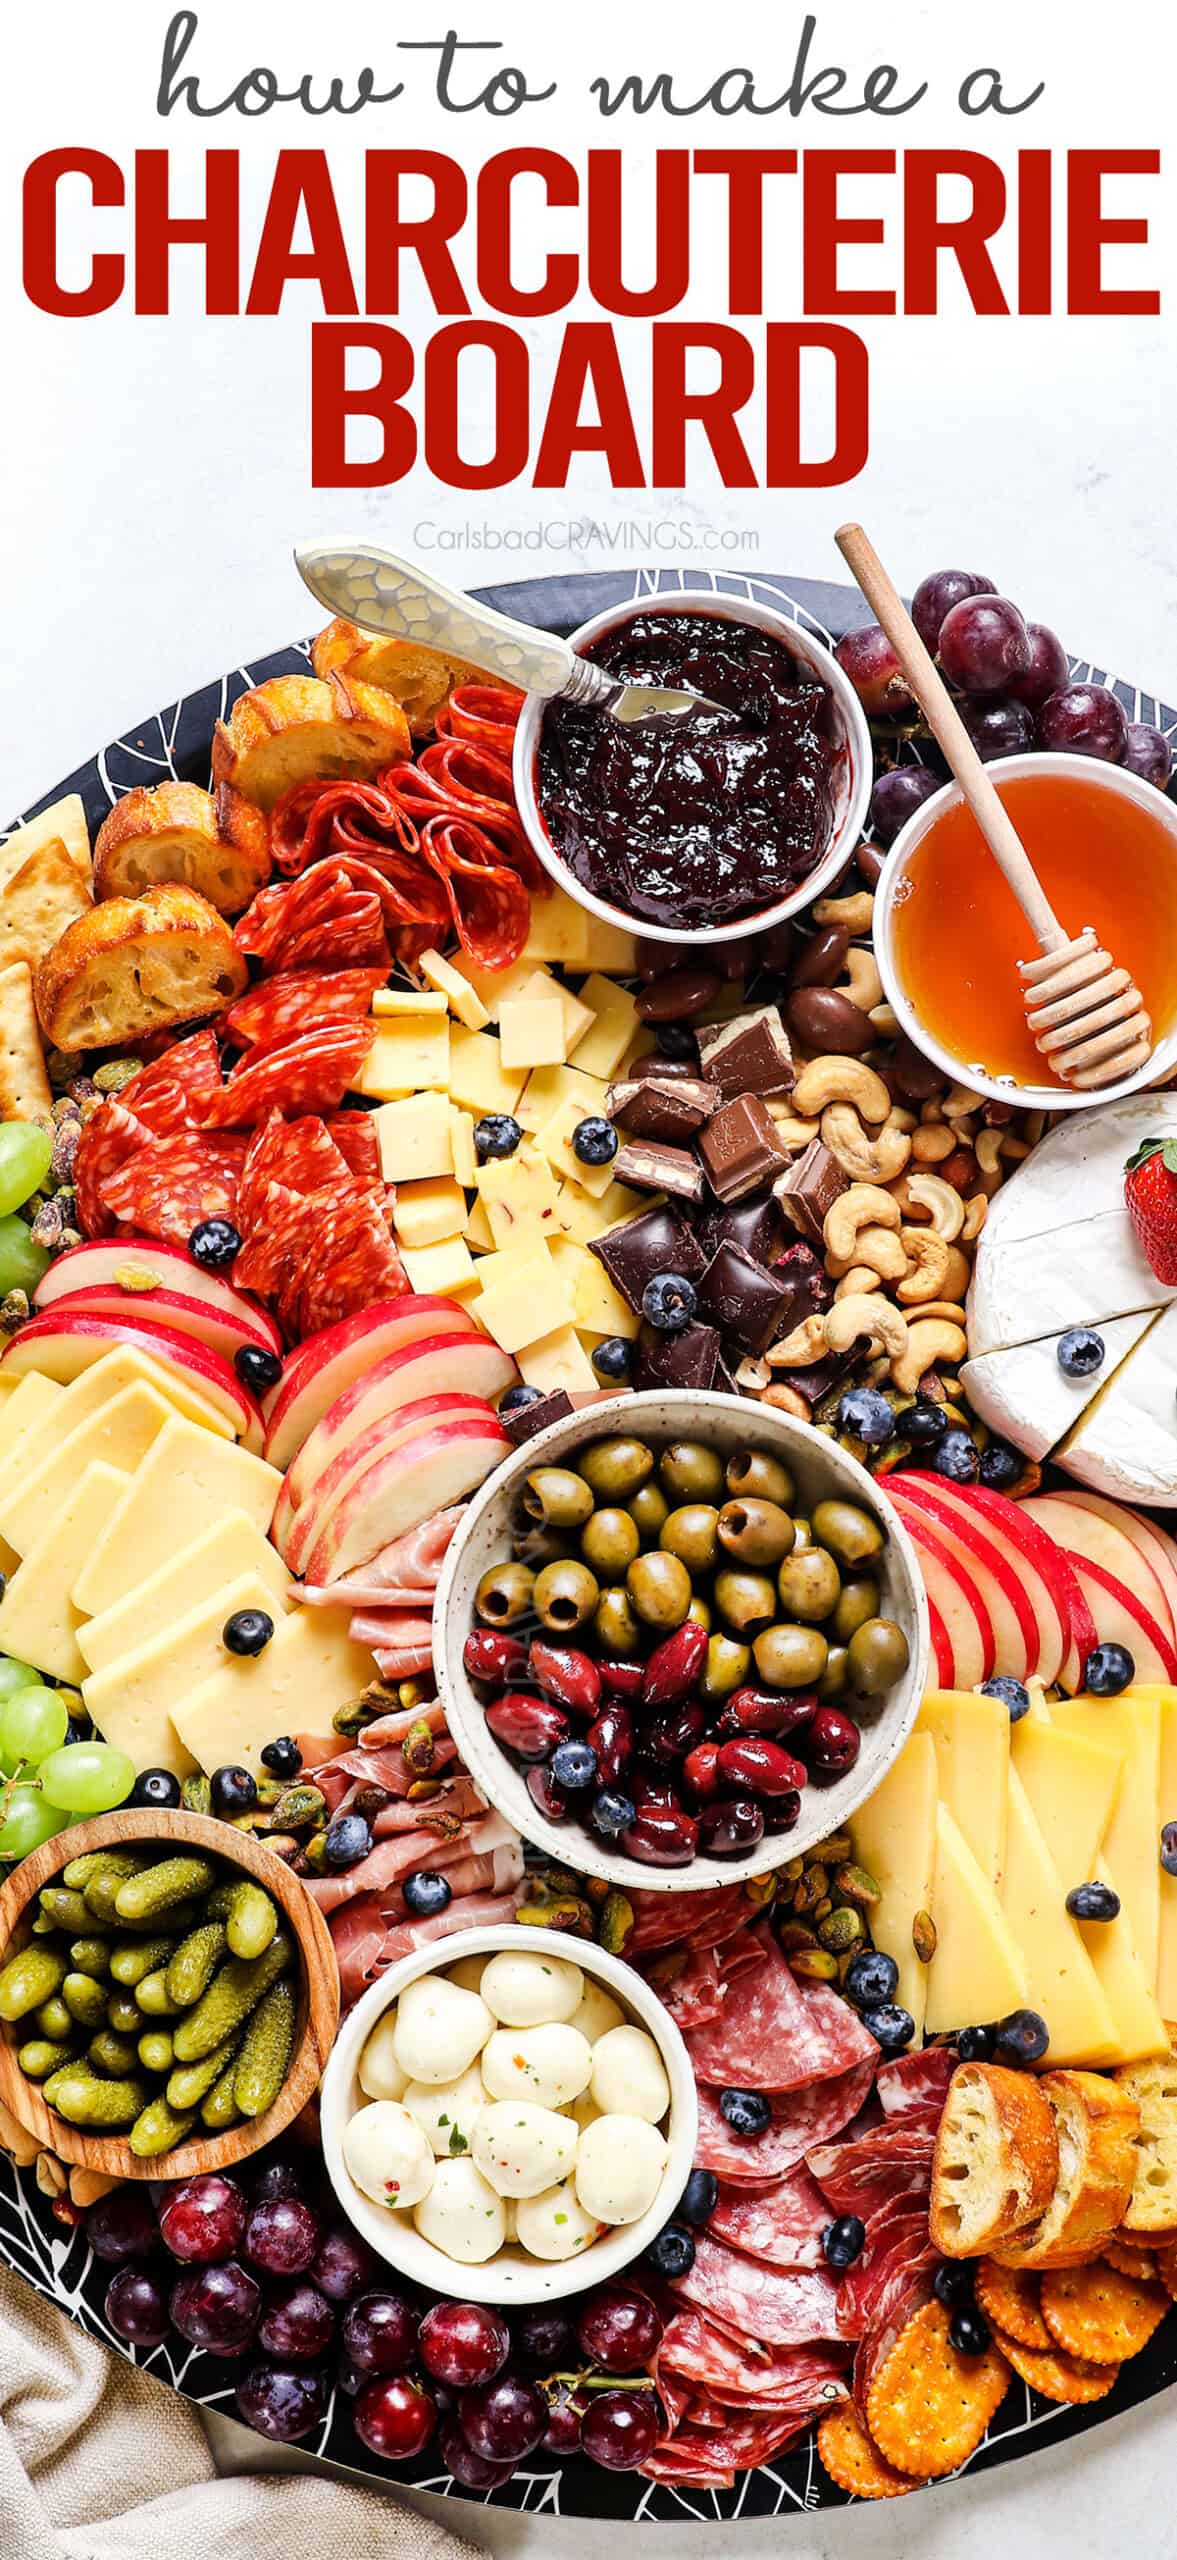
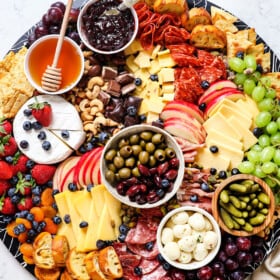
Learn how to make a charcuterie board in minutes that’s a feast of color, texture and flavor to wow your guests – no baking required!
If you’ve been intimidated by gorgeous images of meat and cheese boards – fear no more! Today, I’m going to show you the simple formula for how to make a charcuterie board in minutes that eliminates all of the guess work! It pairs your favorite lusciously rich cheeses, peppery cured meats, sweet fruits, roasted nuts, and briny favorites like olives and cornichons into an epic sweet and salty symphony that has something for everyone. Best of all, cheese and meat boards can be as simple or as elaborate as you like – they’re the endlessly customizable appetizer that’s always a hit!
We love easy yet impressive appetizers around here. If you’re looking for more no-bake favorites, don’t miss Garlic Herb Cheese Log, Key Lime Cream Cheese Fruit Dip, Guacamole and Italian Chex Mix.
How to Make a Charcuterie Board Video

What Is a Charcuterie Board?
A charcuterie board (pronounced shar-KOO-tuh-ree) is a fancy sounding name for an easy assortment of cured meats and cheeses typically served on a wood platter or stone slab. Fruits, nuts, spreads, bread and crackers often accompany the meats and cheeses. Charcuterie boards are most commonly served as an appetizer or as a finger food at parties and gatherings. This post will outline tips to make your next meat and cheese board a runaway success at your next event!

Charcuterie Boards are Easy!
Due to the gorgeous presentation of Pinterest worthy charcuterie boards overflowing with nibbles, you may have the false impression that cheese and meat boards are difficult to make at home. Think again!
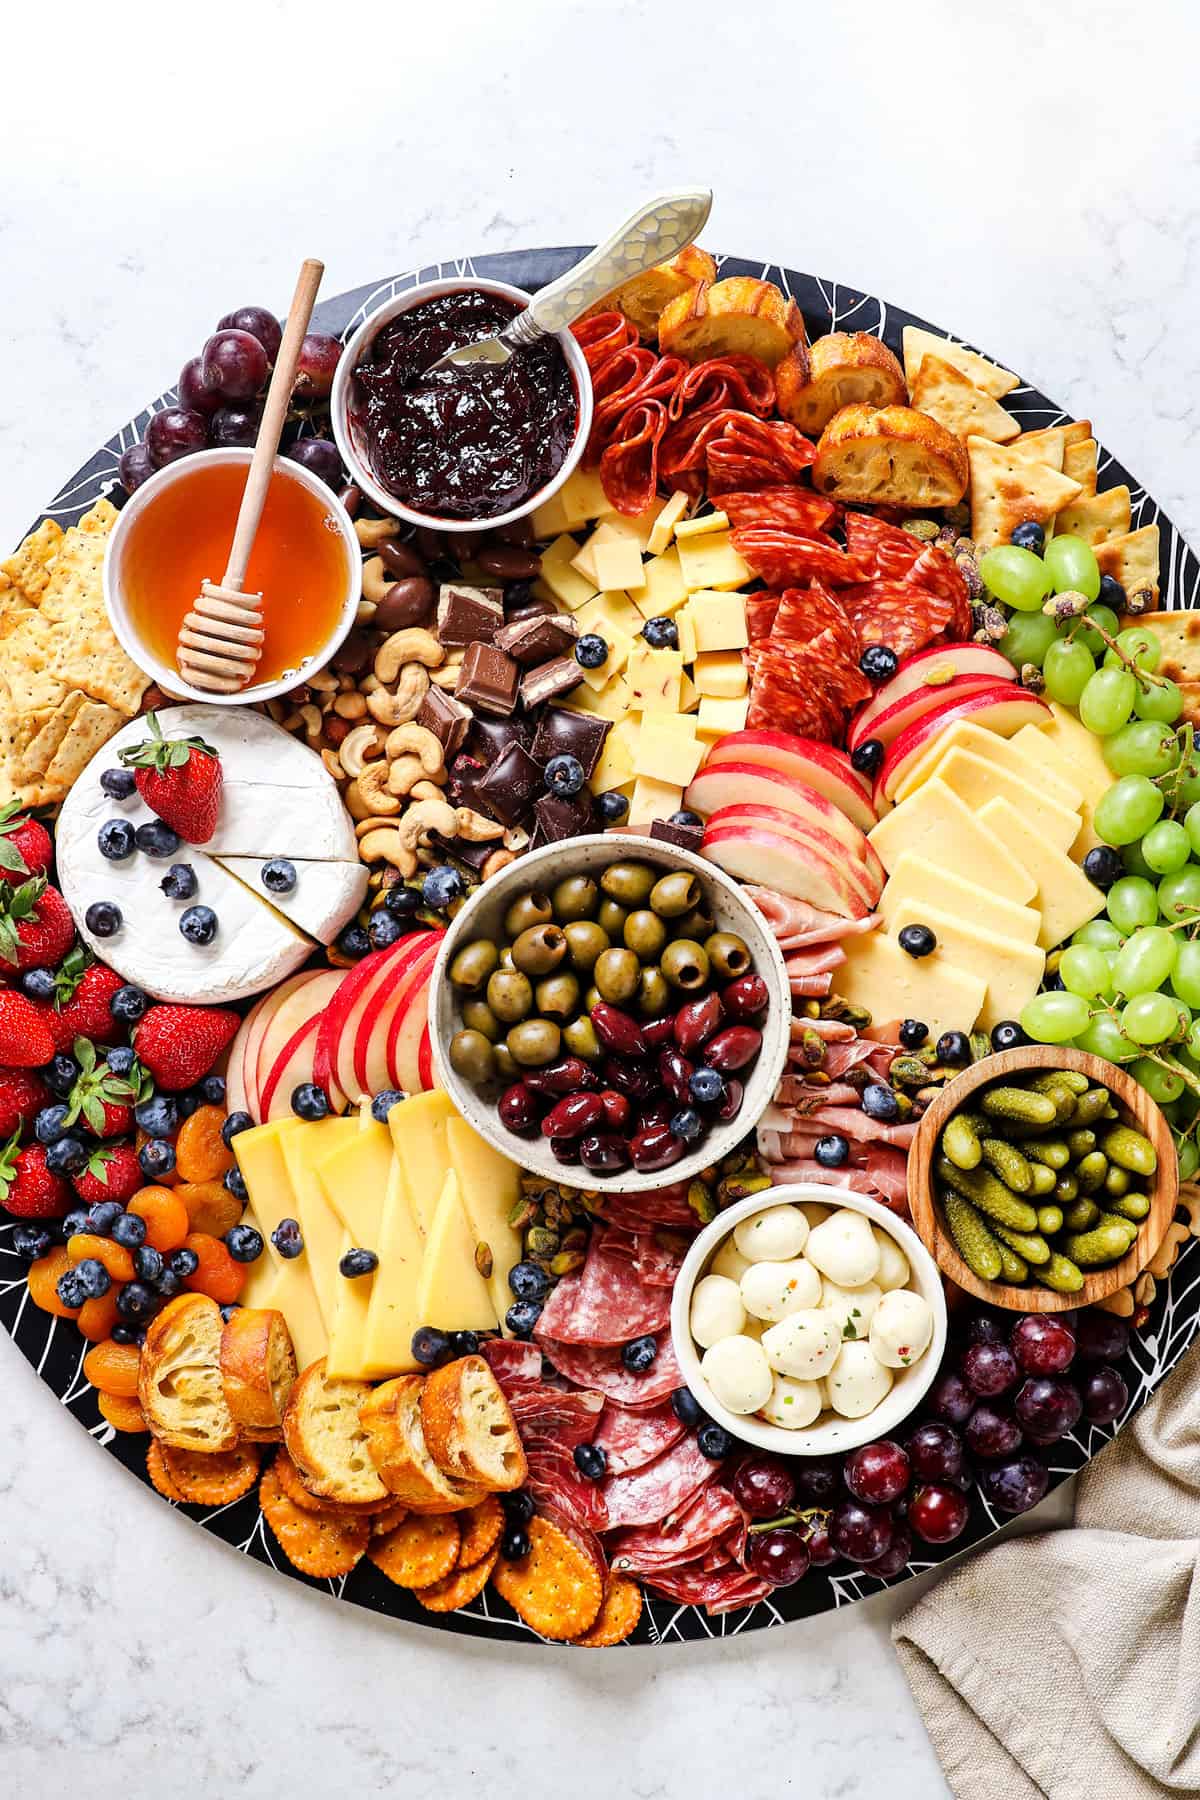
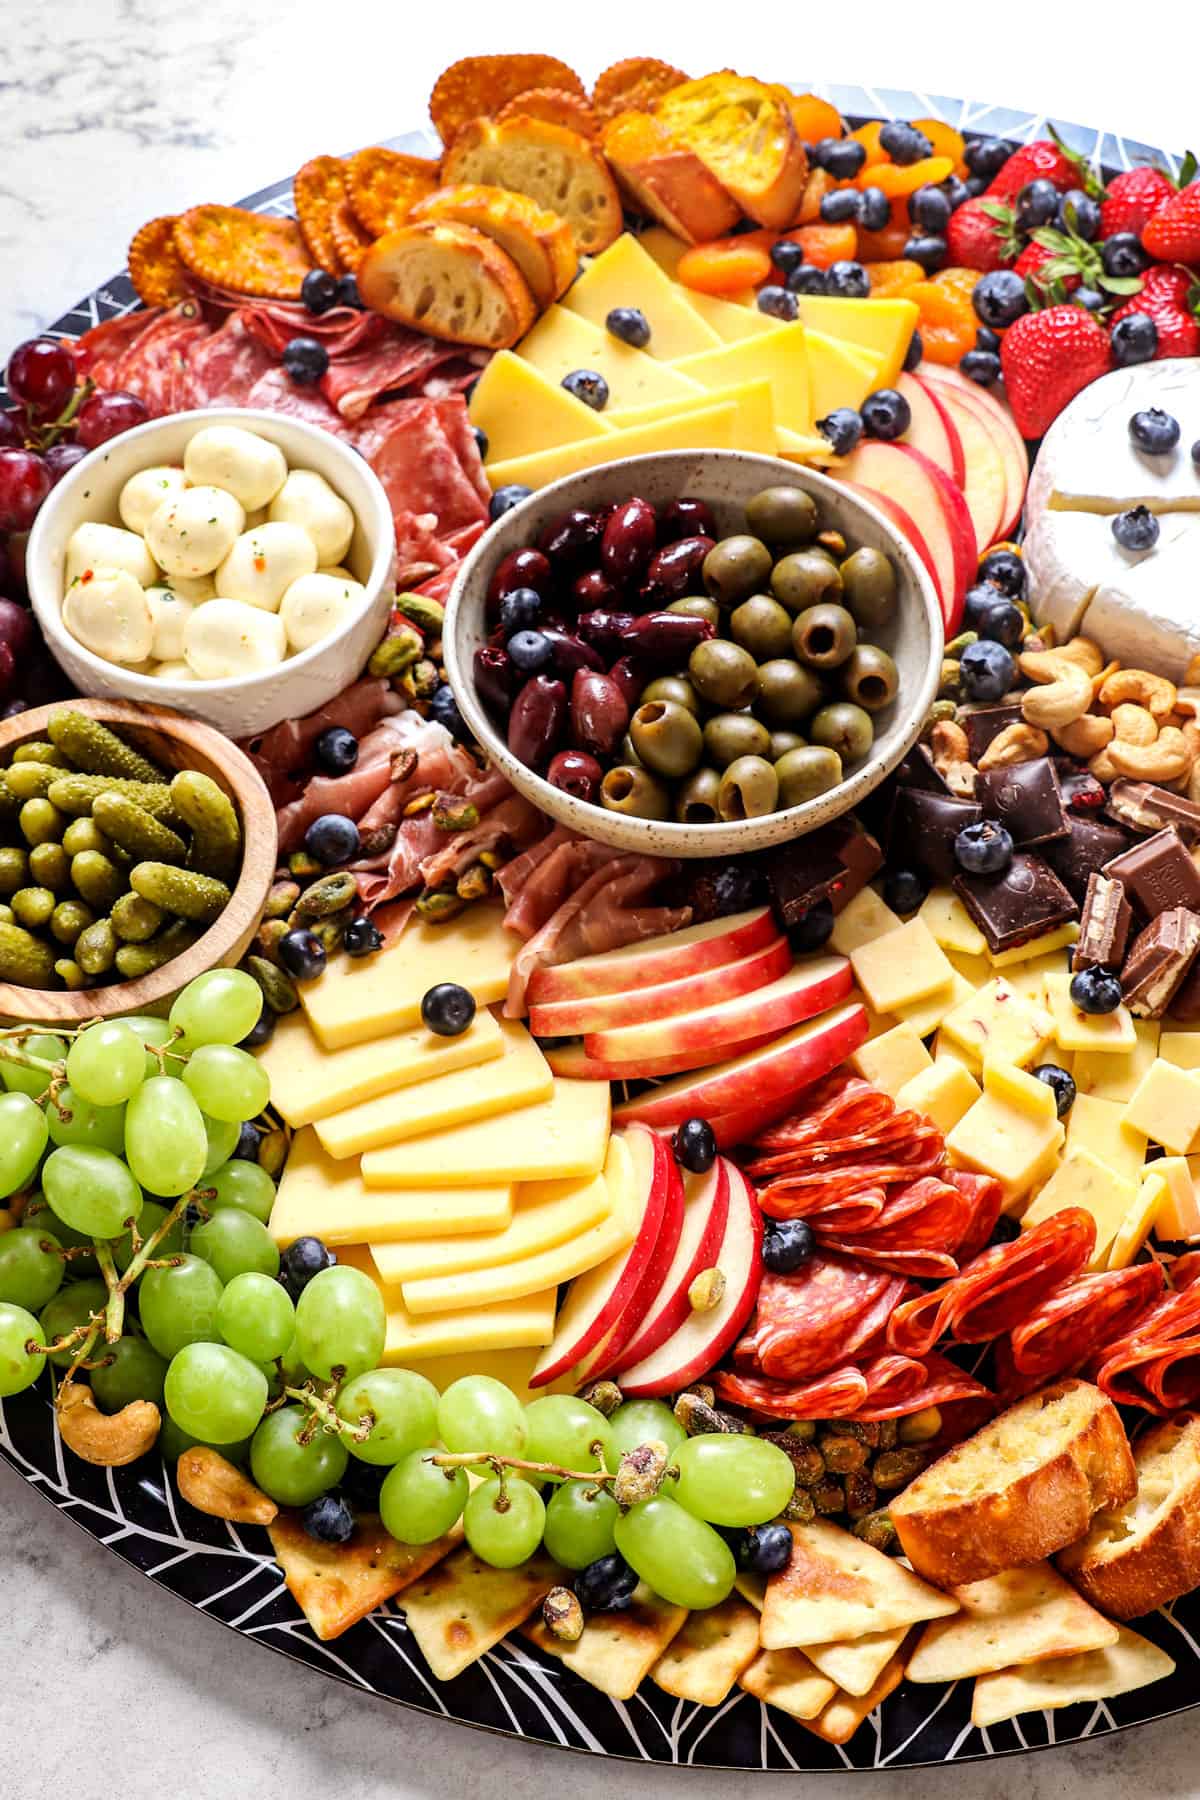
A charcuterie board is one of the easiest appetizers to make because you don’t have to make anything from scratch! You’re simply placing any number of desired ingredients on a board for a feast of color, texture and flavor. You can go all out with a huge spread or simple with just a few favorites.
WHERE TO SERVE CHARCUTERIE BOARDS
The flexibility, scalability, and quick and easy assembly of meat and cheese boards makes them a favorite potluck item for events such as:
Holiday parties or gatherings
Baby showers
Bridal showers
Birthdays
Girl’s night
Movie night
Game night
Book club
Picnics
Play dates
What Goes on a Charcuterie Board?
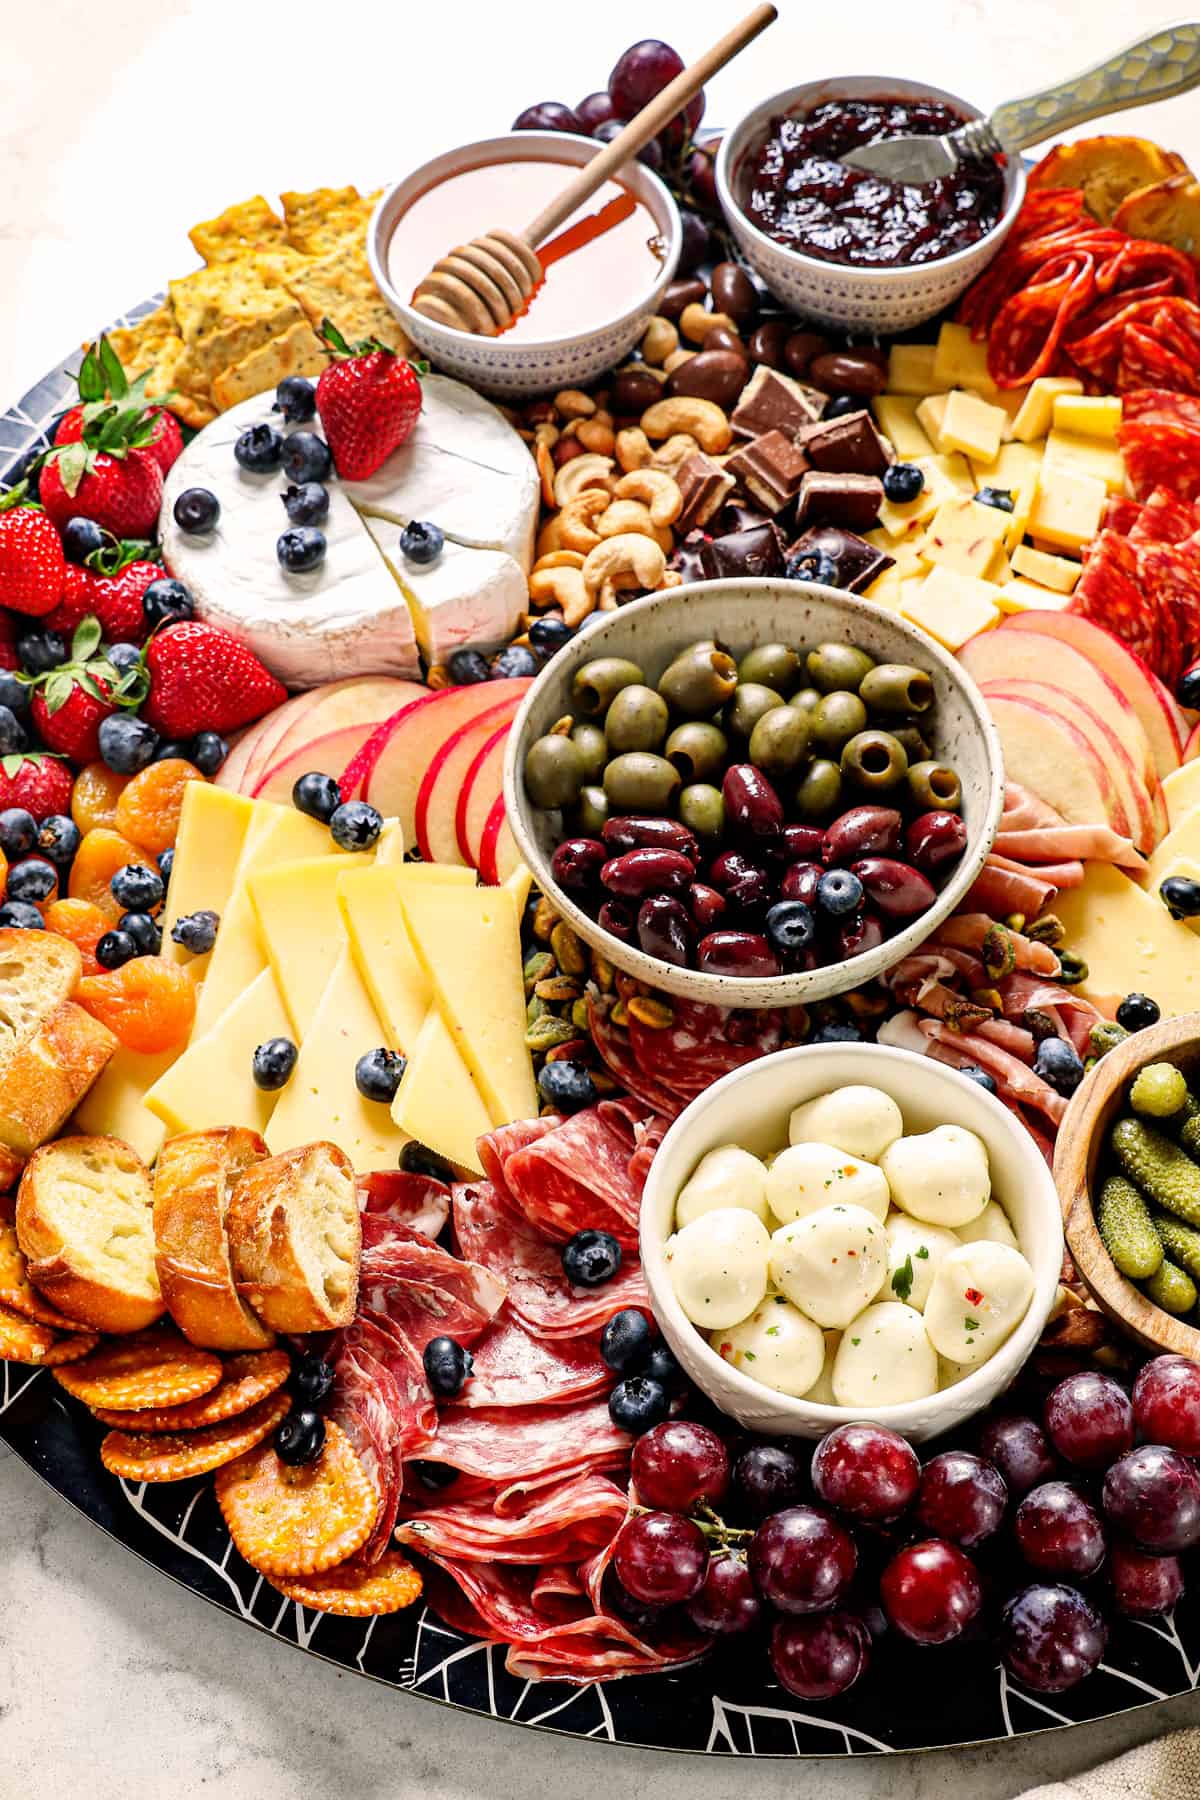
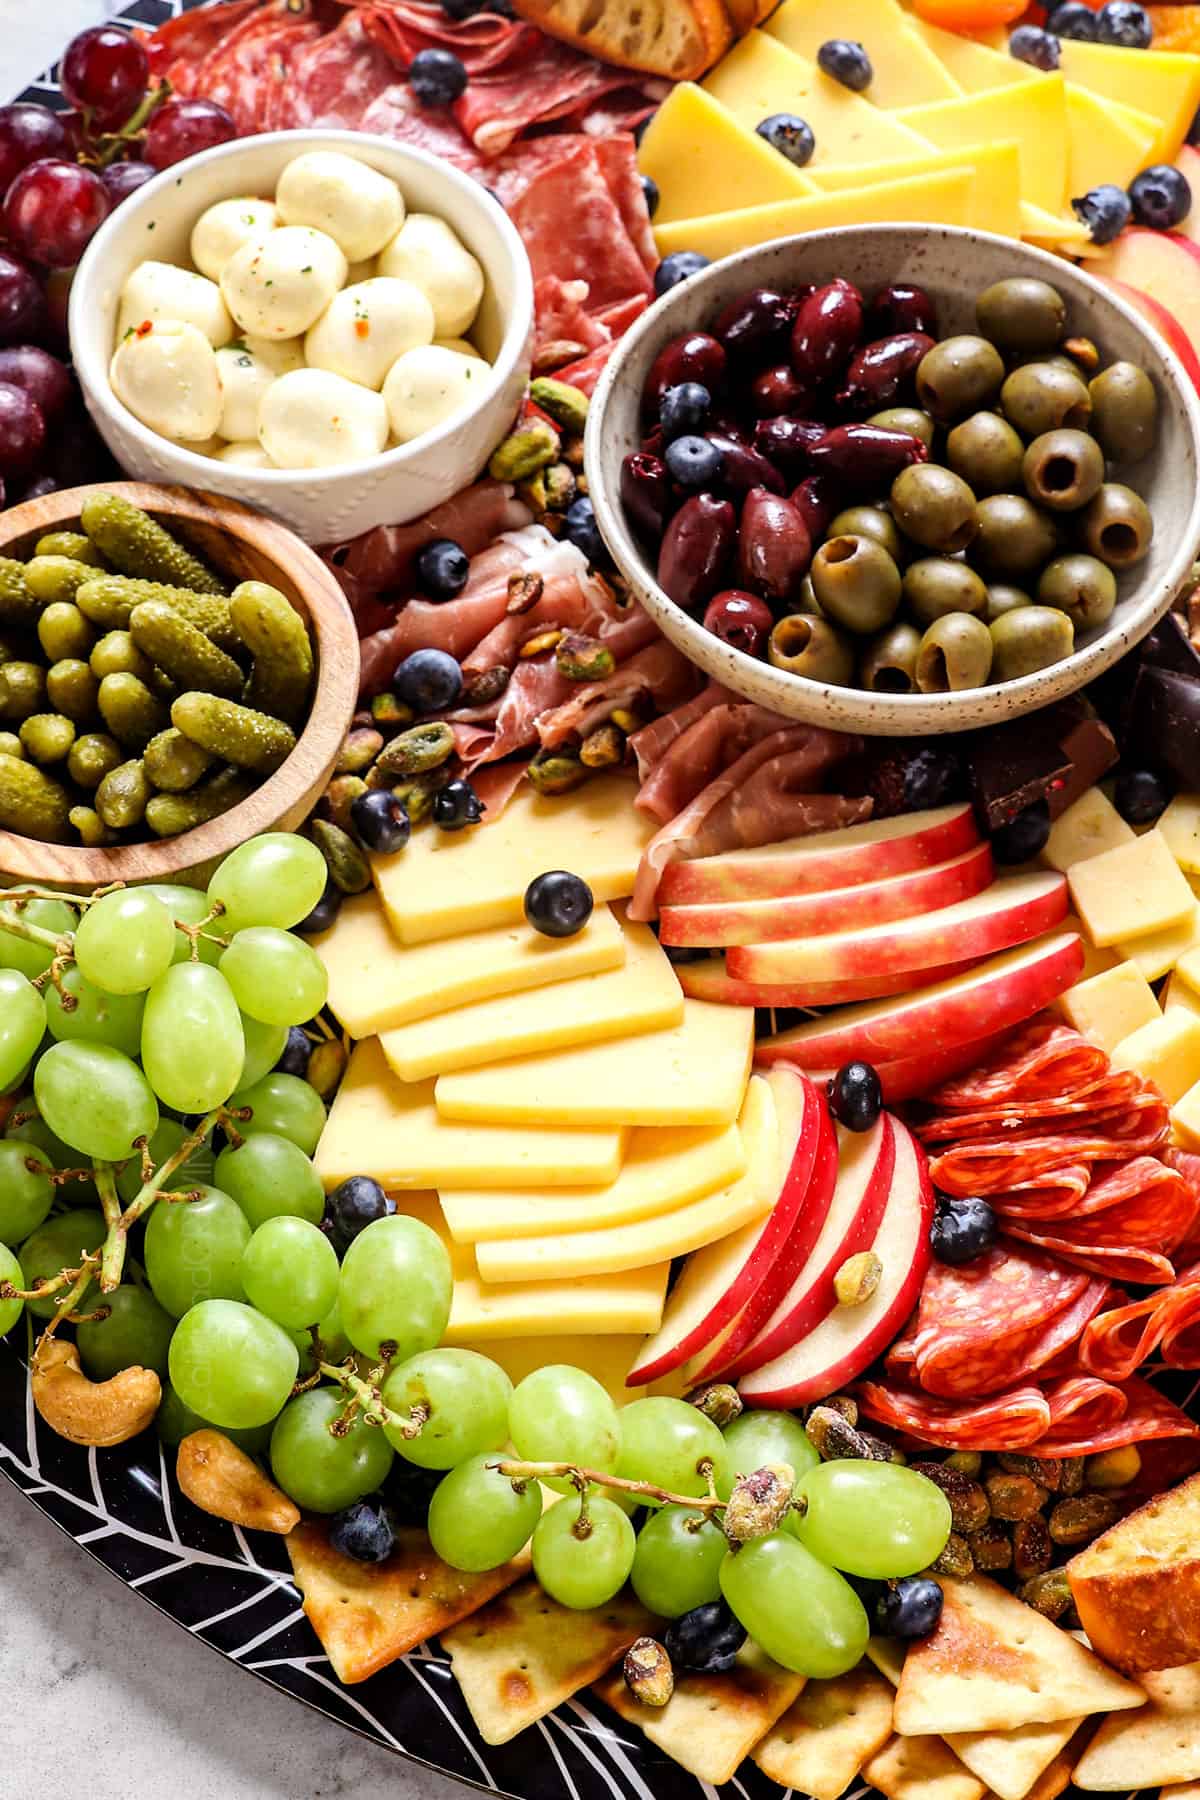
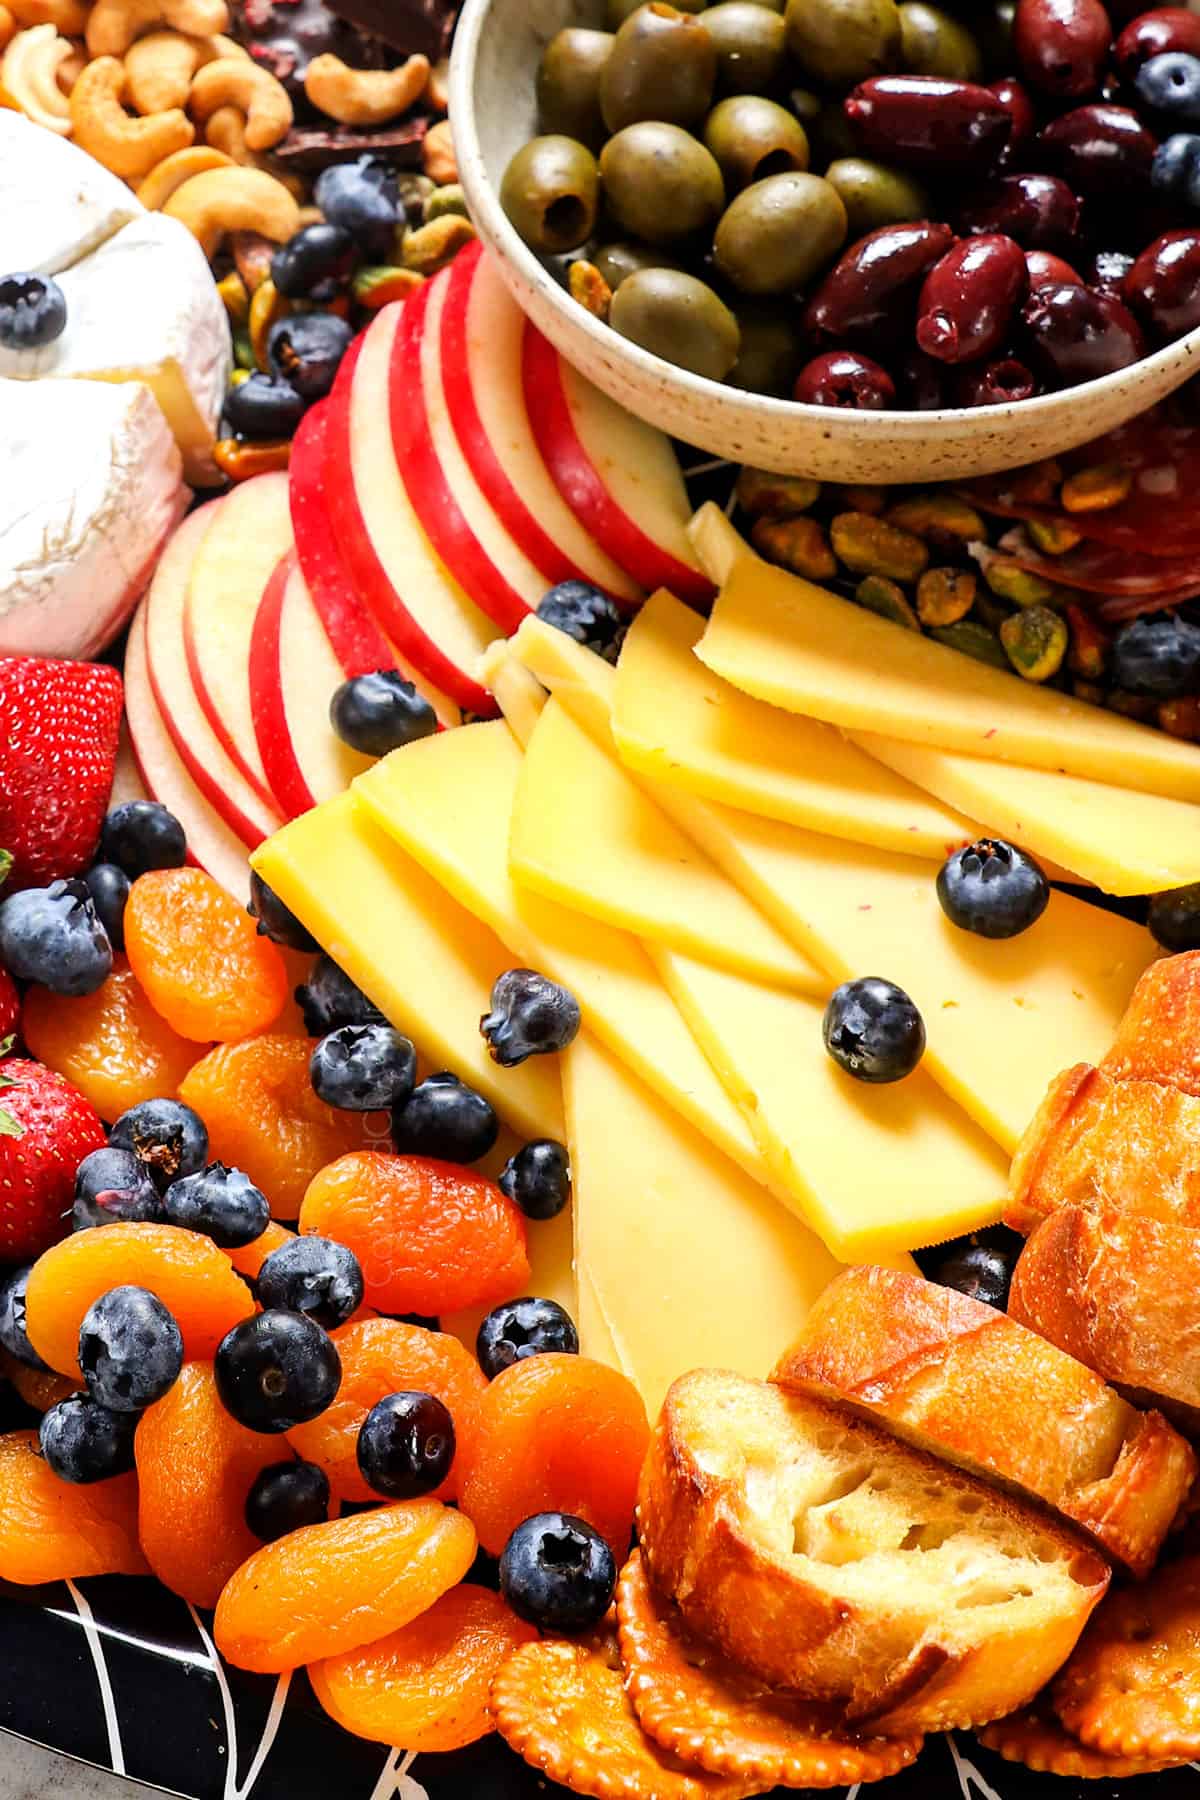
The beauty of DIY charcuterie boards is they are 100% customizable. The base of any charcuterie board is a variety of cured meats and cheeses. From there, you can mix and match the following to your heart’s content:
The key to success, however, is to include a variety of tastes and textures. Add items that are sweet, salty, savory, briny, crunchy, crispy, juicy, and creamy. See the full list of items and quantities in the printable recipe card at the bottom of the post.
Charcuterie Boards vs. Cheese Boards
Many people use the terms “charcuterie board” and “cheese board” interchangeably but they’re distinctly different:
A charcuterie board is all about the meats! Cured or preserved meats are the centerpiece, and complementary foods such as cheeses, nuts, and crackers are arranged around the meats to enjoy together. In fact, the name references the cured meats, derived from the French chair, “flesh,” and cuit, “cooked.”
A cheese board is all about the cheeses! Some people arrange a few cured meats alongside the cheeses, while others prefer to keep cheese boards vegetarian and stick to fruits, nuts, crackers, etc.
The best meats for a Charcuterie Board
To select your meats, head towards the deli department. You’ll find the meats either at the deli counter or pre-packaged with the specialty deli meats and cheeses. Purchase different types of meats for contrasting flavors and textures so every bite is interesting! You can often find variety packs that are less expensive than buying a few meats.
My favorite meats as pictured:
Other tasty meats:
The Best Cheese for a Charcuterie Board
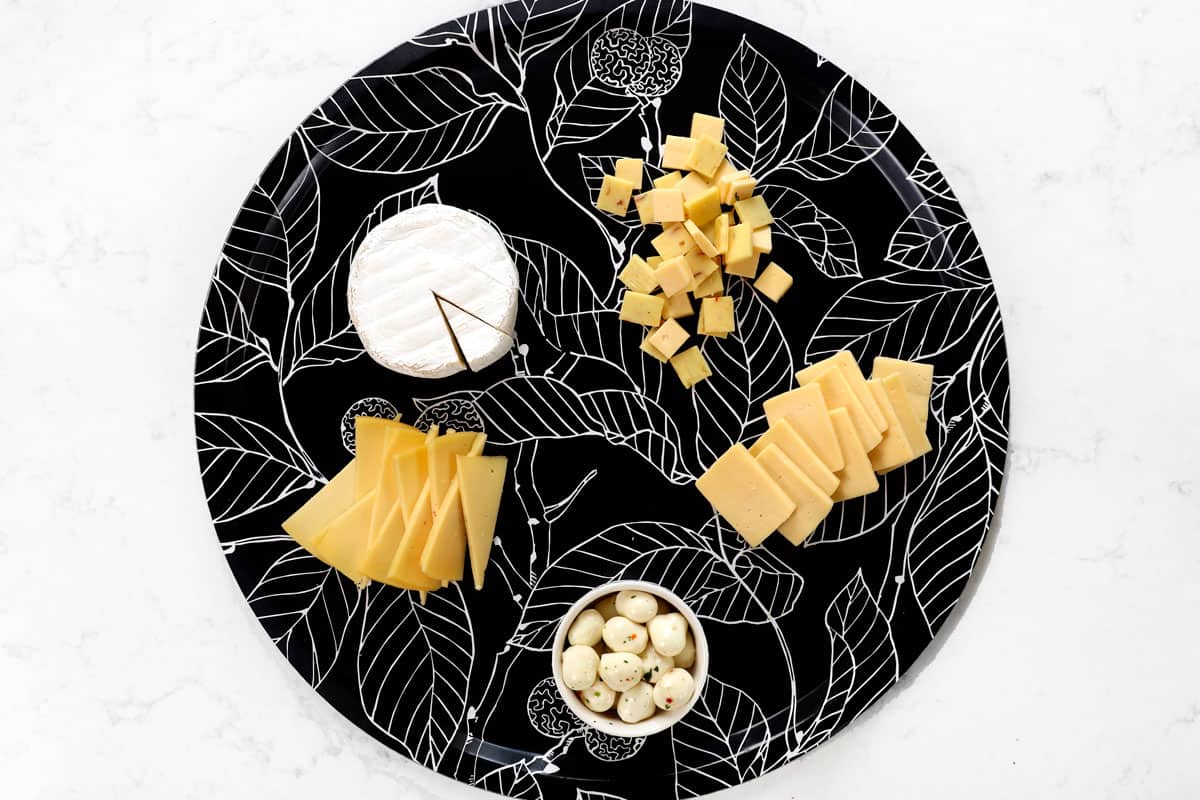
I recommend at least two types of cheese for your charcuterie board, preferably one soft or spreadable cheese and one semi-soft or hard cheese. If you are making a larger board, it’s ideal to have one of each: one spreadable cheese, one soft cheese, and a couple semi-soft and hard cheeses (all outlined below). Again, you want to keep the complementary textures and flavors of every item in mind when building the board.
Spreadable cheeses
These are ideal for spreading on toasts and crackers:
Soft cheeses:
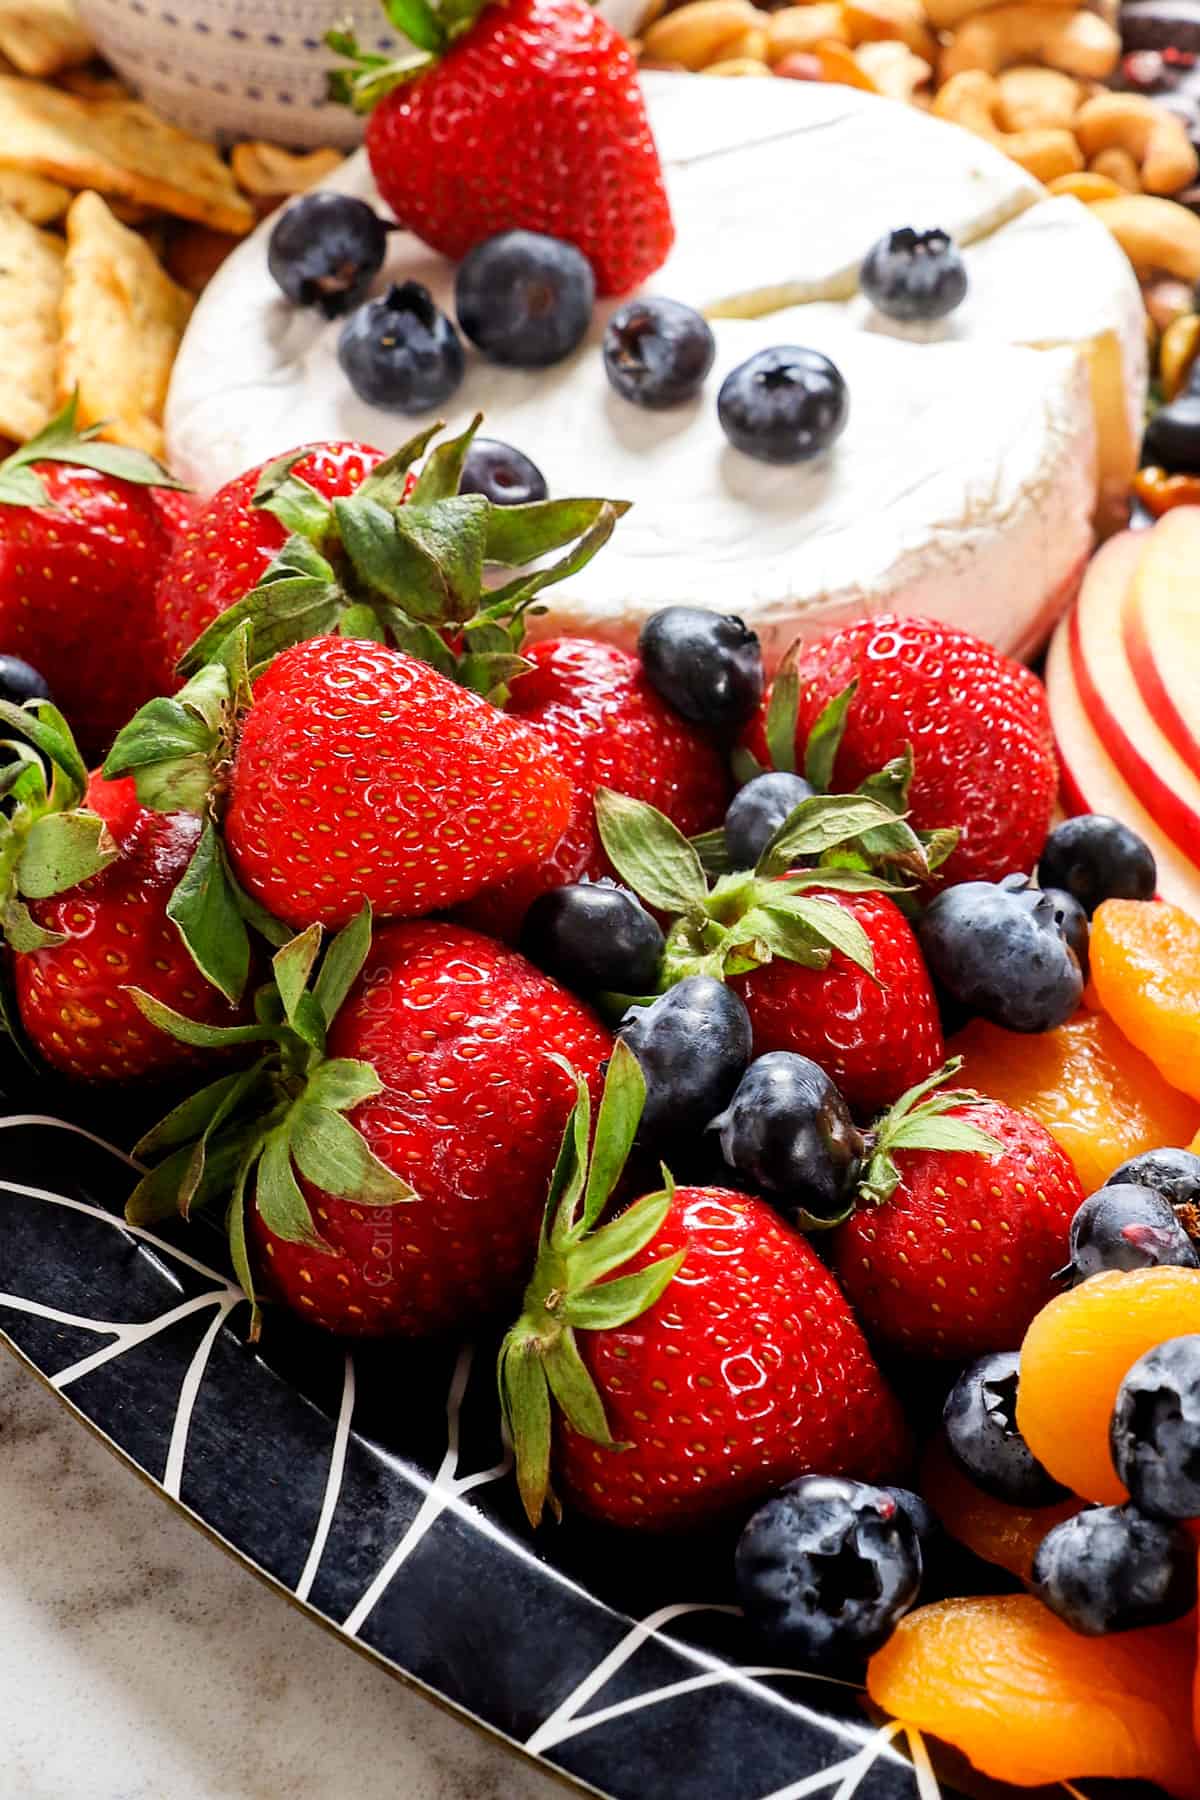
These are also fabulous for spreading on toasts and crackers, and pair well with a drizzling of honey, nuts and fruit. My favorite bite is crostini smeared with brie, topped with a strawberry slice and a drizzle of honey. Marinated mozzarella balls also pair famously with brined olives. Here are a few soft cheese options:
Semi soft and hard cheeses:
There are so many fabulous options! It really depends on your favorite cheese and what your pairing it with on the charcuterie board. My personal favorite cheeses are Gouda and Havarti, so I will always add those, but others may prefer Manchego and white cheddar. Here are my top recommendations:
top recommendations
Other Tasty Options
The Best Fruit for a Charcuterie Board
Fruits’ natural sweetness pairs beautifully with the salty, savory meats and cheeses on a charcuterie board. Grapes, apples, strawberries and blueberries are meat and cheese board favorites, but I also love cantaloupe or honey dew melon balls paired with prosciutto and Burrata. Make sure to wash and dry the fruit ahead of time and slice or pre-cut any larger pieces, such as apples or melons.
Fresh fruit:
Dried fruit:
The Best Dips and Spreads for a Charcuterie Board
Typically honey, fruit preserves and mustard are served on a cheese and meat board in individual containers. Depending on the theme and ingredients of your board, you may also wish to include other dips/spreads like bacon jam, pesto, hummus, etc. Make your own spreads or save time with store-bought. I’ve linked my favorite dips and spreads below:
The Best Nuts for a Charcuterie Board
Nuts add a savory, salty crunch to the charcuterie board. I always like to add at least two for flavor contrast. Purchase roasted, salted nuts so they are stand-alone scrumptious! Check the nut section of your grocery store for not only traditional nuts such as walnuts, pistachios, cashews, cocktail peanuts, and mixed nuts, but for flavored nuts as well.
The Best Bread and Crackers for a Charcuterie Board
Bread and crackers are the vehicle to inhale all of those tasty meats and cheeses! I like to toast French baguette slices and serve with at least two different cracker options for a variety of texture, flavor and shape. Go for gluten-free options if necessary.
The Best Add-Ons for a Charcuterie Board
Charcuterie boards are the ideal home for a briny treat to cut through the rich meats and cheeses. Our favorites include Kalamata olives, picked veggies, and adorable cornichon (mini pickles). Serve the nibbles in individual bowls with toothpicks nearby.

How to Make a Simple Charcuterie Board


Can You Make a Charcuterie Board in Advance?
Meats and cheeses dry out quickly, so I recommend assembling your simple charcuterie board no more than 3 hours in advance without the bread and crackers. Once assembled, wrap the board tightly in plastic wrap and refrigerate until ready to enjoy. Alternatively, you can prepare items ahead of time:
-Cheeses: slice, wrap in plastic wrap and refrigerate days in advance.
-Meats: fold/shape, wrap in plastic wrap and refrigerate days in advance.
-Fruit: wash, pat dry and refrigerate. Apples and pears can be sliced a few hours in advance and either submerged in apple juice or a water/lemon juice bath. Rinse and pat dry before serving.
-Spreads and condiments: transfer to serving dishes, cover and refrigerate up to days ahead of time.

How Long Can a Charcuterie Board Sit Out?
It depends on the temperature and whether the board is sitting indoors or outside. In general, cured meats and cheeses are safe to leave out for up to 2 hours. However, use your best judgment, especially if you’re serving your board outside on a sunny day.

How to Store a Charcuterie Board
Divide the charcuterie board into its individual components and store them all separately. Cured meats can be stored in an airtight container in the fridge, cheeses can be wrapped in plastic wrap and refrigerated, and crackers and nuts can be sealed in zip-top bags, etc.

WANT TO TRY THIS charcuterie board RECIPE?
PIN IT to your appetizer recipe BOARD TO SAVE FOR LATER!
FIND ME ON PINTEREST FOR MORE GREAT RECIPES! I AM ALWAYS PINNING :)!
©Carlsbad Cravings by CarlsbadCravings.com
Charcuterie Board
Save This Recipe To Your Recipe Box
You can now create an account on our site and save your favorite recipes all in one place!
Ingredients
Cheeses (scale up or down as desired)
- 16 ounces hard/semi-soft cheeses pick 2-3 (Manchego, Gouda, Havarti, Gruyere, Cheddar, White Cheddar, etc.)
- 8 ounces soft cheese (Brie, Camembert, or Goat Cheese)
- 12 ounces fresh marinated mozzarella balls
- Optional for larger board: 8 oz. spreadable cheese (Herb Cheese Spread, Triple Cream Cheese like Bourgogne sold at Costco, Cheese Balls)
Meats (scale up or down as desired)
- 8 ounces salami (Genoa salami, Soppressata, etc.)
- 2 ounces prosciutto
- 2 ounces dried coppa
Pickled Items: (optional/pick your favs)
- 1/3 cup pitted Kalamata olives
- 1/3 cup pitted green olives
- 1 cup cornichons or baby dill pickles
Spreads and Condiments (eyeball the amounts)
- 1/3 cup honey
- 1/3 cup fruit jam
- 1/4 cup Dijon mustard
- Dips/spreads as desired (Caramelized Onion, Bacon Jam, Pepper Jelly, etc.)
Fruit (swap in your favorites/in season fruit as desired)
- 2 cups grapes
- 2 cups strawberries
- 1 cup dried fruit like apricots
- 1/2 cup blueberries
- 1 apple or pear, sliced
- Other ideas: melon balls, pineapple chunks, tangerine slices, kiwi slices
Nuts and Nibbles
- 1 cup salted nuts (Pistachios, Cashews, Walnuts, Pecans, Peanuts and/or Mixed Nuts, etc.)
- 4 oz. chocolate bar(s), broken into pieces (I like Chocolate Raspberry)
Crackers and Toasts:
- 8 ounces crackers (choose 2-3 varieties)
- 1 baguette, sliced (brush with olive oil and baked at 400˚F for 6-8 minutes)
Instructions
- Note: The ingredients and measurements are just guidelines – make this board your own! Scale up or down as needed; add/or swap out ingredients. There is no right or wrong as long as you have a variety of textures and savory, salty, sweet flavors.
- Select the board: If you don't have a very large board/platter, use whatever you do have! Use platters, cookie sheets, cutting boards, etc., and pair as many as you need to together. If your board(s) isn't large enough to fit all of the items, add what ingredients you can, then restock as needed.
- Cheeses: Space out the cheeses on the board. Slice hard and semi-hard cheeses into squares, triangles, cubes, etc. and fan them out. Cut a few wedges into the brie. Place mozzarella balls in a bowl.
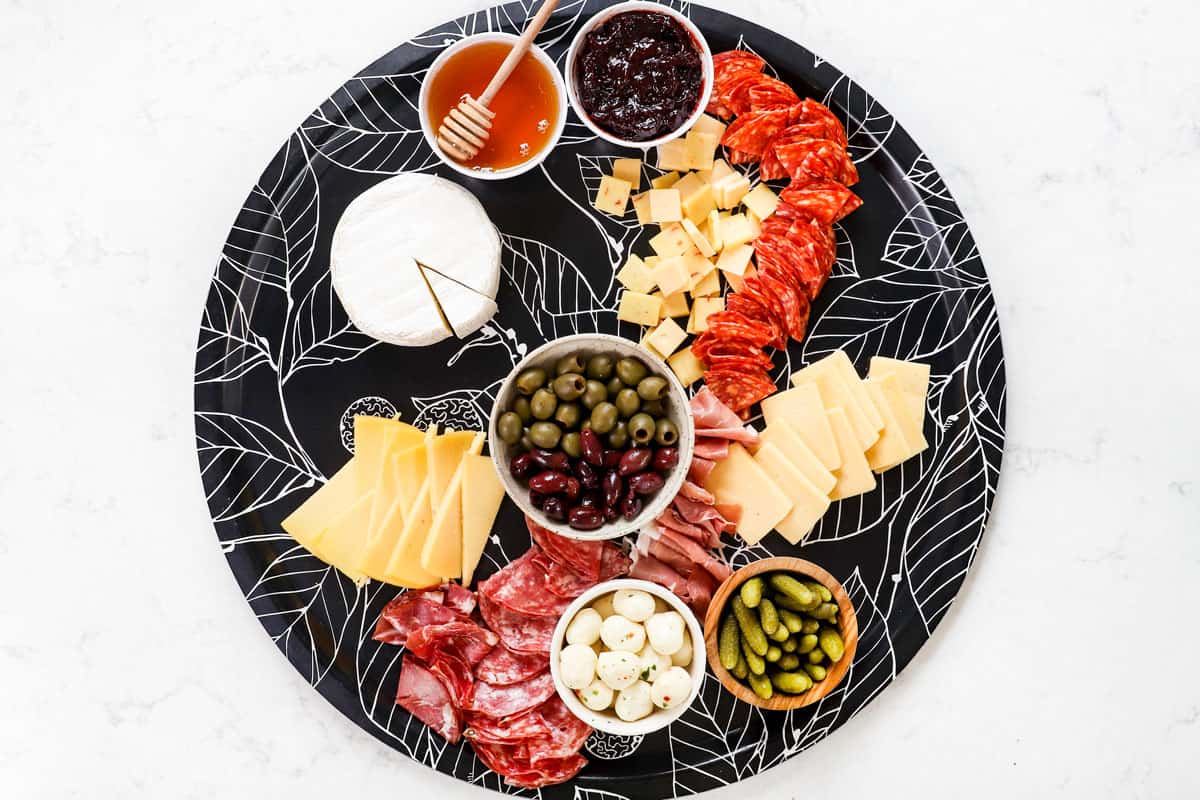
- Meats: Place the meats next the cheeses they pair well with, leaving space around the brie for nuts, berries, and honey. Fold the meats in a variety of patterns (I fold in half, then in half again) or fan them out.
- Pickled Items and Spreads: Add your pickled items, jellies, honey, spreads, dips, etc. to bowls and ramekins. Add them to the board next to items they pair well with (i.e. honey and jam next to brie, olives next to mozzarella).
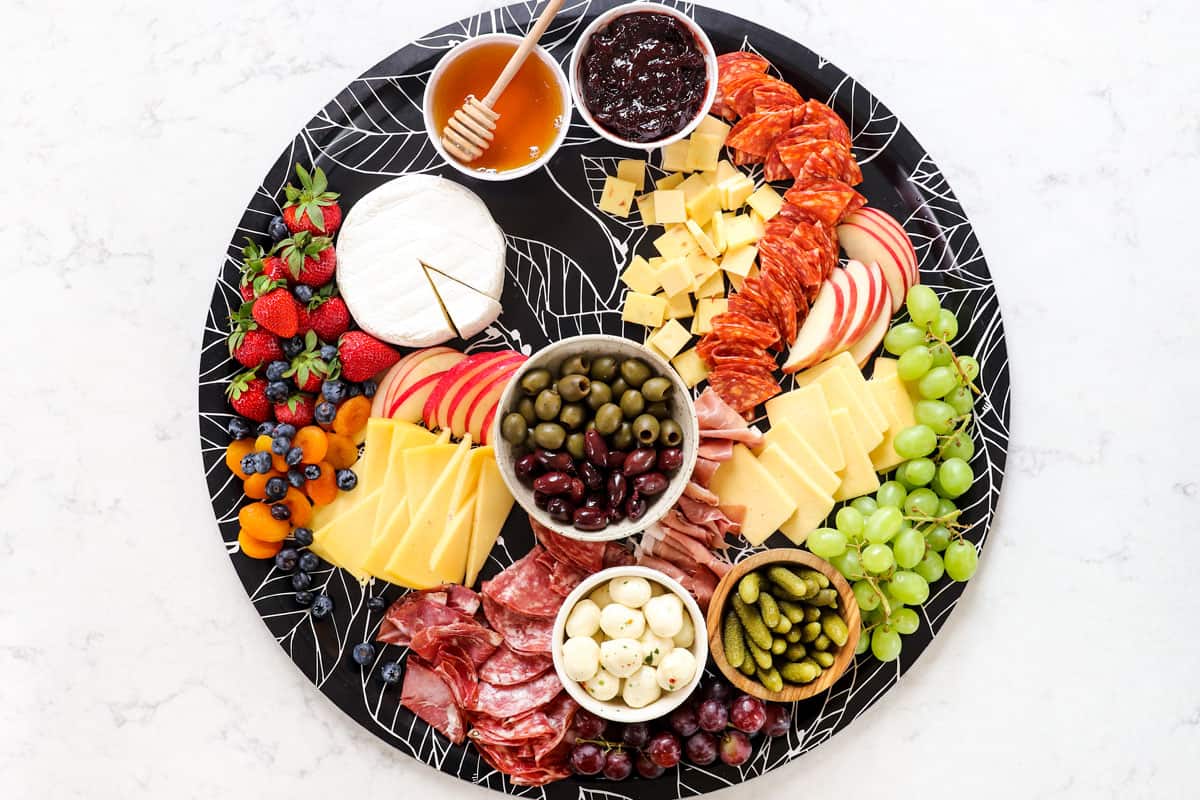
- Fruit: Note, I don't measure any of the fruit, just fill in the spaces as needed. Slice or cube the fruit and cut the grapes into portions so they are easy to grab. Place the fruit next to the fruit they pair well with (i.e. berries around soft cheeses/brie, apples next to Gouda/cheddar).
- Nuts and Nibbles: Add pistachios, pecans and/or walnuts around the brie or soft cheeses. Other nuts like peanuts and cashews can be placed in any spaces. Add any extras like chocolate squares.
- Add crostini and crackers: Arrange the crackers and crostini in any empty spaces. The platter is usually bursting at this point, but you can usually squeeze the crackers in around the borders of the platter. You can also serve extra crackers/bread in a separate serving dish.
- Add serving utensils: Add spoons, knives, mini forks, toothpicks, etc. to the spreads, honey, dips, olives, pickles, etc. You may also wish to label the meats and cheeses.
Video
Notes
Prep Ahead
Meats and cheeses dry out quickly, so I recommend assembling the board no more than 3 hours in advance without the bread and crackers. Once assembled, wrap the board tightly in plastic wrap and refrigerate until ready to enjoy. Brie, however, is best removed from the fridge one hour before serving. Alternatively, you can prepare items ahead of time:- Cheeses: slice, wrap in plastic wrap and refrigerate days in advance.
- Meats: fold/shape, wrap in plastic wrap and refrigerate days in advance.
- Fruit: wash, pat dry and refrigerate. Apples and pears can be sliced a few hours in advance and either submerged in apple juice or a water/lemon juice bath. Rinse and pat dry before serving.
- Spreads and condiments: transfer to serving dishes, cover and refrigerate up to days ahead of time.
Want To Make This Recipe?

Did You Make This Recipe?
Tag @CarlsbadCravings and Use #CarlsbadCravngs
Leave a Review, I Always Love Hearing From You!


Cindy says
Look at this charcuterie board! Mine came out perfect because I just copied what you did. It is loaded. Everyone loved it, so fun to make too!
Jen says
Awesome Cindy! I’m so pleased the board was easy to follow and a hit!
Illene says
I loved the variety of cheeses, meat, nuts, fruit, and even chocolate! So much goodness on one board! I added hot honey on the side. Definitely a 10/10
Jen says
Thanks Ilene for your 10/10 review! I’m so pleased you loved this charcuterie board!