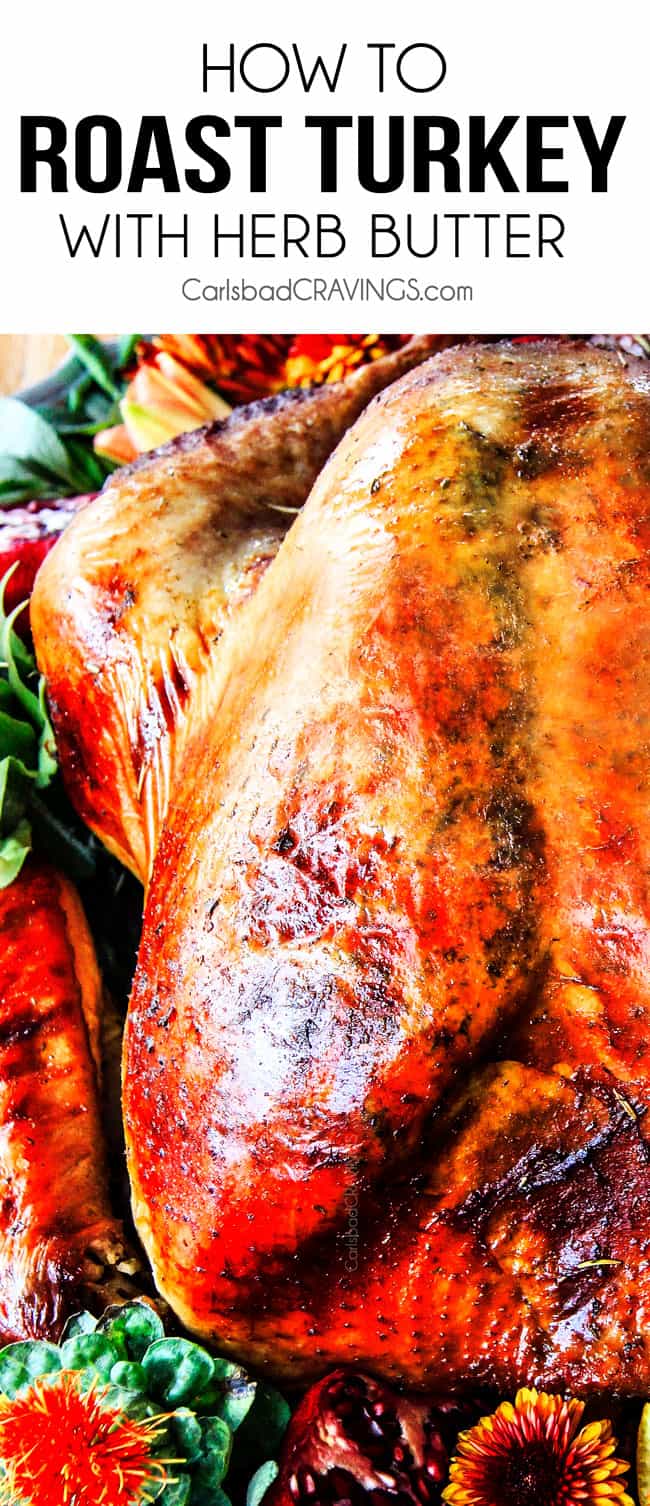
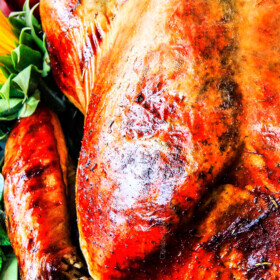
Your detailed guide to How to Roast Turkey perfectly every time AKA the juiciest, most tender, flavorful turkey you ever sunk your teeth into! Readers agree, you will be the hero of Thanksgiving with this recipe: “Best turkey I’ve ever made!,” “I found my go-to Thanksgiving turkey recipe,” and “juicy and flavorful and everyone loved it!” Follow my recipe and you can’t go wrong!
Watch How to Roast Turkey
Before we get into the nitty gritty of How to Roast Turkey, if you still need a few Thanksgiving ideas or simply want the BEST appetizer, sides or dessert, make sure to check out my Thanksgiving Guide which has over 50 Thanksgiving recipes all from CARLSBAD CRAVINGS all in ONE place to make your Thanksgiving prep that much easier and delicious! Now onto the main event!

Butter Turkey Recipe Ingredients
Let’s take a closer look at what you need to make this recipe (measurements in the printable recipe card at the bottom of the post):
For the turkey and Roasting:
For the turkey Brine:
For the herb butter:
For the turkey gravy:

WHAT TURKEY TO BUY?
First of all, what turkey size will feed your crowd? A general rule of thumb is 1½ pounds per person. So for 8 people, buy a 12-pound turkey. Of course there are variables in this calculation such as kids, big/small eaters, but in general, if you plan on 1 ½ pounds/person you will be safe.
Now what type of turkey? For this roast turkey recipe we are brining our turkey (more on that below), so we want a specific turkey – FRESH, NEVER FROZEN. Some turkeys are frozen then thawed at the store so check the label for “previously frozen” – we don’t want that. Frozen turkeys are almost always injected with a sodium solution. This, combined with brining, will make your turkey too salty.
We also don’t want kosher, self-basting and pre-brined turkeys because they either have been salted or have been injected with broth, salt, seasonings, and/or other flavorings. By using this type of turkey, you’ll also end up with an overly salted and dried out bird. So keep it fresh!


HOW TO THAW YOUR TURKEY
We don’t want to use a frozen turkey for brining but if you already have purchased your frozen turkey, then just be sure to cut the salt in the brine IN HALF. If your turkey is frozen, don’t make the mistake of waiting until Thanksgiving to thaw your turkey – or even waiting a few days before. Frozen turkeys take at least 3 days to thaw in the refrigerator – and our brine takes a day – so plan accordingly. It’s much better to give yourself too much time than not enough.
The safest and most convenient way to thaw your turkey is in the refrigerator. Place turkey on a roasting rack in a roasting pan. This will catch any juices/water from the packaging. As a rule of thumb, your turkey will need AT LEAST 24 hours for every five pounds. So, if you have a 15 pound turkey, plan on 3 solid days for defrosting, 1 day for brining and 1 day for caution, as it’s better to have a little wiggle room. A defrosted turkey is completely safe in your refrigerator for a couple days.
If you are brining, as you should and as instructed in this recipe, you can start your brining when the turkey is still partially frozen. This isn’t ideal, but is fine if you are in a time crunch.
Why Brine Your Turkey?
By nature, turkey is a lean meat so it needs extra help in the moisture and flavor department and brining is hand’s down the best way to season and infuse your turkey with moisture and flavor through and through because it actually changes the molecular structure of the bird! Brining takes a little planning ahead but very little hands-on time and results in the juiciest, show stopping roast turkey you ever did taste!
Brining is a marinating method that uses salted water to increase the moisture, and seasonings and aromatics to increase flavor and help the turkey retain flavor during cooking. According to American’s Test Kitchen, they found that turkey roasted straight out its package will retain about 82 percent of its total weight after cooking, a brined turkey, however, will retain about 93 percent of its total weight after cooking! This is 11% more juices/water which means more tender meat from the surface to the bone.
Contrary to conventional wisdom, brining DOES NOT make the roasted turkey taste salty – unless you don’t wash it off thoroughly. The salty solution only makes your turkey moister by hydrating the cells of its muscle tissue before cooking, via the process of osmosis, and by allowing the cells to hold on to the water while they are cooked. The salt is left in the brine solution, not the bird.
Now, let’s brine!

How to make this Herb Butter Turkey Recipe
Let’s take a closer look at how to make roast turkey with step-by-step photos (full recipe in the printable recipe card at the bottom of the post):
Brining your Butter Turkey
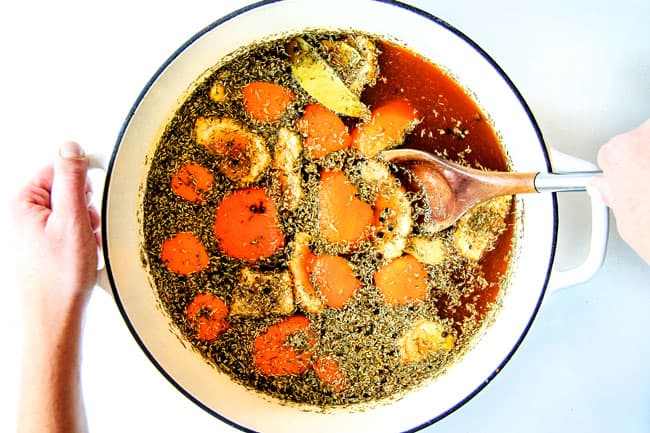
- Combine Ingredients: Combine the vegetable broth, sea salt (NOT kosher or table salt or it will be WAY too salty), brown sugar, garlic, rosemary, sage, paprika, thyme, peppercorns, bay leaves and peels from 2 oranges in a large stock pot and bring to boil in order to dissolve the salt and sugar. Next, remove from heat, stir in apple juice and cover and let brine cool to room temperature. You can place in the refrigerator to speed up the process.
2. Prepare Turkey: Remove the neck, giblets and tailpiece then rinse the turkey and pat dry. You are going to want to do this is the sink, as quite a bite of juices will be released when you open the turkey bag.
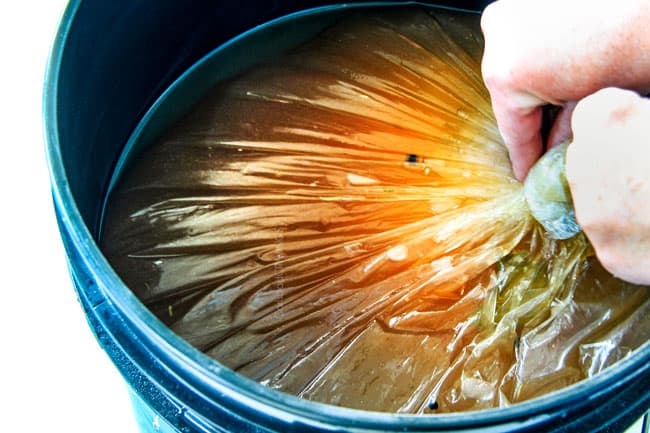
3. Add Turkey to Bag: Next, place your turkey in a large brining bag. There are actual Brining Bags that I have seen at Bed, Bath and Beyond, but I used I use Reynolds Oven Bags, Turkey Size, for meats/poultry 8-24 lbs. These bags are typically located in the grocery aisles near the cooking utensils/disposable foil pans.
Tip: No Leaking Brine!
I highly recommend double bagging your turkey in case the bag punctures and leaks – as happened to me before – fortunately, my turkey was on a large baking tray – phewy.
4. Add Brine: Once your turkey is in the bag, pour the cooled brine over the turkey then stir in ice water. Make sure the brine fills the cavity of the turkey and covers the turkey by squeezing out any excess air in the bag. If your brine needs more liquid, top it off with equal amounts vegetable broth and apple juice.
Tip: The Easiest way to Submerge Turkey
It is helpful to place the bag in another container to push the liquid up around the turkey. The easiest method I have found is to place my bag in a 5 gallon Home Depot bucket and then add my turkey to the bag, add my brine and ice water, seal up the bag, then weigh it down so the turkey doesn’t float and refrigerate.
5. Brine Turkey: The turkey gets brined in the refrigerator/cooler for 16-24 hours. The general rule of thumb is 1 hour per pound.
Where to Brine Your Turkey
If your refrigerator space is limited, the vegetable drawer can be a good option to place your bagged, brining turkey. If the brine doesn’t cover the turkey when placed on its side, be sure to flip the bag every so often.
You can also place the brining turkey in a cooler and surround it with ice packs, taking care to flip/rotate every so often, just take care to maintain a temperature above freezing but below 40 degrees to stay out of the bacteria growing “danger zone.”
6. Rinse the Turkey: When ready to remove turkey from brine, place it in the sink and cut the bag. Now, thoroughly rinse the turkey, including the cavity, with cool water for at least 5 minutes to get rid of excess salt.
7. Dry Turkey: Next, place your turkey on a roasting rack set in a roasting pan and thoroughly pat dry with paper towels. Place turkey in the refrigerator for at least 30 minutes, however, I highly recommend leaving it in the refrigerator overnight in order for the skin to dry out which means crispier skin during roasting.
How to Butter a Turkey
Our brined turkey will be wonderfully moist with flavor trapped inside the bird, but now it’s time to take it the next level – the best-roast turkey-I’ve-ever-eaten-level with Herb Butter. Herb Butter moistens the turkey, infuses it with flavor and helps promote that beautifully golden skin – and literally takes minutes to whip up!
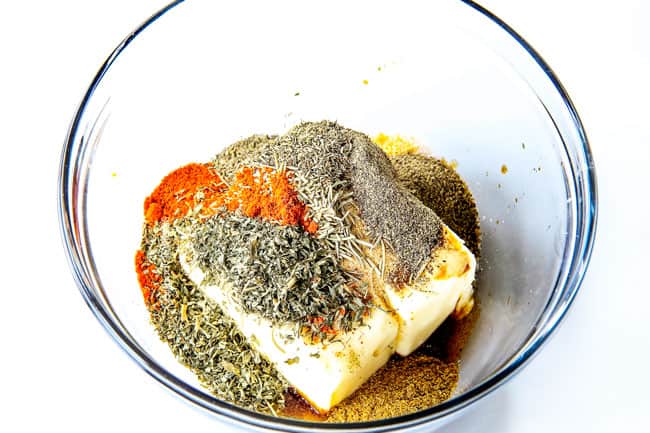
- Combine Butter Ingredients: To make our herb butter, simply whisk together softened butter, olive oil (to prevent the butter from burning), a splash of Dijon and soy sauce, and plenty of seasonings: garlic powder, dried rosemary, dried parsley, dried thyme leaves, onion powder, paprika, pepper, ground cumin. The butter is multi-dimensional, flavorful and balanced.
2. Loosen the Skin: If you have never used herb butter under the skin of a turkey before, don’t be intimidated, it is quite easy once you just go for it. The easiest method I have found is to come at the turkey from 4 different areas – from each breast from both the top and from the bottom.
First, gently loosen the skin on the breasts starting at the large cavity end by gently running your fingers between the skin and the meat, taking care not to tear the skin. Loosen the skin about halfway back then rotate the bird and repeat from the neck end until all the breast skin is loosened.
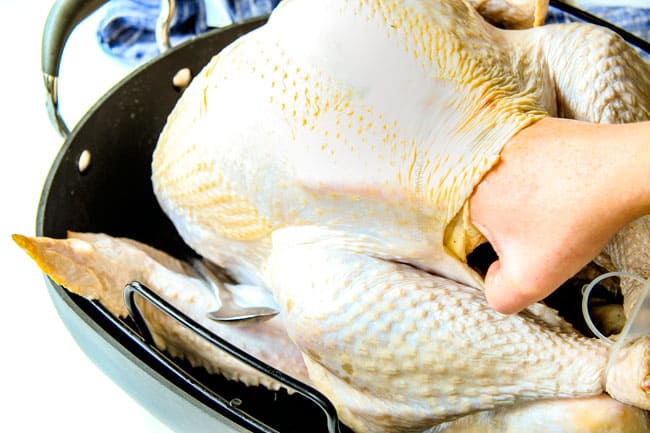
3. Add Butter Under the Skin: Place 2 tablespoons of the softened butter under the skin of each breast and gently press on the skin to spread the butter evenly over half of each breast. Rotate bird and repeat using 2 tablespoons per breast again so the entire breast is covered in butter.
4. Spread Butter Over the Skin: Spread half of the remaining butter over the turkey including drumsticks and wings. Flip turkey over so it is BREAST SIDE DOWN and spread the remaining butter over the turkey. Hello flaaaaaaaavor!
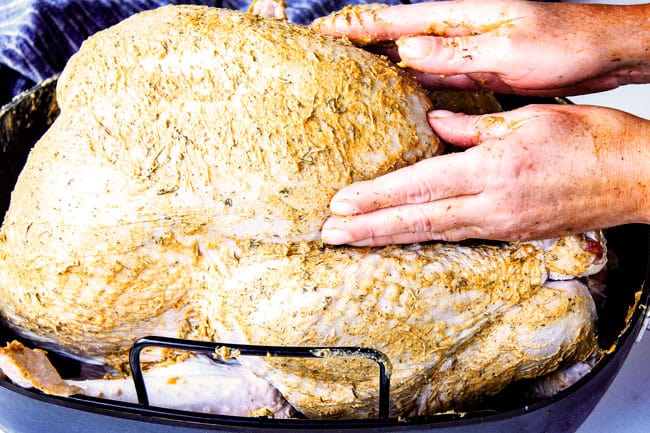
this photo is breast side up before I flipped it to breast side down
Cooking your Herb Butter Turkey
- Stuff the Bird: Now it’s almost time to roast our turkey – they easiest, hands-off part of the process. First, we want to stuff the cavity of our bird with aromatics. I use a quartered orange, onion and apple which not only add moistness but flavor as well. There really is no right or wrong here – many people add carrots, celery, fresh thyme, rosemary, etc. but I did not find that necessary due to the herb butter.
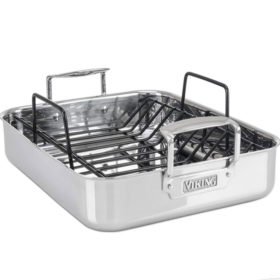
- Place in Roasting Pan: We want to roast our turkey on a rack placed inside a roasting pan which is essential to elevate the meat to promote even cooking and browning.
- Add Broth: Next, place 2 cups chicken broth on the bottom of our roasting pan to enhance moistness and flavor.
- We will add more water about halfway through roasting as it evaporates so we will have plenty of broth for our incredibly flavorful gravy. We use additional water as opposed to chicken broth to ensure our gravy isn’t too salty because you can always add salt but it’s hard to take away.
- Cook Breast Side Down: We start cooking our roast turkey with the breast SIDE DOWN because dark meat needs to cook for a longer period than the top white meat and this help to protect our delicate breast meat from overcooking/becoming dry and instead remains wonderfully juicy.
- Flip: We flip our turkey after 45 minutes and reduce heat from 400 to 350 degrees. Cooking at slightly higher temperature initially gives the turkey a crisp skin, while lowering the temperature for the remaining cooking time prevents the turkey from drying out.
How to Flip a Turkey for Roasting
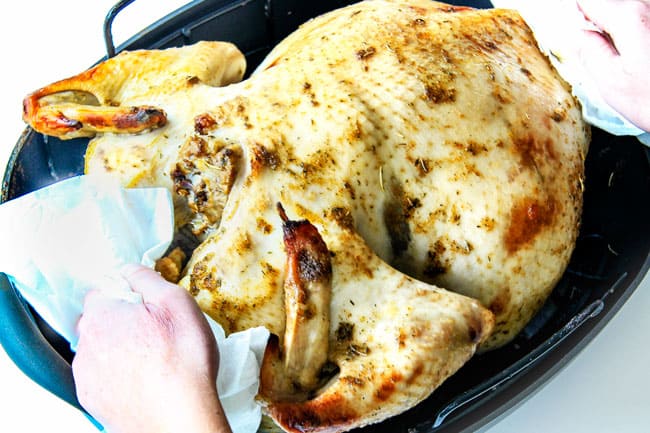
As far as flipping the turkey goes – it really is quite simple. For this latest roast turkey, I used an 18 pounder and had no problem flipping it. Simply use two wads of paper towels to grasp the bird on each end. This protects you from the heat and give you plenty of traction.
Should I baste my Roasted Turkey?
Now the question to baste or not to baste? I baste my roast turkey a few times initially but stop basting about halfway through cooking so the skin can crisp up. If you continue to baste, your skin won’t be crispy and can even become soggy. If you want extra crispy skin, don’t baste at all!

HOW LONG TO ROAST A TURKEY
You NEED an instant read meat thermometer. You can pick these up at your local grocery store, Target, Walmart – most places should carry them. A meat thermometer is essential because there is no accurate way to know if the turkey is cooked through – and not overcooked (almost as important)– without a meat thermometer due to many variables such as size of your turkey, how long you brined your turkey, how long rinsed brined turkey sat in refrigerator, how cold your turkey is, how often you open your oven, etc.
Brined turkeys cook much faster than not brined turkeys so rely on your meat thermometer. The roast turkey should be cooked until it reaches 160°F and then removed from the oven. To test the temperature, insert a thermometer into the thickest part of the breast.
Here is a GENERAL guideline on cooking times by the pound for BRINED TURKEY in a conventional oven. If you have a convection oven, cooking times will be much quicker:
| GENERAL COOKING TIMES FOR BRINED TURKEY | |
| Weight Total | Roasting Time |
| 8-12 pounds | 1.5 to 2 hours |
| 12-16 pounds | 2 to 3 hours |
| 16-20 pounds | 2.5 to 3.5 hours |
| 20-25 pounds | 3 to 4 hours |
REST YOUR TURKEY
After we remove our roast turkey from the oven, we need to let it rest for 20-30 minutes UNCOVERED – so the skin doesn’t get soggy. While the turkey cooks, the juices are forced away from the heat to the middle of the turkey. The resting time allows for the redistribution and reabsorption of the juices throughout the whole turkey.
HOW TO MAKE THE BEST GRAVY
While your roast turkey is resting, it’s the perfect time to make your gravy – the icing on the “cake!”
- Skim Fat: To make our EASY, beautiful, amazingly flavorful gravy, we first want to skim off the fat because nothing is as unappetizing at turkey dinner than fat that separates from your gravy while you pour and eat. The easiest way to do this is by pouring the contents (drippings and liquid) of the roasting rack into a degreasing cup with a spout.
How Remove Grease without a cup
If you don’t have a degreasing cup, no fear! You can still separate the fat by adding the drippings/liquid to a large freezer bag and allowing the fat to separate to the top. Next, seal the bag and hold over a 4+ cup measuring cup so that one bottom corner tip is facing down into the measuring cup like a spout. Make a small cut in this corner with scissors. The bottom liquid will flow through the cut made into the bag without the fat and into the large measuring cup. Stop when you reach 4 cups or the fat. Eazy peazy!
2. Make the Roux: Next, melt some unsalted butter with one tablespoon reserved Herb Butter. After we have melted our butter, we whisk in flour and cook, whisking constantly for 5 minutes.
3. Add Liquid: Next, we slowly whisk in 4 cups of our degreased turkey drippings/liquid. The turkey drippings are the deeply flavorful rich scrapings from the bottom of the roasting pan and boast concentrated flavor that translates into the best gravy on. the. planet.
4. Simmer: Let the gravy simmer until thickened, about 25 minutes which just happens to be the same amount of time your turkey needs for resting. Now taste and add additional Herb Butter (you will have one tablespoon left) if you want even more flavor and season with salt and pepper to taste. Now let’s eat!
HAPPY TURKEY DAY!
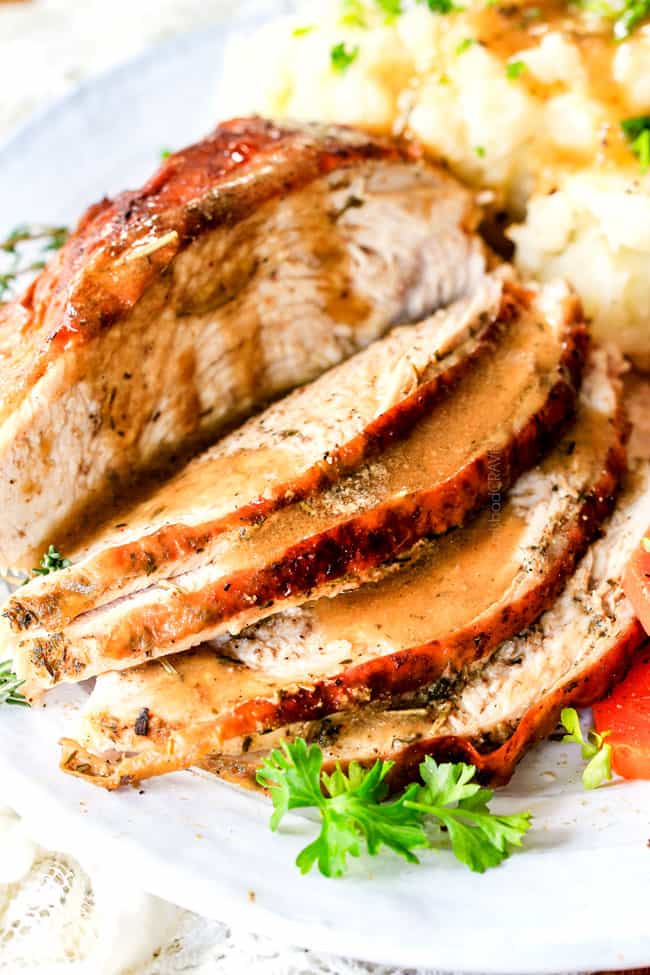

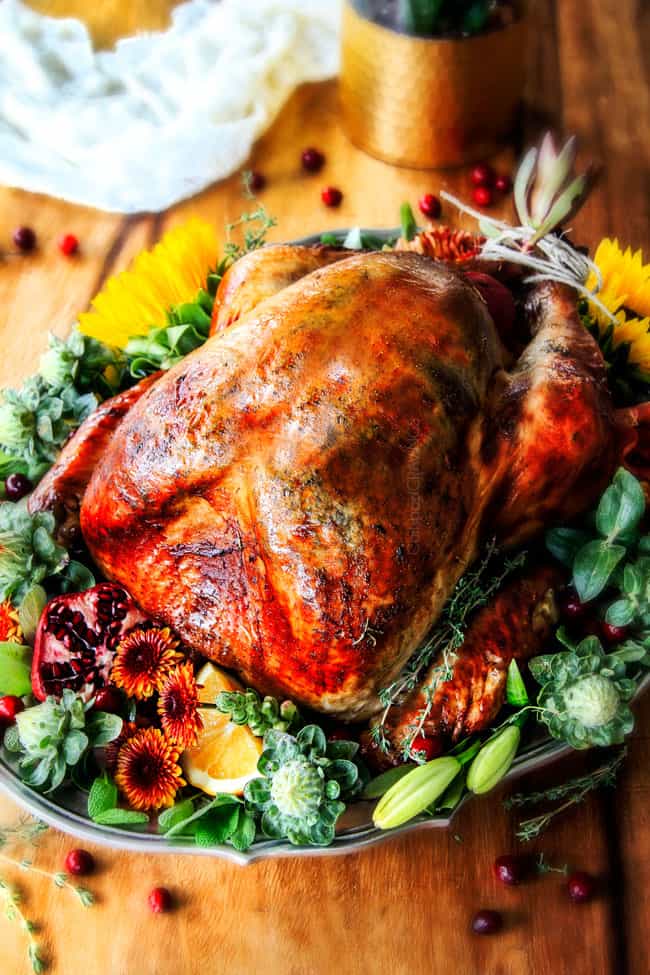
How to serve Herb Roasted Turkey
Serve this herb butter turkey with your favorite Thanksgiving, Christmas, and comfort food sides for a real feast!

How to store Butter Turkey
Leftover oven roasted turkey can be stored in an airtight container in the fridge for up to 5 days or in the freezer for up to 3 months.

How do I reheat Oven Roasted Turkey?
•Microwave: Microwave individual portions for 30 seconds followed by 10-second intervals as needed.
•Oven: Transfer slices to an oven-safe dish with a splash of broth or water. For extra decadent juiciness, dot the slices with butter. Cover with foil and bake at 350ºF for 10 minutes or until warmed through.
•Skillet: Add turkey slices to a skillet with a splash of water or broth. Cover and cook on low until warmed through.

WANT TO TRY THIS Roast Turkey RECIPE?
Pin it to your THANKSGIVING, CHRISTMAS or HOLIDAY Board to SAVE for later!
FIND ME ON PINTEREST FOR MORE GREAT RECIPES! I AM ALWAYS PINNING :)!
©Carlsbad Cravings by CarlsbadCravings.com
Herb Butter Turkey
Save This Recipe To Your Recipe Box
You can now create an account on our site and save your favorite recipes all in one place!
Ingredients
- 1 (14-18 lb) turkey never frozen, NOT pre-brined
Brine
- 8 cups vegetable broth
- 3/4 cup coarse sea salt NOT table or kosher salt
- 1/4 cup packed brown sugar
- 4 garlic cloves, minced
- 1 TBS each dried rosemary, dried thyme, paprika
- 2 tablespoons peppercorns
- 5 bay leaves
- Peel from 2 large oranges save oranges
Add later:
- 8 cups apple juice
- 1 gallon ice water
Herb Butter
- 2 sticks (1 cup) unsalted butter, softened,
- 1 tablespoon olive oil
- 1 tablespoon Dijon mustard
- 1 TBS EACH garlic powder, dried rosemary, dried parsley, dried thyme leaves
- 2 tsp EACH onion powder, paprika
- 1 1/2 tsp EACH pepper, ground cumin
For Roasting
- 2 cups low sodium chicken broth
- 2 cups water
- 1 orange, quartered (use above orange from brine)
- 1 onion, quartered
- 1 apple, quartered
Gravy
- 3 tablespoons unsalted butter
- 2 tablespoons reserved Herb Butter, divided in directions
- 1/3 cup flour
- 4 cups turkey drippings/juices in directions
Instructions
Brine
- In a large stock pot combine all of the Brine ingredients EXCEPT apple juice and ice water. Bring to a boil, stirring frequently to dissolve salt and sugar. Remove from heat, stir in apple juice and cover. Let cool to room temperature. You can place in the refrigerator to speed up the process.
- Remove turkey neck, giblets and tailpiece. Rinse uncooked, defrosted turkey and pat dry. Place in a large brining bag (see Notes).*
- Pour cooled brine over the turkey then stir in the ice water (both directly into brining bag with turkey). Make sure the brine fills the cavity of the turkey and covers the turkey by squeezing out any excess air in the bag. If your brine needs more liquid, top it off with equal amounts vegetable broth and apple juice. Place the turkey in the refrigerator 16 to 24 hours.*
- When ready to roast turkey, remove turkey from brine. Discard brine. Thoroughly rinse turkey, inside and out for 5-10 minutes to rinse off excess salt.
- Thoroughly pat turkey dry (to achieve crispy skin). Place turkey, breast side up upon wire rack set in roasting pan.
- Refrigerate, uncovered for 30 minutes or time permitting, 8-24 hours for crispier skin.
Herb Butter
- When ready to roast the turkey, remove it from refrigerator, wipe away any condensation and let it sit at room temperature for 60 minutes. Meanwhile, make herb butter and spread on the turkey anytime in the 60 minute window.
- Mix all the Herb Butter ingredients together in a medium bowl. Transfer 2 tablespoons to another small bowl and reserve for gravy; let stand at room temperature.
- Using your fingers, gently loosen skin covering each breast by gently running your fingers between the skin and the meat, taking care not to tear the skin. Loosen the skin on the breasts starting at the large cavity end and go halfway then rotate the bird and repeat from the neck end until all the breast skin is loosened.
- Place 2 tablespoons of the softened butter under the skin of EACH breast and gently press on the skin to spread the butter evenly over half of each breast. Rotate bird and repeat using 2 additional tablespoons per breast so the entire breast is covered in butter (a total of 8 tablespoons).
- Spread half of the remaining butter over the turkey including drumsticks and wings. Flip turkey over so it is BREAST SIDE DOWN and spread the remaining butter over the turkey.
- Fill the turkey cavity with oranges, onions and apple. Tuck wings behind back of the turkey and tuck tips of drumsticks into skin at tail to secure. (many turkeys come with drumsticks already secured) Add 2 cups chicken broth to bottom of roasting pan.
ROAST
- Adjust the oven rack to the lowest position and heat oven to 400 degrees F.
- Roast the turkey BREAST SIDE DOWN at 400 degrees F for 45 minutes uncovered. Remove pan from oven and turn oven DOWN to 350 degrees F. Using 2 large wads of paper towels, rotate turkey breast side up. Baste turkey and continue to cook uncovered until the center of the breast registers 160 degrees F. See chart in notes for approximate cooking times.
- About halfway through cooking, or when the chicken broth is getting low, add 2 cups water to bottom of roasting pan. At this point, or when breast is golden brown, cover the breast loosely with aluminum foil to prevent the skin from burning.
- Once cooked, transfer turkey to carving board and let rest, UNCOVERED (so the skin doesn’t get soggy), for 20-30 minutes. Meanwhile, make Gravy. Directions below
Gravy
- Add contents of roasting rack (drippings and liquid) to degreasing cup to skim off fat when poured. OR if you don’t have a degreasing cup then add contents to a large freezer bag and allow fat to separate to the top. Seal bag and hold over a 4+ cup measuring cup so that one bottom corner tip is facing down into the measuring cup like a spout. Make a small cut in this corner with scissors. The bottom liquid broth will flow through the cut made into the bag without the fat and into the large measuring cup. Stop when you reach 4 cups or the fat. Set aside.
- Add 3 tablespoon unsalted butter and ONE tablespoon reserved Herb Butter to a medium/large saucepan and melt over medium-high heat. Add the flour and cook for 5 minutes, whisking constantly.
- Reduce heat to low and slowly whisk in degreased 4 cups of turkey drippings/broth from bottom of roasting pan. If you have less than 4 cups than add water to equal 4 cups. Bring to a boil then reduce to a simmer until thickened, about 20-25 minutes. Taste and add additional reserved butter a little at a time if desired for more flavor. Season with salt and pepper to taste if desired.
CARVE
- With top of bird facing towards you, cut along both sides of breastbone, from one end of the turkey to the other.
- Gently pull each breast half away to expose wishbone then pull and remove wishbone.
- Cut along rib cage to remove breast completely. Place entire breast half on carving board and cut on bias into thin slices.
Video
Notes
- PLANNING/TIMING: If using a fresh turkey, you should brine Tuesday-Wednesday, let sit in refrigerator to dry out skin Wednesday-Thursday and cook Thursday/Thanksgiving.
- WHAT TURKEY TO BUY: Purchase a fresh, NOT frozen turkey because frozen turkeys are often brined, which means salt is added to preserve the turkey. If you must use a frozen turkey then cut the sea salt in the brine by half. Do not buy a kosher, self-basting or pre-brined turkey.
- SEA SALT: Be sure you are using sea salt. I prefer sea salt because it has great flavor. Kosher salt is twice as strong so if you must use it, then cut the salt in half.
- HERB BUTTER: I use dried herbs because fresh herbs have the tendency to burn. If you have had success with fresh herbs then use 3x fresh herbs as the dried amount.
- BASTING: Basting is optional. If you like very crispy skin then don’t baste your turkey at all! I baste my turkey 2 different times within the first half of cooking then don’t baste it all the last half of cooking.
*HOW TO BRINE:
- I use Reynolds Oven Bags, Turkey Size, for meats/poultry 8-24 lbs. to brine my turkey in. I recommend double bagging your turkey in case the bag punctures and leaks. It is helpful to place the bag in another container to push the liquid up around the turkey. I place my bag in a large Home Depot bucket and then add my turkey to the bag. If the turkey is floating, weight it down with a heavy object.
- The vegetable drawer of your refrigerator is also a great place to brine your bagged turkey. Just make sure all the extra air is out of the bag so it can be sealed tightly and the brine will cover the turkey. If the brine doesn’t cover the turkey, be sure to flip the bag every so often.
If your refrigerator space is limited, then place your turkey in its brine bag in a cooler and surround with ice packs. Flip turkey/rotate turkey every so often.
COOK TIME
You NEED a meat thermometer. Brined turkeys cook much faster than not brined turkeys so rely on your meat thermometer. There is no accurate way to know if the turkey is cooked through – and not overcooked – without a meat thermometer due to many variables. Below is a GENERAL guideline on cooking times by lb for BRINED TURKEY but start checking your turkey at least 30 minutes before the below time. GENERAL COOKING TIMES FOR BRINED TURKEYWeight Total Roasting Time
8-12 pounds 1.5 to 2 hours
12-16 pounds 2 to 3 hours
16-20 pounds 2.5 to 3.5 hours
20-25 pounds 3 to 4 hours
HOW TO DOUBLE THE GRAVY
To double the recipe without extra Herb Butter or turkey drippings, use:- 8 tablespoons unsalted butter
- 2 tablespoons reserved Herb Butter, divided in directions
- 2/3 cup flour
- 4 cups turkey drippings/juices in directions
- 4 cups low sodium chicken broth
- 1 to 1 ½ teaspoons chicken bouillon (add less and add more to taste)
- 1 teaspoon EACH garlic powder, onion powder, dried parsley
- ½ teaspoon EACH paprika, dried oregano, dried thyme, dried rosemary
- Salt to taste
Want To Make This Recipe?

Did You Make This Recipe?
Tag @CarlsbadCravings and Use #CarlsbadCravngs
Leave a Review, I Always Love Hearing From You!
Carlsbad Cravings© Original


Wendy Leal says
Best turkey I’ve ever made! My only complaint is it was so good, we didn’t have any leftovers! I found my go-to Thanksgiving turkey recipe. I was a little nervous about trying a new recipe on a holiday, but it was perfect. I used a fresh, Diestel turkey that was 17.5 lbs and it was juicy and flavorful and everyone loved it. Thank you!
Jen says
Yay! I’m so thrilled that your risk paid off and that it will be a repeat!
Kirsten says
Hi Jen!
Happy Holidays! I made your Roast Turkey with Herb Butter for Christmas Eve dinner. It was moist and full of incredible flavor! I brined the turkey for 13 hrs in the double bags in a large stock pot overnight. I doubled the gravy, as we had a 14 lb. turkey, and I am so glad I did. I could drink the gravy! I think it is the best gravy I have ever had. We are now watching “It’s A Wonderful Life”. Perfect dinner and delightful evening. Thanks again for your incredible recipes. Tomorrow, I am making your Beef Tenderloin recipe and your Green Bean Salad along with some other beloved family recipes. Have a wonderful holiday!
Jen says
That sounds like the perfect evening! I am so thrilled that the gravy was delicious, thank you for trying so many recipes!
Kamar says
Thank you so much for this recipe. Would this recipe work for roast chicken as well? I have a whole chicken that is 3.85 lbs. If the recipe works, is there anything I need to change?
Also, I love the decoration you used for the Turkey. What type of flowers and herbs you used? Are they edible?
Thanks!
Jen says
Hi Kamar! While the flavors could work for chicken, this recipe is designed specifically for turkey. Chicken would require different brining and cooking times because of the smaller size. In the photos, I’ve garnished with fresh fruits like oranges and pomegranates, along with sprigs of the herbs used in the recipe. You can check your local florist for flowers that are edible – they’re a fun way to add color!
Kamar says
Thank you again for this recipe! One more question, please: May I use this recipe to roast my Turkey in a spatchcock way? If so, do I need to make any changes?
Thanks in advance!
Jen says
Hi Kamar! Yes, you can use the recipe for spatchcocking. You’ll need to modify the cooking time slightly, as spatchcocking will reduce the roasting time. Generally, spatchcocked turkey takes about 1.5 to 2 hours at 450°F, depending on the size but it’s crucial to monitor the turkey’s internal temperature (165°F in the breast, 175°F in the thigh) for best results. I highly recommend a digital probe thermometer for this: https://amzn.to/4hS81Dn
Rachel says
Hi Jen! I’m making this for Christmas but I waited too long and the only turkey I could find is a Honeysuckle turkey that has already been brined. Should I just halve the salt or not worry about the brine at all?
Jen says
Hi Rachel! I’m afraid that your turkey would turn out too salty if you tried brining it a second time. So go ahead and skip the brining step this time and move on to seasoning it Hope it turns out so good for you! Merry CHristmas!
Alicia says
Hi! I first wanted to say thank you as I basically learned how to cook from trying out so many of your recipes over the years and they never disappoint. I am planning to make the turkey for Thanksgiving this year and I am going to be cooking a 20-22 lb turkey. I was wondering by how much I should increase the ingredients in this recipe?
Jen says
Wow Alicia! I am so honored to have you say that about my recipes! Thanks so much and thank you for your question! I would increase the ingredients by 1.5. Lmk how it turns out and/or if you have any other questions! Happy Thanksgiving!
Jessica says
Quick question, can I make the brine (that stock pot portion) ahead of time? I’m going to be out of town to pick up my son from college so I would need my husband to put the turkey in the brine on Tuesday. I’m trying to see where I can make it as easy for him as possible. This way all he would have to do is put in the turkey and the ice water. By the way, is the ice water a combination of cold water and ice or just REALLY cold water? Thanks for your help. I LOVE your recipes. They are always so flavorable.
Jen says
Hi Jessica! Thank you for your question! You can make the brine and store it in the fridge ahead of time! Since it will already be cooled off you just need to add really cold water. You just don’t want the brine to be too warm for the turkey. I hope it turns out delicious and that you have a wonderful time with your son home from college! So fun!
Fatine says
Thank you for this recipe! I made it last year and absolutely loved it. I’m planning to make it again, but this time I’m using an Empire Kosher turkey for the first time. Do you have any experience with that brand? I’m wondering if I should adjust the amount of salt or follow the recipe as is. Not sure if I should brine it too. I’ve seen mixed guidance online and would really appreciate your insight. Many thanks!
Jen says
Hi Fatine! I am not familiar with Empire, so this is what ChatGPT had to say:
“Kosher turkey like Empire has been processed according to kosher rules, but that doesn’t always mean “extra salty”. A lot depends on how it’s been brined or injected by the brand, which can vary.
Empire turkeys are often just “clean-certified” and may not have added sodium, but there are kosher brands that do inject sodium solutions, so it’s wise to check your specific package.”
So, I would check the packaging specifically if it has added salt.
Wendy says
I’ve used this as my Thanksgiving turkey recjpe for the last two years and it turns out perfect every time! The gravy it makes is so delicious. Thank you for sharing!
Jen says
Hi Wendy! Thank you so much for your sweet review! So amazing that this turkey has made it to your Thanksgiving table 2 years running! It’s wonderful to hear how much you loved the turkey and the gravy!