Wonderfully EASY golden, buttery Puff Pastry Cannoli Cones stuffed with decadently creamy authentic sweet ricotta filling are super impressive yet hardly any effort! Make ahead for everyone to drool over at your next party/gathering/Easter!
How to Make Cannoli Cones
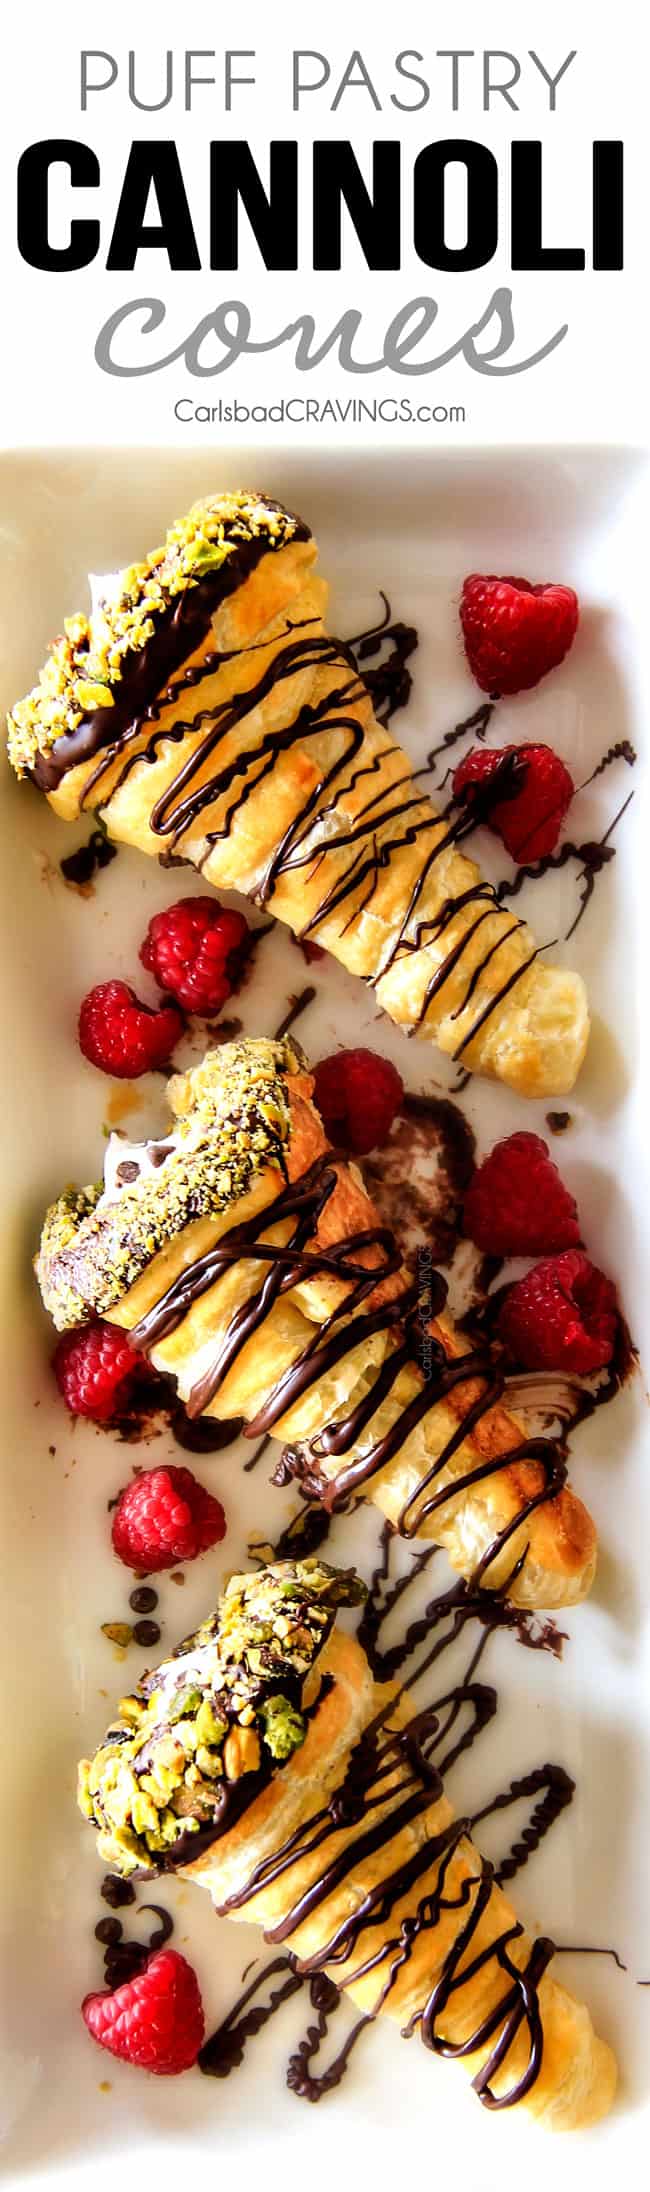
Let’s Cannoli!!! I had another post lined up for today but as soon as I saw this super fun idea of Puff Pastry Cannoli Cones from Pepperidge Farm, I knew I had to share ASAP for Easter because who doesn’t love Cannoli?! AKA tube shaped crispy fried pastry shells stuffed with sweet ricotta cream filling? Cannoli is probably one of our most popular Italian dessert recipes of all time. In Italy they are called Cannoli Siciliani. The singular, cannolo actually means “little tube” in the Sicilian language. And in my language, they mean YUM.
Although cannoli is a beloved dessert by many, there are few (myself included) who own the right kitchen equipment (cannoli metal tubes) or patience (definitely me) for the labor intensive process of mixing the dough, rolling out perfect disk-shaped pieces, painstakingly wrapping the dough around the tubes, frying each one. I am exhausted just typing that.
Instead, these buttery, flaky Puff Pastry Cannoli Cones make preparing “Cannoli” accessible to everyone! They are a wonderfully simple alternative to devour our traditional cannoli filling because after all, non-traditional cannoli are a whole lot more delicious than no cannoli. And they are a LOT delicious. period.
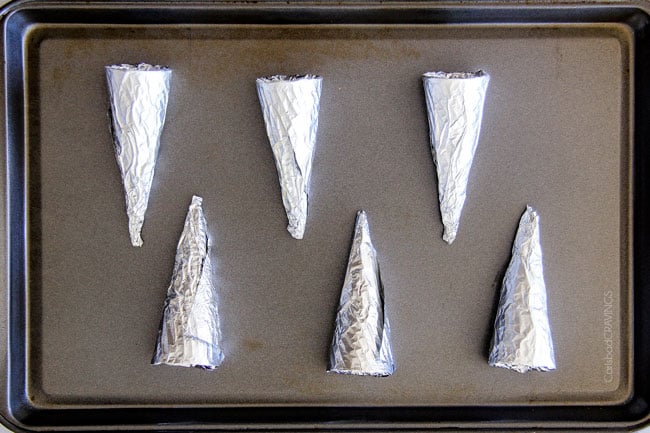
To make these mega simple Puff Pastry Cannoli Cones, we first wrap sugar cones in aluminum foil, tucking any excess foil into the top then spray with nonstick cooking spray. These will be our molds.
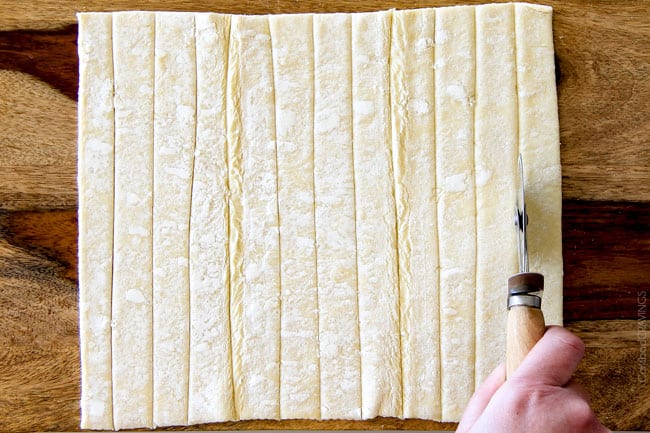
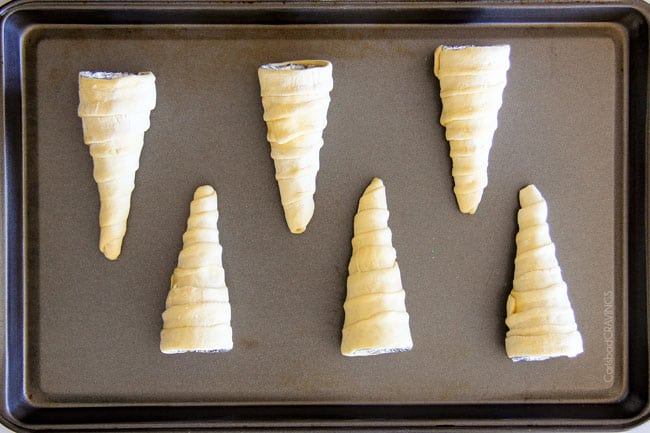
Next, we unfold our pastry sheet and cut it into 3 rectangles along the fold marks then proceed to cut each rectangle lengthwise into 4 strips, making 12 strips total. We will use two strips per cone.
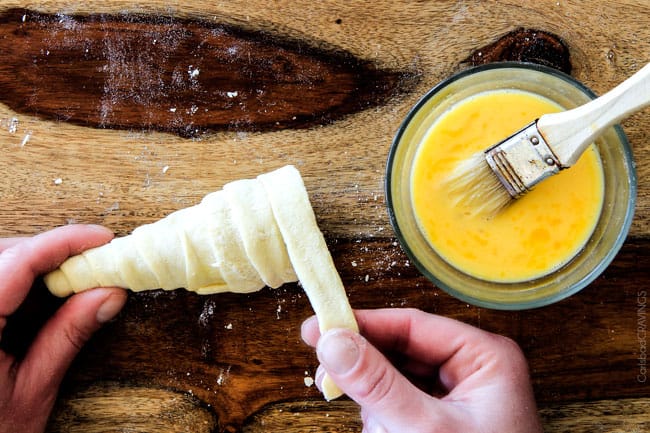
Starting at the pointed end, wrap 1 strip around the cone, overlapping the edges slightly then brush the end with the egg wash then firmly press the end of another strip to join and continue wrapping. Repeat with the remaining pastry and cones. It sounds more complicated than it is, but really takes less than 2 minutes per cone – SO easy!
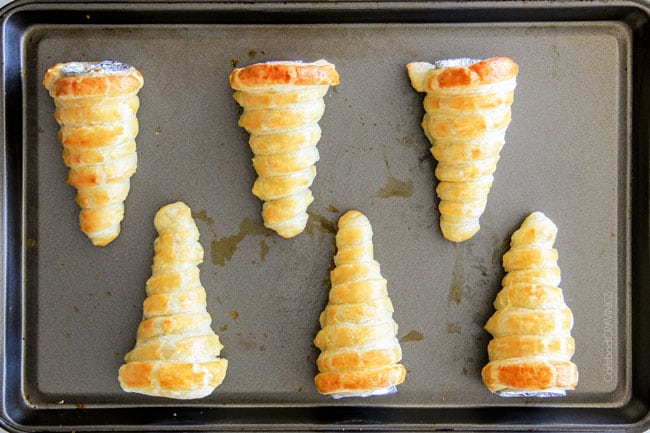
Finally, brush the wrapped pastry cones with the egg wash and bake for 15 minutes.
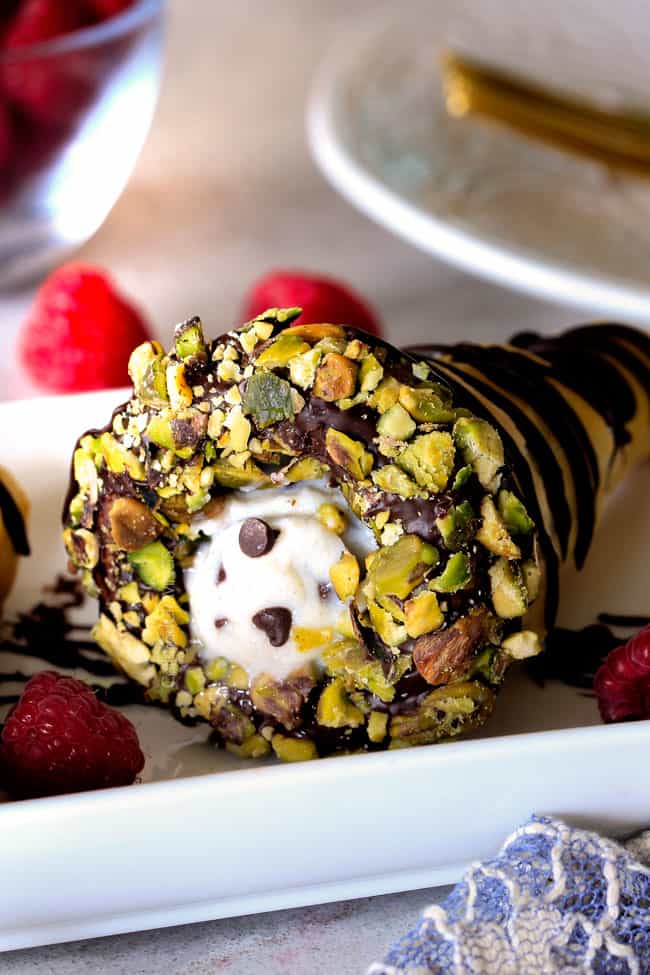
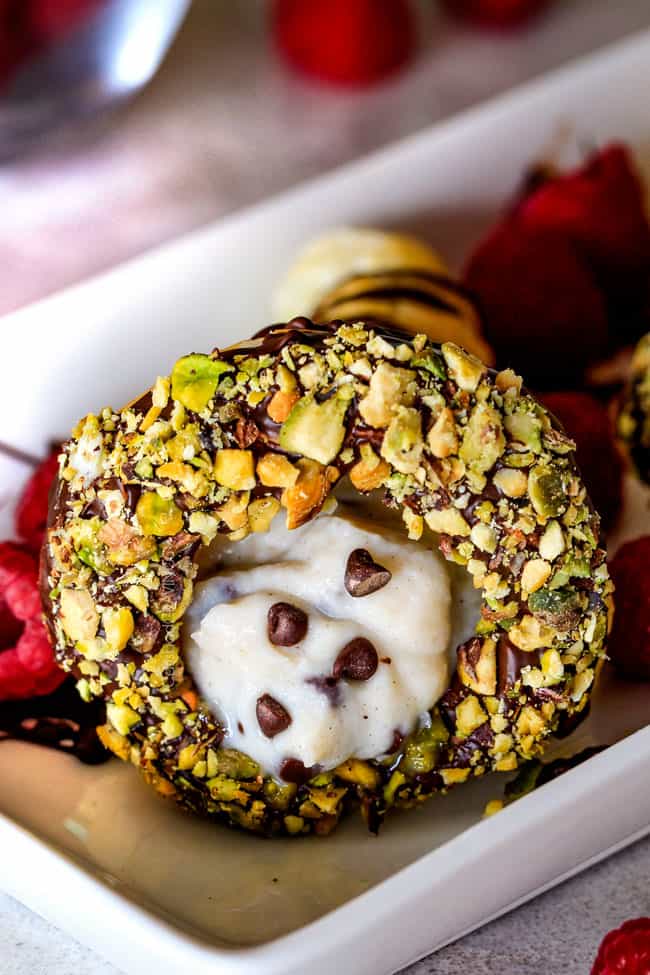
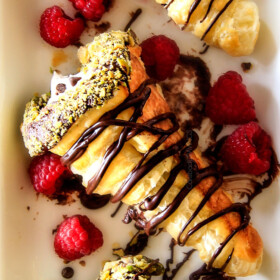
After they have cooled, carefully remove the pastry cones from the foil cones. They should slip out quite easily after you loosen any dough from around the cone opening. I like to dip the edges in melted chocolate and crushed pistachios afterwards (directions included), but the possibilities are virtually endless! The Sicilian cannoli are often trimmed laterally and covered with candied cherries, orange peels or chopped pistachios.
Let’s talk cannoli filling!
This traditional cannoli filling recipe is slightly adapted from Italian American Chef Buddy Vlasatro and is delicious in its simplicity with just ricotta, superfine sugar, vanilla, cinnamon and mini chocolate chips but feel free to blend in other popular cannoli filling components such as orange zest, nuts, nutmeg, pistachios, candied fruit/orange peel, cherries, chocolate etc.
Although simple there are a few tips and tricks for Cannoli success:
- You MUST DRAIN the ricotta cheese or your filling will be soupy and your shells soggy. Its super easy to do, but you have to factor the time into your prep. To drain, place a fine mesh sieve over a bowl. Add ricotta to sieve and top with plastic wrap or parchment paper then place something quite heavy on top to press the liquid out (I use a Costco size jar of pickles). Let drain at least 2 hours. (May drain longer in the refrigerator).
- You need to use SUPERFINE SUGAR or your filling will taste grainy. I make my own superfine sugar by adding it to my food processor, covering with a kitchen towel (as it creates quite a bit of “sugar dust”) and blending 1-2 minutes. Now you have powdery superfine sugar! Let the sugar settle 10 seconds or so then remove the lid and add your sugar to a mixing bowl along with ricotta, vanilla and cinnamon.
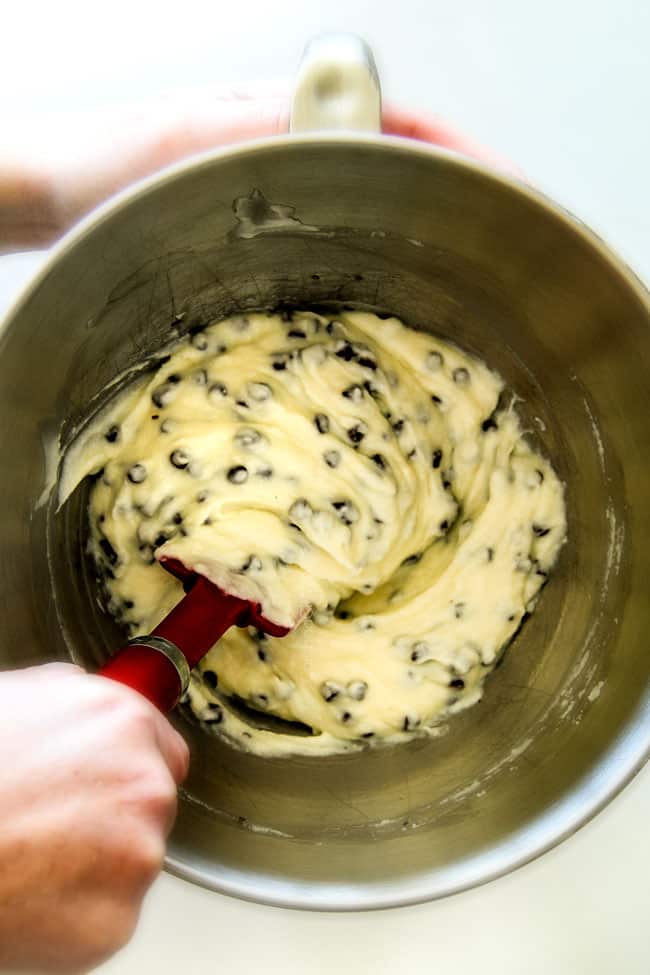
- DON’T OVERMIX your filling or it will become soft/runny. Using the paddle attachment, beat on low to medium speed just until the sugar is completely dissolved, approximately 1-2 minutes. The best way to tell if it’s dissolved is to taste the mixture until you don’t detect any graininess. Add mini chocolate chips and beat just until evenly distributed.
- REFRIGERATE OVERNIGHT in an airtight container. Again, easy to do, but you need to plan for. Refrigerating your filling overnight makes all the difference in the world to let the flavors develop. I tasted the filling the day of and thought it was “okay” and then the next day I couldn’t stop devouring it. World of difference.
- Fill your shells WHEN READY TO SERVE, or no more than an hour beforehand. This ensures your shells stay nice and crispy. You can have all the components ready to go – ricotta filling in the fridge, shells in an airtight container – so assembling is still super quick and easy.
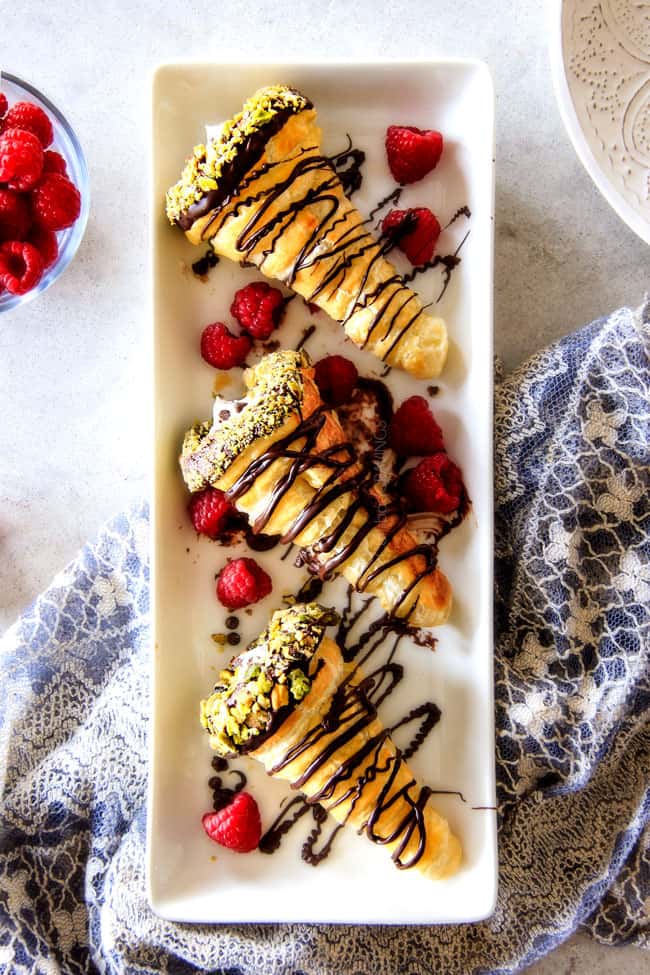
Now let’s cannoli with our buttery, flaky, crispy shell bursting with dreamy, creamy, sweet ricotta filling sprinkled with mini chocolate chips! A simplified taste of Sicily.
Looking for more dessert recipes?
- Mini Chocolate Peanut Butter Pies
- Layered Carrot Cake with Pineapple Cream Cheese Frosting
- German Chocolate Cupcakes with Ganache Filling
- Toffee Pecan Caramel Pound Cake
- Strawberry Cheesecake Pie
- Salted Caramel Milk Chocolate Cake
Want to try these Puff Pastry Cannoli Cones?
Pin them to your Dessert or Special Occasion Board to SAVE for later!
Find me on Pinterest for more great recipes! I am always pinning :)!
©Carlsbad Cravings by CarlsbadCravings.com
Puff Pastry Cannoli Cones
Save This Recipe To Your Recipe Box
You can now create an account on our site and save your favorite recipes all in one place!
Ingredients
Puff Pastry Cones
- 6 sugar ice cream cone
- 1 sheet from a 17.3-ounce pkg. Puff Pastry Sheets thawed
- 1 egg
- 1 tablespoon water
Cannoli Filling
- 2 cups whole ricotta, drained (in directions)
- 2/3 cup superfine sugar*
- 1 teaspoon vanilla extract
- 1/4 teaspoon ground cinnamon
- 1/4 cup semi-sweet mini chocolate chips
Chocolate Coating (optional)
- 1/2 cup semi chocolate chips
- 1 1/2 teaspoons Vegetable oil
Chocolate Drizzle (optional)
- 1/2 cup semi-sweet chocolate chips
- 1 1/2 teaspoons Vegetable oil
Garnishes (optional)
- crushed pistachios
- mini chocolate chips
- berries
- Powdered sugar
Instructions
Cannoli Filling
- Drain the ricotta by placing a fine mesh sieve over a bowl. Add ricotta to sieve and top with plastic wrap or parchment paper then place something quite heavy on top to press the liquid out (I use a Costco size jar of pickles). Let drain 2 hours. (May drain longer in the refrigerator.)
- After ricotta has drained, add it to the bowl of a stand mixer fitted with the paddle attachment (you can use hand mixer if needed). Add sugar, vanilla and cinnamon. Beat on low to medium speed just until the sugar is completely dissolved, approximately 1-2 minutes, taking care not to overmix or the filling will become soft/runny. The best way to tell if it’s dissolved is to taste the mixture until you don’t detect any graininess.
- Add mini chocolate chips and mix just until evenly distributed. Refrigerate overnight in an airtight container for flavors to develop. Can be stored for up to 5 days.
Puff Pastry Cones
- Preheat oven to 400 degrees F.
- Wrap cones in aluminum foil, tucking any excess foil into the top of the cone. Spray foil cones with nonstick cooking spray.
- Whisk the egg and water together in a small bowl. Set aside.
- Unfold pastry sheet on a cutting board. Cut the pastry sheet into 3 rectangles along the fold marks. Cut each rectangle lengthwise into 4 strips, making 12 strips total (see picture in post). You will use 2 strips per cone.
- Starting at the pointed end, wrap 1 strip around the cone, overlapping the edges slightly. Brush the end with the egg wash then firmly press the end of another strip to join and continue wrapping. Repeat with the remaining pastry and cones.
- Brush the wrapped pastry cones with the egg wash. Place the cones onto a baking sheet. Bake 15 minutes at 400 degrees F or until the pastry cones are golden brown. Let the pastries cool completely on the baking sheet on a wire rack. Carefully remove the pastry cones from the foil cones.
Chocolate Coating
- After cones have cooled, add ½ cup chocolate chips and 1 ½ teaspoons vegetable oil to a small bowl. Microwave at 50% power, stirring at 30 second intervals until chocolate is melted. Dip the top of the cones in the chocolate then dip in either crushed pistachios or mini chocolate chips if desired. Place on parchment paper until set. Repeat with all cones. Store cones in an airtight container until ready to fill.
Fill Cannoli Cones
- When ready to serve cannoli, either spoon filling into cones or use a pastry bag to pipe in filling.
Chocolate Drizzle (optional)
- Add ½ cup chocolate chips and 1 ½ teaspoons vegetable oil to a small bowl. Microwave at 50% power, stirring at 30 second intervals until chocolate is melted. Let cool 5 minutes then place in a small Ziploc bag. Snip the corner of the plastic bag and drizzle over Cannoli.
Serve!
- Serve with fresh berries (SO GOOD!) and powdered sugar if desired.
Video
Notes
Want To Make This Recipe?

Did You Make This Recipe?
Tag @CarlsbadCravings and Use #CarlsbadCravngs
Leave a Review, I Always Love Hearing From You!
Cannoli Cones from Pepperidge Farm with filling slightly adapted from Chef Buddy Vlasatro
Carlsbad Cravings© Original


Marisa Franca @ All Our Way says
We have the cannoli tubes and we tried it once — huge failure. Being the do not waste people that we are — we ate our mistakes. 🙁 Now this would be great to do and we could use our tubes. I’m pinning!!
Jen says
Oh no, so sad your cannoli tubes were a failure! but you are so right, you could totally use them with this puff pastry method with 100% success! Your kids and grandkids would love these!
Lindsay | With Salt and Pepper says
At first when I read that ricotta was the traditional filling, I thought, that seems a bit watery. Then when you said you have to drain it, it made total sense. Puff pastry is the best time saver, I use it all the time! I’ve never made cannoli before but you make it look totally achievable!
Jen says
Yes, totally achievable with puff pastry and they look super fun and festive too! I’m excited for you to try these, they are super yummy!
Heather Lampman says
Hi Jenn! So, I thought the only thing in the world that I would call “eye candy” was a super hot man! Sorry that this has to run second, but…ya know…there’s nothing hotter than a super hot man!
I’m lucky that my favorite local grocery store sells fresh cannelloni shells and filling for people to make their own, but nothing could compare, for looks and presentation, with your recipe!
I will make these for Easter. I’m going to knock the socks off my guests, and bask in the glory!
Jen says
LOL! you are hilarious and too nice! These are mighty pretty and its always nice when food looks more impressive than the skills it takes to make it! Your friends and family will love them for Easter!
Carolyn in Utah says
Puff pastry scares me– even the pre-made stuff! But I’ll give it a try. My husband and I are always puzzled by cannolis we’ve had in bakeries because they’re always so bad, even at NYC bakeries! Maybe the key is making them them at home.
Not to sound like a stalker, but did I see your father on TV yesterday? Having read your story before, I was left wondering….
Jen says
Hi Carolyn! you will LOVE how easy this puff pastry is to work with – promise – it will completely take your fear of pre-made puff pastry away :)! I hope you make these and love them more than the NY bakeries! And yes, that absolutely was my dad 🙂 We got to be there and are so proud of him!
Sushma Jassal says
Hi these look yummy & I would love to make them to take into work which means making them in advance; I saw it mentioned to make just before serving to avoid the pastry becoming soggy! Would it be possible to line the insides with melted chocolate, when you do the rim with pistachiosto, and allow it to dry to create a barrier to protect the pastry from becoming soggy?
Many thanks,
Sushma
Jen says
Hi Sushma, what a fine idea to bring these to work! I think lining the inside with chocolate to create a barrier is a brilliant and delicious idea and would work great! The other alternative is to just assemble them at work – you could do this 30 minutes before serving and they wouldn’t get soggy. Hope this helps, enjoy!
Donna says
I made this and they were OMG delicious! I needed 12 desserts so to extend the filling, I whipped up about half more plain whipped cream and folded it in gently. I put the filling in a plastic ziplock bag, nipped off one corner, and kept it closed with a binder clip and in the fridge when not needed. I filled cones on demand for party guests and they would stand very patiently waiting while I filled the cone of their choosing. This dessert is a real showstopper and I am very pleased with the results. Thank you for a great recipe.
Jen says
Hi Donna, thank you so so much for your awesome comment! What a fun idea for a party and for guest to pick their own cone – love it! I’m thrilled they were such a hit!
Twihla Halvorson says
I have read that you can make cannoli filling with marscapone instead of ricotta. I am just wondering if you have tried that? I may just have to experiment when I make your puff pastry cannoli shells.
I have always wanted to try and make cannoli’s. Now, I am ready to try. Thanks!!
Jen says
You’re so welcome Twihla! It would depend on your tastes – Mascarpone tends to be richer and denser than ricotta. Ricotta is so creamy and soft which is why it is the more popular of the two when making cannolis. I have heard of some mixing the two together for the filling which you can also try. Have fun experimenting! I hope you love them!