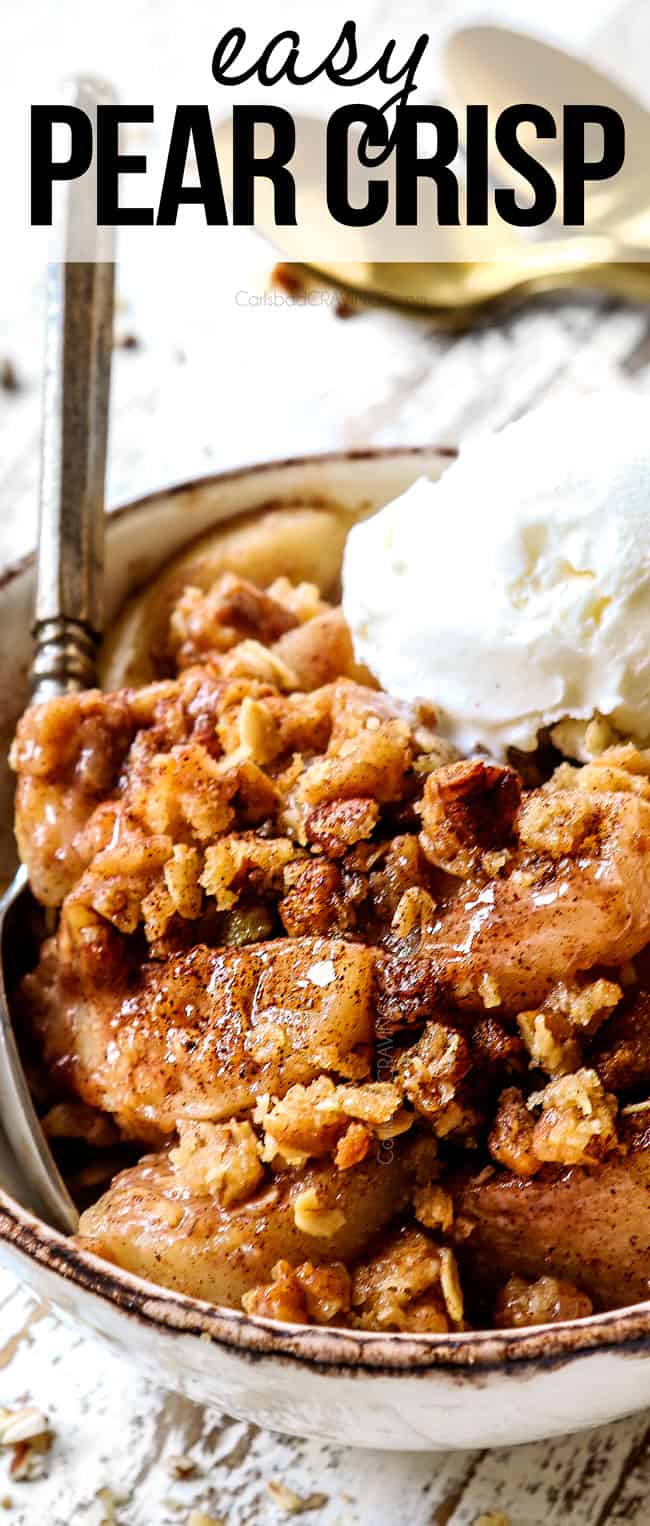
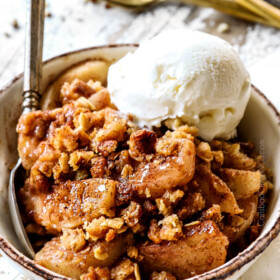
Pear crisp may look impressive, but is one of the easiest, tastiest Fall desserts of all time!
This pear crisp recipe is a sophisticated spin on apple crisp, bursting with ginger, cinnamon spiced pears blanketed in an irresistible buttery, crunchy pecan, oat, cinnamon, brown sugar topping. Despite being unabashedly delicious, this pear crisp is also ridiculously easy – with just 20 minutes of prep! Simply combine the pears with a simple blend of sugar and seasonings then sprinkle on the topping that is stirred together in ONE bowl (no food processor, no cutting in cold butter, etc.!) and bake. This easy pear crisp recipe requires pantry friendly ingredients and can be assembled ahead of time then just popped in the oven for an easy stress-free dessert perfect for Thanksgiving, Christmas, or an any-time easy seasonal treat.
Fall is the season of desserts! We especially love whipping up cozy, comforting desserts this time of year like pear pie, pumpkin bundt cake, mini apple pies and pumpkin cheesecake.
PIN THIS RECIPE TO SAVE FOR LATER
PEAR CRISP RECIPE
This sensational pear crisp recipe is about to become your go-to dessert whether for potlucks, Thanksgiving or a weeknight meal. You’ll love this recipe because:
- Quick and Easy. It’s a slice, dump and bake dessert that can be made at a moment’s notice – no making pie crust, no chilling pie crust, etc. BUT it delivers all of the warm satisfying comforting flavors you love about pie PLUS that satisfying buttery crunch.
- Tasty. Sweet pears laced with cinnamon, ginger, cardamom and nutmeg and a splash of vanilla and lemon juice elevate the filling to mesmerizing. The oatmeal pecan topping is SO crunchy offering a textural contrast to the softer fruit. It’s a beautiful marriage of warm, sweet and crunchy mingled with creamy, cooling vanilla ice cream.
- Make Ahead. The crumb topping made with melted butter allows you to completely assemble the pear crisp ahead of time for a stress-free dessert win.
WHAT IS a pear crisp? What is THE DIFFERENCE BETWEEN a CRISP AND A CRUMBLE?
A pear crisp is a baked pear dessert topped with a crispy and crunchy topping often made with flour, sugar, butter, nuts and sometimes oats. It is one of the easiest desserts to make because it doesn’t require a pie crust and all of the ingredients bake together at once.
The main difference between a crisp and a crumble comes down to the topping. In a crisp, the topping is made with flour, sugar, butter, oats and sometimes nuts that get sprinkled over the fruit before baking to create a crunchy topping. The topping of a crumble is very similar made with flour, sugar and butter except it doesn’t usually include oats or nuts. The topping of a crisp is coarser and crunchier and perfect for this pear crisp recipe!
Why this Pear Crisp Recipe Works
Pear Crisps are easy to make with a fabulous recipe but you can’t just swap pears into your favorite fruit crisp recipe. Here’s a little science behind why and how this pear crisp recipe works:
Why use melted butter? In apple crisp recipes, cold butter is cut into sugar, flour, nuts and oatmeal, to create a dry, powder topping that melts into a crunchy blanket when baked. This same topping doesn’t work for a pear crisp, however, because the pears release more juice than apples do, washing the powdery topping down into the pear filling. Instead, pear crisps need a sturdier topping. This pear crisp boasts a streusel topping in which melted butter is incorporated directly into the flour, oatmeal and nuts to bind all the ingredients together so it bakes as a separate entity and doesn’t wash away. Bonus, this method is super easy!
How do you make the topping extra crunchy? The addition of pecans to the topping adds a healthy crunch, but what truly makes the topping extra crunchy is increasing the baking temperature of 375 degrees F (typical for fruit crisp recipes) to 425 degrees F. This hike in temperature results in a spectacularly crunchy topping which translates into a spectacular pear crisp.
Can I use apples in this recipe? I am often asked if you can swap pears for apples or apples for pears in a recipe and the answer is no, that is why this pear crisp is getting its very own recipe post (if you want to make apple crisp, use this recipe). Pears bake more quickly than apples even though they contain about the same amount of moisture because their cell walls are weaker. This translates into different amounts of needed cornstarch/flour, sugar, etc. and different baking times. This pear crisp recipe is perfectly proportioned with enough sugar to make the filling sweet but not too much which would make it watery.
Why use cornstarch? Thickening the filling is necessary because pears release juice when cooked. This is to our advantage because the juices mingle with the sugar, warm spices, lemon juice and vanilla to create a sweet, self-basting sauce that’s the perfect creamy consistency thanks to cornstarch, without becoming gummy. Without cornstarch, the juices would create a watery filling.
WHAT ARE THE BEST PEARS for PEAR CRISP?
It might sound extreme, but pear crisps can be made or ruined by the type of pear you use. The pears affect both the flavor and texture of the pear crisp – so choose wisely! For this recipe, use firm but ripe Bartlett pears for the best flavor and texture.
HOW CAN I TELL IF MY PEARS ARE RIPE?
You’ll want to use pears that are the cusp of their ripeness, meaning they give ever so slightly when squeezed. These pears have converted most of their starches into sugar so they’re flavorful but don’t exude all their juice when cooked so they retain their structure. Baking accelerates the process in which enzymes break down pear’s water-retaining cell walls. This means if you use ripe pears, they’ll beak down too much and you’ll end up with mush.
SHOULD I PEEL PEARS FOR PEAR CRISP?
Yes, please peel your pears for this recipe. If you don’t peel your pears, you’re left with an unpleasant tough texture as the skin doesn’t break down and soften enough to be inconsequential when baking.
Can I Make Pear Crisp with Canned Pears?
No, do not make pear crisp with canned pears. They are already soft and will turn the filling to watery mush in this recipe.
Pear Crisp Ingredients
You probably have everything you need to make this pear crisp recipe in your pantry right now except for the pears! In addition to Bartlett pears, you will need:
PEAR CRISP FILLING:
- Sugar: use granulated sugar to enhance the natural sweetness of the pears.
- Cornstarch: pears release a lot of moisture when baked so we need a thickening agent to prevent the filling from becoming watery. Cornstarch blends seamlessly with the pears so you aren’t left with a gummy filling or raw flour.
- Lemon juice: the slight acidity helps balance the sweetness. The lemon juice also keeps leftover pear crisp (should you be so lucky) from turning brown.
- Vanilla extract: adds an extra oomph of flavor. Use quality extract for the best flavor.
- Spices: cinnamon, nutmeg, ginger, cardamom and salt enhance the flavors and balance the sweetness of the pear crisp. Cardamom boasts a complex flavor that’s citrusy, minty, spicy, and herbal and is a nice compliment to both cinnamon and nutmeg and pairs fantastically with pears. If you don’t keep it on hand, however, you can skip it.
PEAR CRISP TOPPING:
- Flour: helps bind the topping ingredients together and give it a crumbly texture. I use all-purpose flour but any flour will work great, including gluten free flour.
- Old fashioned oats: add a fabulous slightly chewy texture. If you only have quick-cooking oats (NOT instant oats), you may use those.
- Pecans: finely chopped for a tantalizing crunch.
- Brown sugar: adds sweetness and a hint of molasses. It also adds moisture to the topping. Use light brown sugar for best results so the molasses flavor isn’t overpowering.
- Granulated sugar: adds additional sweetness and balances the brown sugar.
- Butter: helps bind the ingredients together and helps give it the crumbly texture. Use unsalted butter so we can control the salt. If you only have salted butter, omit the salt in the topping.
- Salt: enhances the flavor.
- Cinnamon: because even the topping needs to be seasoned!

HOW TO MAKE PEAR CRISP
Pear crisp is a beloved dessert not only because its DELICOUS but because it’s so easy to make! Here’s how:
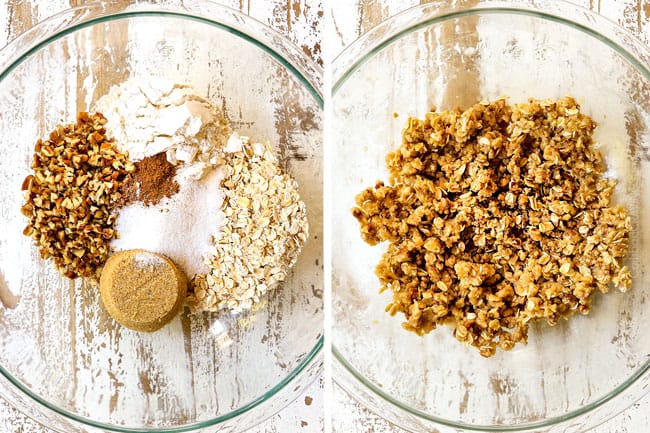
STEP 1: MAKE PEAR CRISP TOPPING
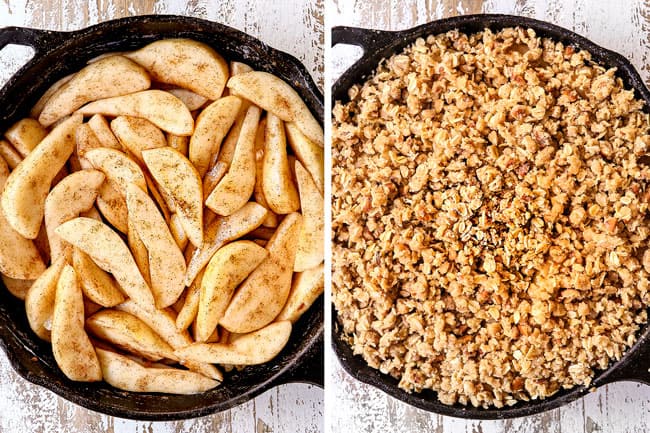
The topping is made in one bowl in just a couple minutes – chopping the pecans actually takes the most time which can be done in the food processor. To make the topping, add flour, oats, pecans, brown sugar, granulated sugar, cinnamon and salt to a large bowl and stir until combined. Pour in the melted butter and stir with a spatula to combine then get in there with your hands and use your fingers to work the topping until the mixture resembles crumbly wet sand.
STEP 2: MAKE THE FILLING
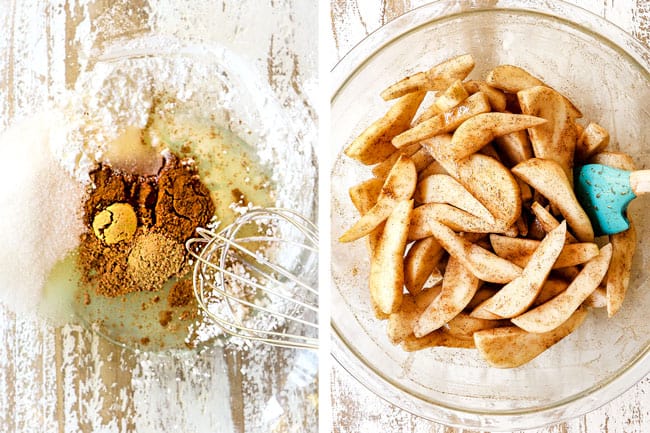
Whisk the granulated sugar, lemon juice, cornstarch, vanilla extract, cinnamon, nutmeg, ginger, cardamom, salt together in large bowl. The mixture will be thick but will loosen as it mixes with the pears. Add the pears as you slice them. Coating the pears in the sugar mixture draws out the sweet juices and eliminates the need for the extra water in the recipe.
STEP 3: ASSEMBLE
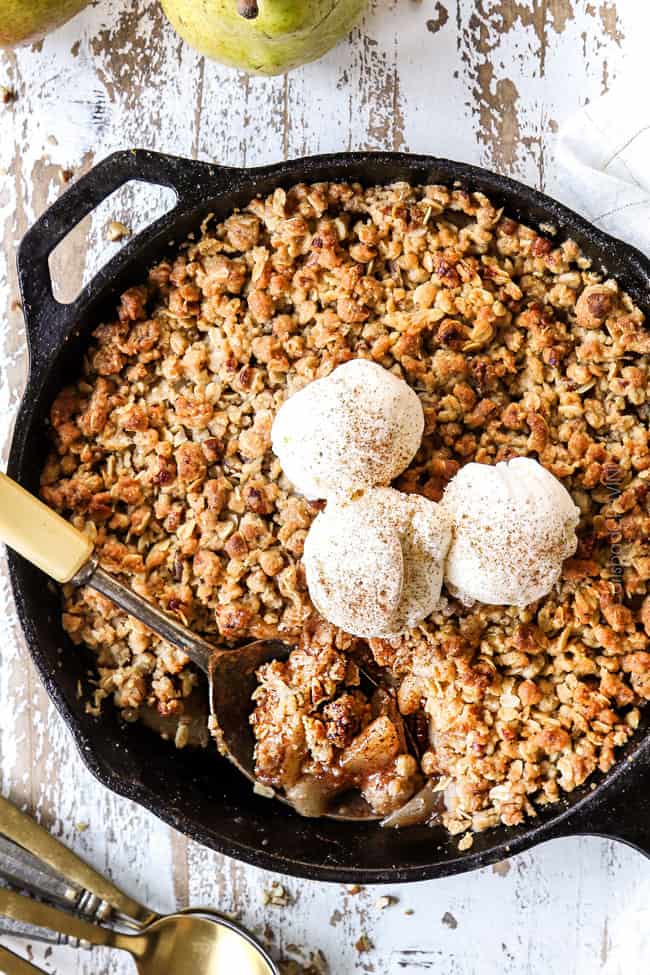
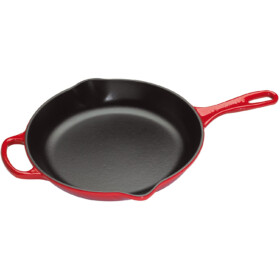
Transfer the pear mixture to a buttered 8×8 pan or a 9-inch cast iron skillet. Evenly sprinkle the with topping, crumbling the mixture into smaller pieces as you go.
STEP 4: BAKE
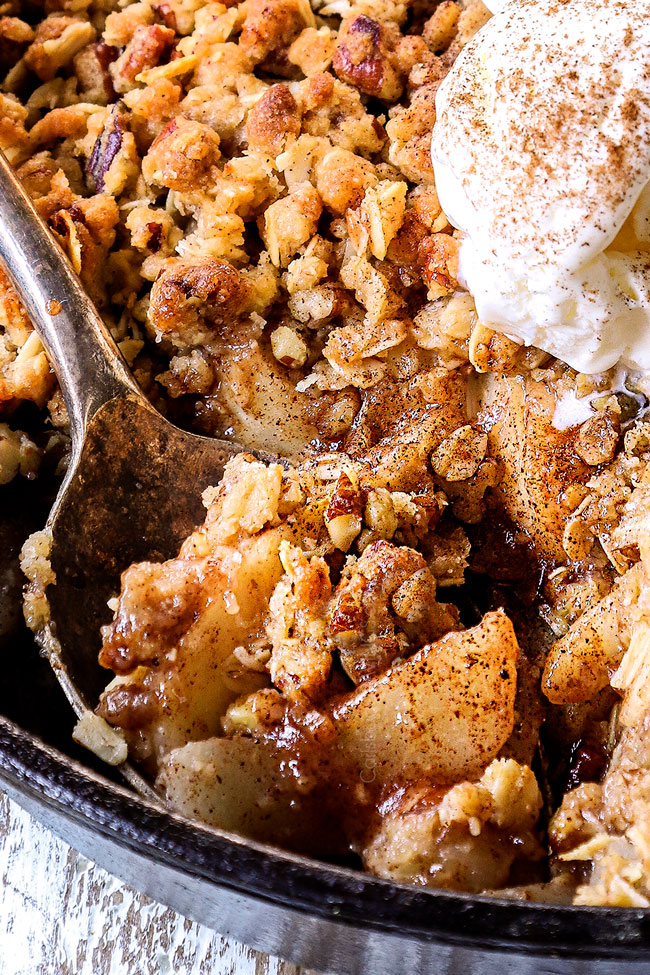
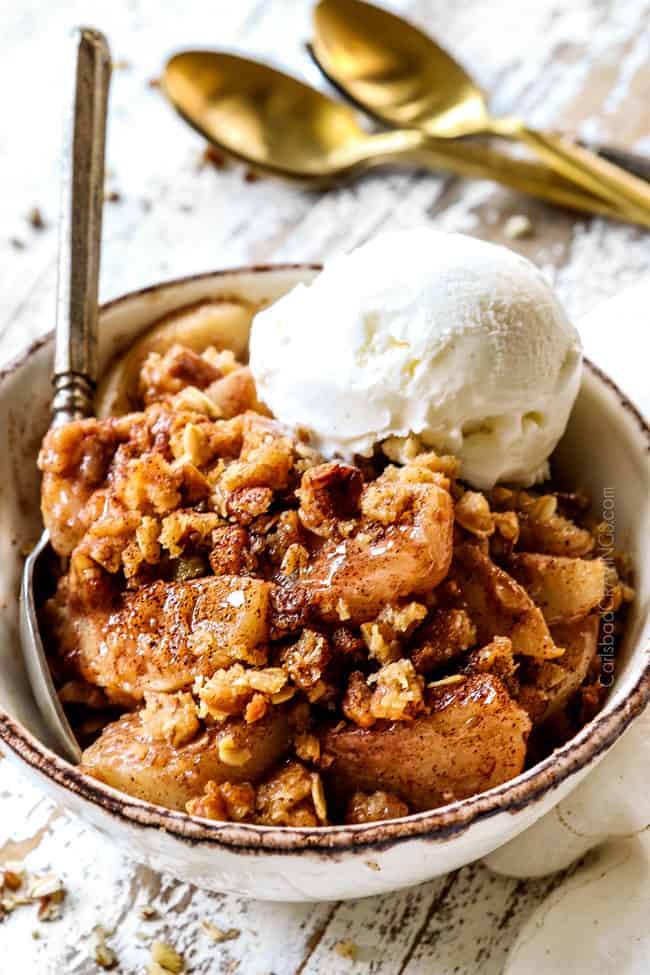
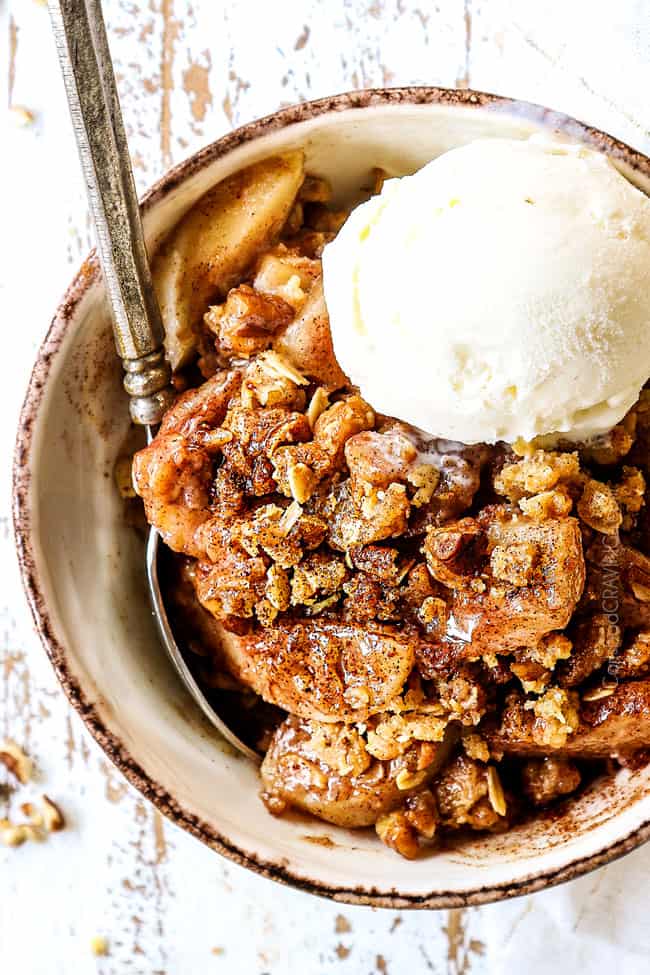
Bake at 425 degrees F until the fruit is bubbling around the edges and topping is golden brown, about 30 minutes, rotating the pan halfway through baking. Transfer baking dish to wire rack and let cool until warm, about 15 minutes. This will give the sauce a chance to thicken a little more as it cools. Serve warm with vanilla ice cream.
Easy Pear Crisp Recipe Tips
- Use firm yet ripe Bartlett pears. Bartlett pears create perfectly tender filling without becoming mushy. They will also prevent the filling from becoming watery. The pears should barely give when squeezed.
- Stall pear ripening. If your pears are ripening quicker than you would like, place them in the refrigerator to delay the process. I also suggest purchasing a couple extra pears just in case some ripen more quickly than others.
- Room temperature pears. If you’ve been keeping your pears in the refrigerator, make sure you take them out a couple hours before baking. Room temperature pears will bake more evenly.
- Kitchen gadgets. Peeling and slicing the pears takes the majority of prep time in this pear crisp recipe, but if you have an apple peeler and corer and/or food processor (with attachment) for slicing the pears, your prep time can be cut in half.
- Slice pears on the thick side. Slice the pears 1/2-inch thick – not any thinner – so they become tender not mushy, in the allotted baking time (the time it takes for the topping to become crunchy).
- Slice pears uniformly. Uniform sliced pears ensure you beautifully tender pears throughout without some crunchy ones mixed in.
- Use real butter. If you want the BEST Pear crisp recipe, you must use real butter, margarine won’t have the same effect.
- Thoroughly combine topping. I have found the best way to mix the butter into the topping is to start with a spatula then use my hands to make sure all of the flour, pecans and oats are covered with the butter.
- Make topping first and refrigerate. If you wonder why your toppings haven’t gotten as crispy as you like them on previous desserts, it’s likely your topping was not chilled. For the crispiest topping, the butter should be very cold before going into the oven so always make your topping FIRST and refrigerate.
- Prevent burnt topping. I never have the problem of a burnt topping –but if it’s your first time making this pear crisp recipe, keep an eye on it to be safe. If the topping starts to brown too quickly, then lay a piece of foil over the top and bake on.
- Serve warm. This pear crisp recipe is exponentially better served warmed!
PEAR CRISP RECIPE VARIATIONS:
My favorite easy pear crisp is this classic recipe – but that doesn’t mean you can’t mix it up! Here are some pear crisp recipe variation ideas:
- Add cranberries. Cranberries and pears are heavenly together! To make, replace 1 ½ cups sliced pears with 1 ½ cup fresh cranberries. Don’t use frozen cranberries because they will release too much moisture.
- Add caramel. You can easily make this caramel pear crisp by drizzling with homemade caramel sauce or coconut caramel sauce would be fantastic.
- Add coconut. You can add sweetened coconut to either the filling, the topping – or both!
- Make gluten-free pear crisp. Swap the flour in the topping with gluten free flour and all the rest of the ingredients are gluten free BUT many oats are processed in facilities that also process wheat, so make sure you purchase certified gluten free oats.
- Make vegan pear crisp. Replace the butter with vegan butter in the topping.
- All nuts. If oats aren’t your thing, omit the oats, and increase the pecans to ¾ cup.
HOW TO SERVE PEAR CRISP
The BEST pear crisp recipe is served warm, fresh from the oven. It becomes exponentially more delicious with a big, cold scoop of vanilla ice cream. The cold, silky smooth ice cream mingled with the warm, sweet, crunchy cinnamon crisp is heavenly!
HOW TO STORE PEAR CRISP
- Pear crisp should be allowed to cool completely at room temperature.
- Once cool, cover tightly with plastic wrap or foil and refrigerate for 3-4 days. I don’t suggest transferring the crisp to another container, because inevitably some of the topping mixes with the filling which means no more crunchy crisp.
HOW LONG IS PEAR CRISP RECIPE GOOD FOR?
Pear crisp is the very best fresh from the oven because the crisp is the crunchiest. You can certainly enjoy leftover Pear crisp, but the topping will start to soften. Refrigerated pear crisp is good for 3-4 days.
HOW TO REHEAT PEAR CRISP
- Microwave: The microwave is convenient for smaller portions but the topping won’t get as crispy as the oven – just full disclosure – but still delish. To microwave, transfer a portion of pear crisp to a microwave safe plate. Microwave for 30 second intervals until warmed through.
- Oven: Reheat the baking dish at 350 degrees F for 20 minutes or until heated though. You can also transfer smaller portions to a smaller baking dish or cast-iron skillet to reheat.
HOW TO MAKE AHEAD
You can completely assemble the pear crisp ahead of time according to recipe directions, cover with foil, refrigerate until ready to bake. Bake according to directions, adding an extra 5-10 minutes.
HOW TO FREEZE PEAR CRISP
Both unbaked and baked pear crisps freeze well but if you have the choice, I would reserve freezing baked pear crisp for leftovers. If you are purposefully making pear crisp to freeze, then do not bake first, so the pears and topping only bake once:
- If baked, let the crisp cool completely.
- Wrap the pear crisp with a layer of plastic wrap followed by a layer of foil.
- Freeze for up to 3 months.
- When ready to use, thaw overnight in the refrigerator.
- For pre-baked, warm crisp in the oven at 350 degrees F for 20 minutes or until heated through.
- For unbaked, bake at 425 degrees F for 30 minutes or until hot and bubbly around the edges.
Want to try this Pear Crisp RECIPE?
Pin it to your Dessert, holiday or Thanksgiving Board to SAVE for later!
Find me on Pinterest for more great recipes! I am always pinning :)!
©Carlsbad Cravings by CarlsbadCravings.com


Pear Crisp Recipe (with Oats and Fresh Pears)
Save This Recipe To Your Recipe Box
You can now create an account on our site and save your favorite recipes all in one place!
Ingredients
For the filling:
- 3 pounds ripe but firm Bartlett pears peeled, sliced into 1/2-inch slices
- 1/4 cup granulated sugar
- 1 tablespoon lemon juice
- 1 tablespoon cornstarch
- 1 teaspoon vanilla extract
- 1 1/2 teaspoons cinnamon
- 1/2 teaspoon nutmeg
- 1/4 tsp EACH ginger, cardamom, salt
For the topping:
- 1/2 cup all-purpose flour
- 1/2 cup old fashioned rolled oats
- 1/2 finely chopped pecans
- 1/3 cup packed brown sugar
- 3 tablespoons granulated sugar
- 1/4 teaspoon cinnamon
- 1/8 tsp EACH nutmeg, salt
- 8 tablespoons unsalted butter melted
Instructions
- Preheat oven to 425 degrees F. Grease an 8×8 baking pan or 9-inch cast-iron skillet with softened butter; set aside.
- To make the topping: Add all of the topping ingredients to a large bowl except the butter and stir until combined. Pour in the melted butter and stir with a spatula to combine then use your hands to combine until the mixture resembles crumbly wet sand. Cover and transfer to the refrigerator while you prep the filling.
- To make the filling: Whisk all of the filling ingredients together in a large bowl except the pears. Add the pears and stir to combine as you slice each pear. Stir all the pears until evenly combined in the sugar mixture.
- To assemble: Transfer filling to prepared baking dish. Sprinkle topping evenly over the filling, breaking up any large chunks.
- To bake: Bake at 425 degrees F until fruit is bubbling around the edges and topping is golden brown, about 30 minutes, rotating the pan halfway through baking. Transfer baking dish to wire rack and let cool until warm, about 15 minutes. Serve warm with vanilla ice cream.
Notes
Recipe Cooking Tips
- Use firm yet ripe Bartlett pears: You’ll want to use pears that are the cusp of their ripeness, meaning they give ever so slightly when squeezed. If you’re pears are too ripe, your filling will turn to mush or be watery.
- Stall pear ripening. If your pears are ripening quicker than you would like, place them in the refrigerator to delay the process. I also suggest purchasing a couple extra pears just in case some ripen more quickly than others.
- Room temperature pears. If you’ve been keeping your pears in the refrigerator, make sure you take them out a couple hours before baking. Room temperature pears will bake more evenly.
- Cardamon: Boasts a complex flavor that’s citrusy, minty, spicy, and herbal and is a nice compliment to both cinnamon and nutmeg and pairs fantastically with pears. If you don’t keep it on hand, however, you can skip it.
- Old fashioned oats: If you only have quick-cooking oats (NOT instant oats), you may use those.
- Butter: Use unsalted butter so we can control the salt. If you only have salted butter, omit the salt in the topping.
- Thoroughly combine topping. I have found the best way to mix the butter into the topping is to start with a spatula then use hands get in there with your fingers to work the topping to make sure all of the flour, pecans and oats are covered with the butter.
- Make topping first and refrigerate. If you wonder why your toppings haven’t gotten as crispy as you like them on previous desserts, it’s likely your topping was not chilled. For the crispiest topping, the butter should be very cold before going into the oven so always make your topping FIRST and refrigerate.
- Prevent burnt topping. I never have the problem of a burnt topping –but if it’s your first time making this pear crisp recipe, keep an eye on it to be safe. If the topping starts to brown too quickly, then lay a piece of foil over the top and bake on.
- Serve warm. This pear crisp recipe is exponentially better served warmed!
HOW TO STORE and reheat
- Pear crisp should be allowed to cool completely at room temperature.
- Once cool, cover tightly with plastic wrap or foil and refrigerate for 3-4 days. I don’t suggest transferring the crisp to another container, because inevitably some of the topping mixes with the filling which means no more crunchy crisp.
- To reheat in the microwave: The microwave is convenient for smaller portions but the topping won’t get as crispy as the oven – just full disclosure – but still delish. To microwave, transfer a portion of pear crisp to a microwave safe plate. Microwave for 30 second intervals until warmed through.
- To reheat in the oven: Reheat the baking dish at 350 degrees F for 20 minutes or until heated though. You can also transfer smaller portions to a smaller baking dish or cast-iron skillet to reheat.
HOW TO MAKE AHEAD
You can completely assemble the pear crisp ahead of time according to recipe directions, cover with foil, refrigerate until ready to bake. Bake according to directions, adding an extra 5-10 minutes.HOW TO FREEZE PEAR CRISP
Both unbaked and baked pear crisps freeze well but if you have the choice, I would reserve freezing baked pear crisp for leftovers. If you are purposefully making pear crisp to freeze, then do not bake first, so the pears and topping only bake once:- If baked, let the crisp cool completely.
- Wrap the pear crisp with a layer of plastic wrap followed by a layer of foil.
- Freeze for up to 3 months.
- When ready to use, thaw overnight in the refrigerator.
- For pre-baked, warm crisp in the oven at 350 degrees F for 20 minutes or until heated through.
- For unbaked, bake at 425 degrees F for 30 minutes or until hot and bubbly around the edges.
Want To Make This Recipe?

Did You Make This Recipe?
Tag @CarlsbadCravings and Use #CarlsbadCravngs
Leave a Review, I Always Love Hearing From You!
Carlsbad Cravings© Original


Sheila says
I made this exactly as written and it was sooooo good! I love all your recipes. You should make a cookbook!
Jen says
Thank you so much Sheila, I’m so happy it was a hit! No plans for a cookbook, but thank you for making my recipe!
Lisa says
How long can this crisp be refrigerated before you need to bake it? For instance if I make this on Sunday would I be able to bake it on Thursday? Or should I freeze it? Should I make the pears first and then make the topping the night before?. What are your thoughts?
Jen says
You can completely assemble the pear crisp ahead of time and freeze it unbaked! Put it in the fridge the night before to unthaw and then bake at 425 degrees F for 30 minutes or until hot and bubbly around the edges. Hope you enjoy!
Jen says
Hi Sheila,
It’s finally happening! Thank you so much for your previous interest in a cookbook xo
I’m excited to inform you it’s now available for presale! Copy and paste the following into your browser: https://carlsbadcravings.com/home/cookbook/ OR Google “Carlsbad Cravings Cookbook”:
Happy Cooking!
Cassie says
Can you make the crisp the day before and then add the topping right before baking?
Jen says
Yes!
Courtney says
just popped this in the oven , next up your Pear Pie recipe for Thanksgiving
Jen says
Yay! I hope you love them both, Happy Thanksgiving!
Jeanne Barrett says
Thus was an amazing crisp! Spices are perfect. Topping is the best I’ve ever made.
Jen says
I love hearing that Jeanne, thank you so much!
Linda says
Looking forward to trying your recipe!
I have a Bartlett pear tree so I would like to freeze some unbaked crisps. Whenever I have done this in the past I’ve found that raw frozen pears get very watery. Does it help to bake them in a completely frozen state?
Jen says
Hi Linda, here is an interesting article about baking with frozen fruit: https://www.seriouseats.com/how-to-bake-a-pie-with-frozen-fruit
“The frozen fruit will deflate and release its water content as it thaws, so it will seem juicier. But’s the same amount of liquid you’d find in fresh fruit; it just shows up a lot earlier in the process.”
So, in theory, both ways will work, just be prepare to bake the crisp an additional 15 minutes or so if using frozen pears which may require you to cover the top to prevent excessive browning. Good luck, please let me know how it goes!
NANCY says
I made this last night. I had 3 lbs of small pears and they were very ripe so I ended up adding 2 small granny smith apple diced small. Otherwise I made it exactly as written. It turned out so yummy it’s actually gone already. Thanks for a great recipe.
Jen says
That’s what I like to hear, thank you so much Nancy! Love the addition of apples too!
Monica Susan Contois says
I made this delicious Pear Crisp. I didn’t have the nuts on hand but all the same, yummy.
Jen says
I’m so pleased it was a hit, thanks so much!
LornaRN says
WOW! This crisp is fantastic!! I served it this evening to my neighbors and the guests told me it was the best crisp they have ever had and I agree!! They told me this at least 4 times during our visit and again as they were leaving!
I made the crisp exactly as written. Unfortunately, my 8 pears were only 2 pounds and I had already made the topping and sauce. I mixed the pears into the sauce and when I put them in the pan, I did not put the extra “sauce” in, just what was on the apples and a bit that stuck on the spoon. I used a smaller pan and cooked for 20 minutes. It was perfect. Served warm with vanilla ice cream. Delicious!
This is now in my “A List of Favorite Recipes” file on Pinterest. I may try it with apples sometime as I LOVE the warm, fall spices. Thank you!!
Jen says
Thank you so much for the ultimate complement of the “best crisp.” Love that you make it with apples as well!
Pat says
Can you freeze in small ram Ike a?
Jen says
yes!
Lynn says
I got a bag of pears in the produce clearance section & decided to try someyhing different fir dessert. I found your recipe on Pinterest; I did not have cardamom, but had everything else, so I made it. I served it warm with French vanilla ice cream. It was delicious and a big hit!! It took a bit longer to prepare than I thought, but so worth it!! My pears were a bit ripe (hence the clearance bag), but I just cut them a little thicker, and they were fine. I will definitely make this recipe again!! Thanks!! Lynn
Jen says
Thanks for taking the time to review this pear crisp Lynn, I’m so pleased it was a hit!
Anna says
I just put this recipe in the oven and can’t wait to taste it! My dad gave me a 6lb can of pears randomly so I’m curious how it will be with canned instead of fresh. I’ve made these and 3 batches of pear oat muffins and finely finished the can lol
Jen says
Thanks for trying this recipe, Anna, I’m excited to hear how it turned out! What a yummy use for extra pears! 🙂
Cindy Vanderzalm says
WOWZERS!!! This was so good! I loved the addition of the cardamom, but ½ the nutmeg (personal preference). Thank you so much.
Jen says
Thank you for your review, Cindy! I am so happy you loved this recipe and the addition of the cardamom!
Rinki says
The recipe is a sure winner. I made it exactly followed the recipe and it worked wonders so delicious n crunchy in every bite. Thanks for sharing. From now on this will be my go to for peach crisp.
Jen says
I’m so happy to hear that you’ve found a go-to recipe!
Lisa says
Delicious and easy! I had a bunch of ripening pears and wanted to use them when I stumbled upon this recipe. Had everything in my pantry already too! I think my pears were a little more ripe than recommended, but it was still so good – was just a little more liquidy.
Jen says
Yum! I’m so glad you loved it!
Ashley says
Do you think I could use pumpkin spice seasoning as a sub for the spices if that’s what I have on hand?
Jen says
Yes, that should work, enjoy!
Gina says
Super delicious! I made it and it didn’t take much time at all! I didn’t have cardamom but it truly didn’t need!
Thank you
Gina
Jen says
Thank you Gina! I’m so glad you loved it!
Hannah says
So yummy! Is the filling able to be canned?
Jen says
I’ve never tried canning the filling. But so glad you loved it!
Nanette Spoehr says
Excellent! Thank you for sharing. Followed the directions exactly and it was delicious – said everyone!
Jen says
Thank you Nanette! I am so happy to hear everyone enjoyed it!
Gina B says
Absolutely delicious! I will definitely make this again.
Jen says
Thank you Gina! I’m thrilled to hear that this recipe will be a repeat for you!
Sharon says
20 that’s my rating it’s delicious thank u. Spice is spot on it was crispy and I’ll make this again..
I did have 2 only make half I’m single so that’s how I prepare almost everything.
Thank U 4 all your hard work and sending out the best of recipes.
Jen says
Yay Sharon! I am so thrilled to receive such a high review! Thank you for your sweet words! I am so happy to share my love of delicious food with you!