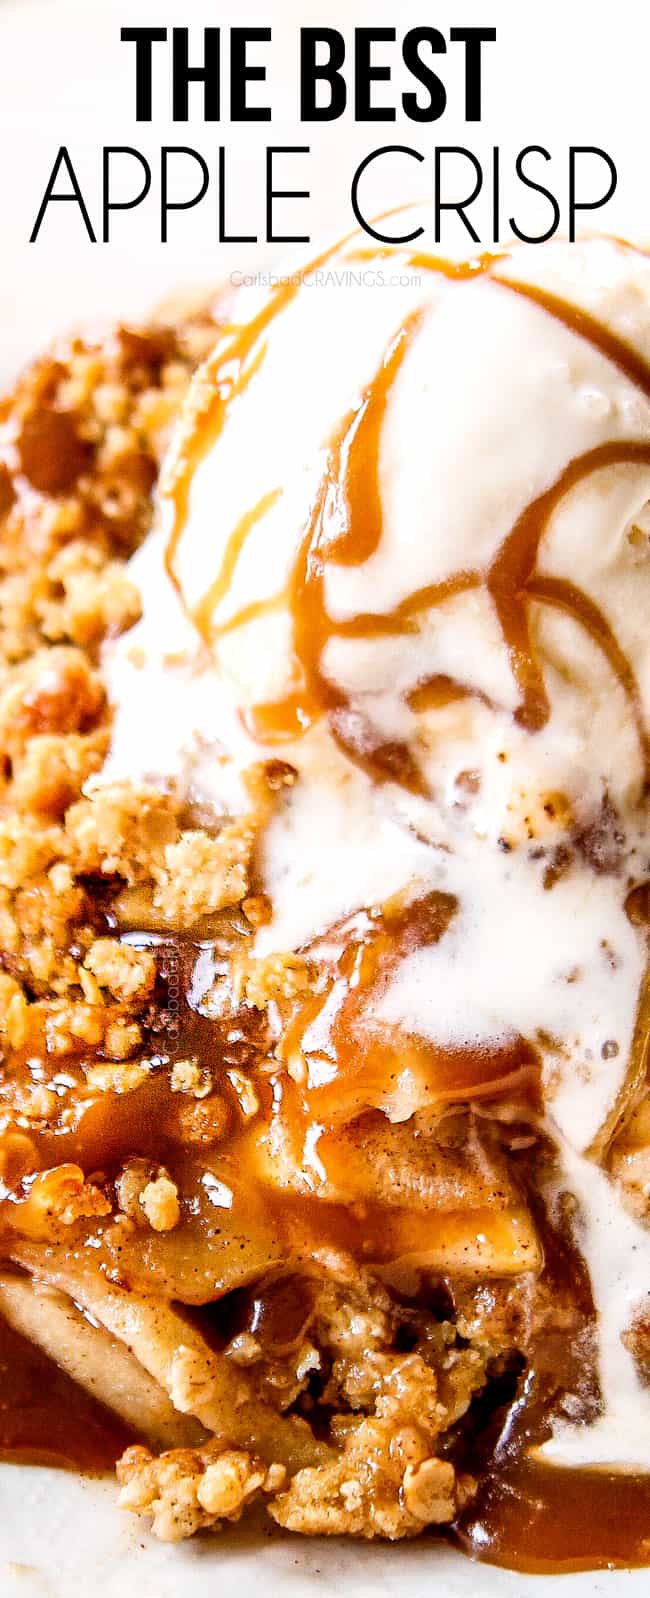
This Apple Crisp recipe is a true crowd-pleaser with readers saying, “Wow,” “Delicious,” and “Much better than the apple crisp I usually order in restaurants!”
This recipe is crunchy, buttery, full of brown sugar and perfectly tender cinnamon apples and is way easier than apple pie! Every detail of this recipe is crafted to perfection, from the fruit’s consistency to the golden, perfectly baked topping, so you can be confident this will be the best Apple Crisp you’ve ever tasted. Follow along for tips, and tricks including how to assemble ahead of time!
Topping updated 11/28/22
Watch How to Make Apple Crisp
PIN THIS RECIPE TO SAVE FOR LATER
The BEST Apple Crisp Recipe!
This easy recipe is my go-to Fall dessert because it’s crazy easy and crazy delicious. It’s the perfect warm comforting dessert that everyone from toddlers to grandparents adore – which means they adore you for making it.
I also love to make this recipe because it’s easier and less time consuming to make than Apple Pie—the lazy baker’s Apple Pie if you will—because it doesn’t require hours of chilling pie crust, hours of cooling the pie and can all be dumped into a 9×13 pan BUT it delivers all of the warm satisfying comfort of Apple Pie—WINNING!

Why You’ll Love this Recipe for Apple Crisp!
This is the best Apple Crisp recipe for multiple reasons. I know that’s a bold claim, but this recipe is boldly delicious. I’ve spent time refining every detail, from different cooking techniques, ingredients, ingredient ratios, etc., to bring you the ultimate tried-and-true recipe! Here’s why it’s the best:

Homemade Apple Crisp Ingredients
You probably have everything you need to make this Apple Crisp recipe in your pantry right now except for the apples! In addition to Granny Smith apples, you will need:
Apple crisp FILLING:
apple crisp TOPPING:
Let’s take a closer look at what you need to make this recipe (measurements in the printable recipe card at the bottom of the post):

Best Apples for Apple Crisp
It might sound extreme but Apple Crisps can be made or ruined by the type of apple you choose because they affect both the flavor and texture of the recipe—so it is crucial to use the right apples!
Granny Smith Apples are a sturdy baking apple that will bake up beautifully tender and not turn to applesauce. More importantly, Granny Smith apples are slightly tart which perfectly offsets the sweetness in both the filling and the crumb topping.
If you use a different apple, your Apple Crisp will be too sweet, not balanced or as flavorful.

How to Make Apple Crisp with Oats
Let’s take a closer look at how to make this recipe with step-by-step photos (full recipe in the printable recipe card at the bottom of the post):
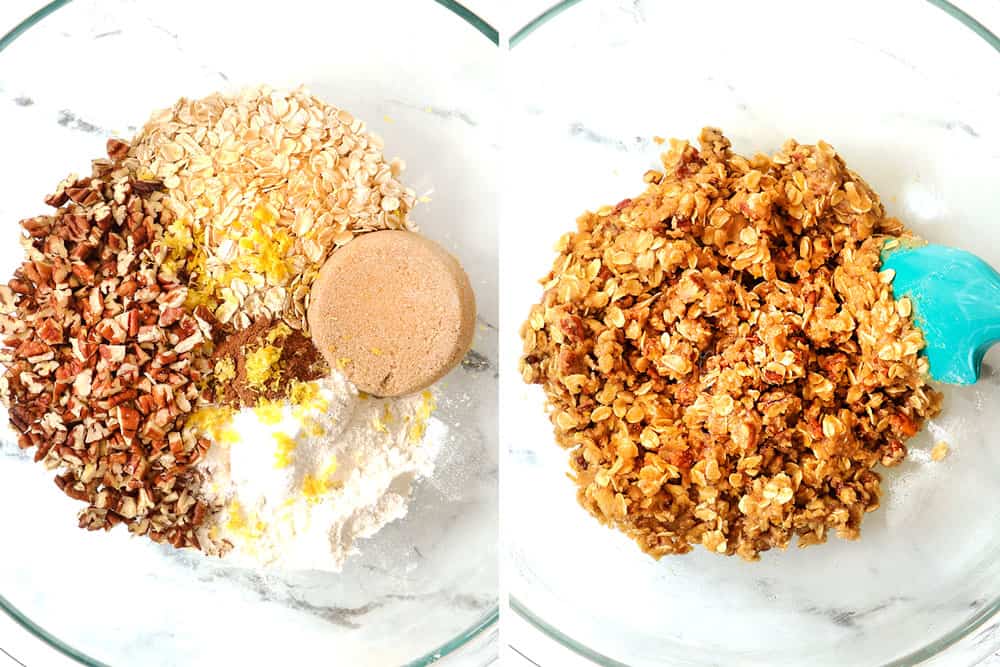
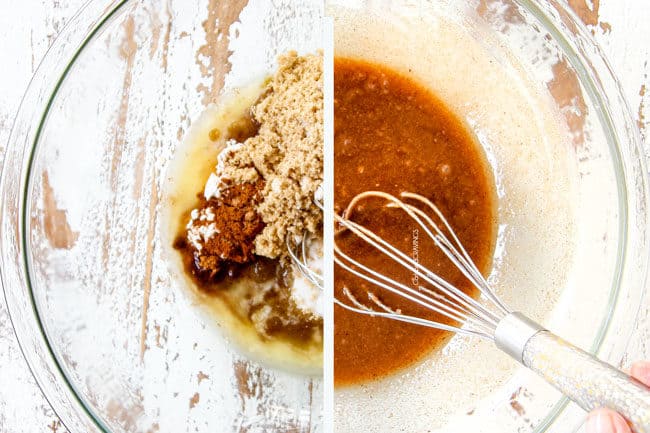
STEP 1: MAKE Apple CRISP TOPPING
The topping is made in one bowl in just a couple minutes – chopping the pecans actually takes the most time which can be done in the food processor.
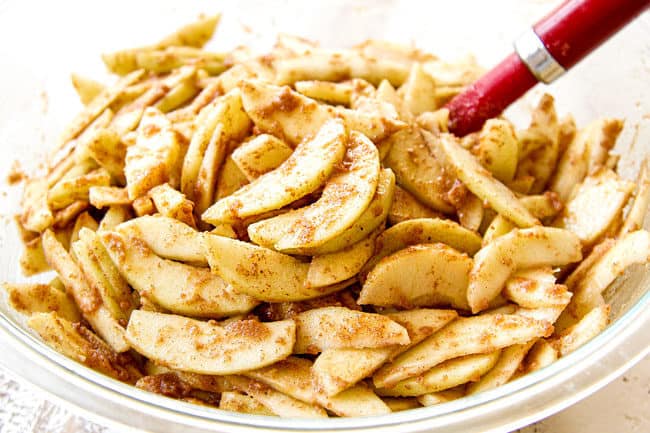
Step 2: Make the Filling
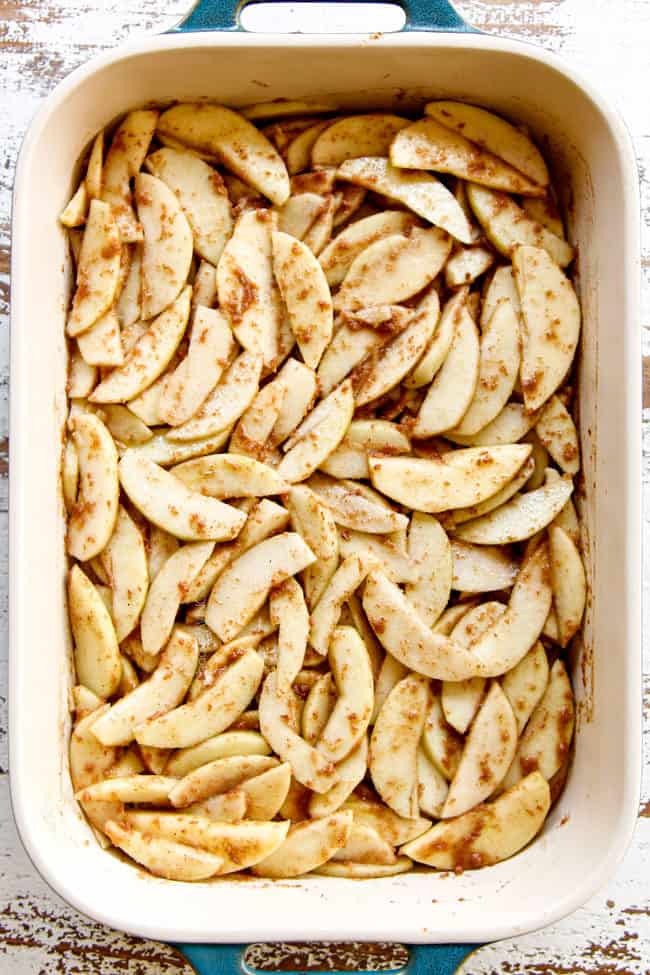
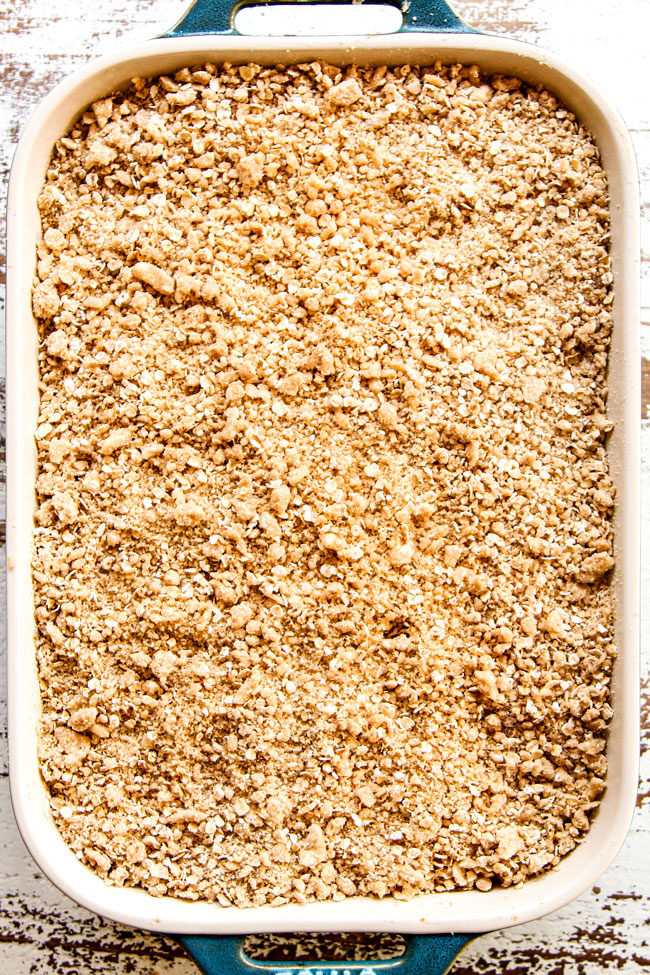
Step 3: Assemble
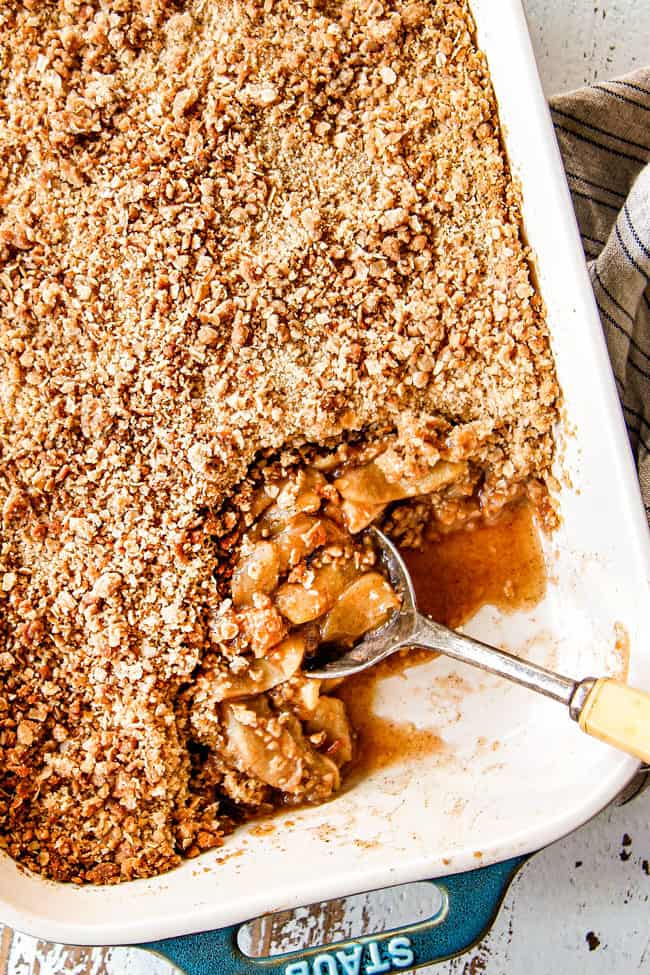
Step 4: Bake
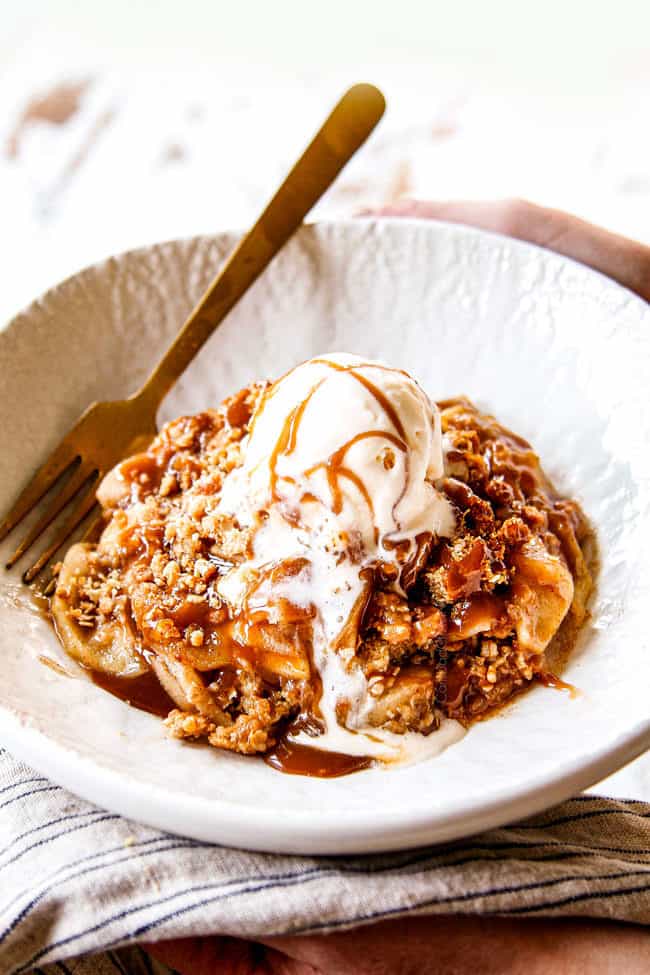
Step 5: Serve

Best Apple Crisp Recipe Tips

Best Apple Crisp Recipe Variations
My favorite easy Apple Crisp is this classic recipe – but that doesn’t mean you can’t mix it up! Here are some recipe variation ideas:

How to serve homemade APPLE CRISP
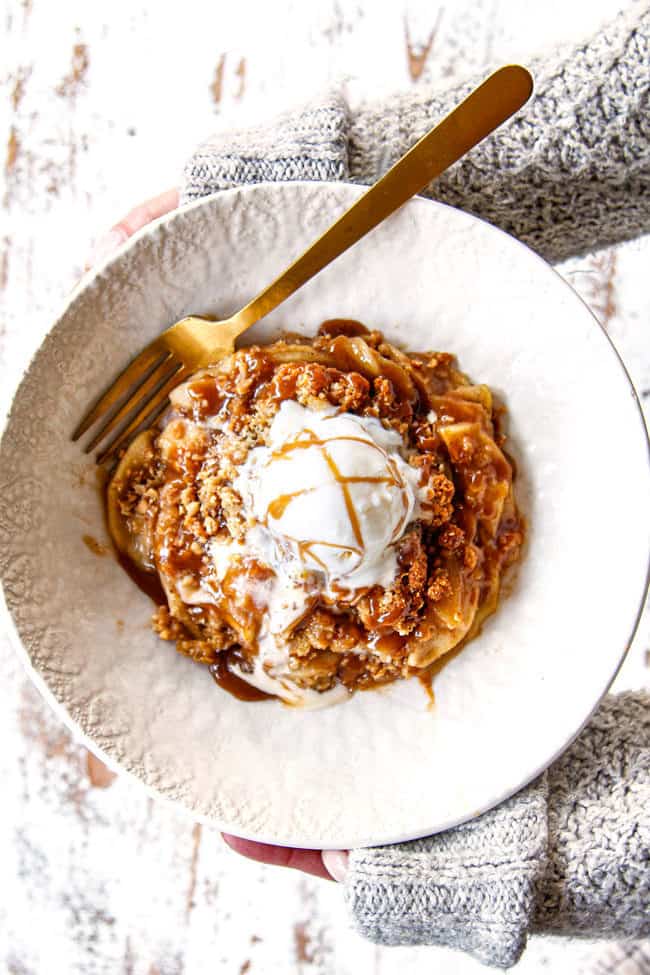
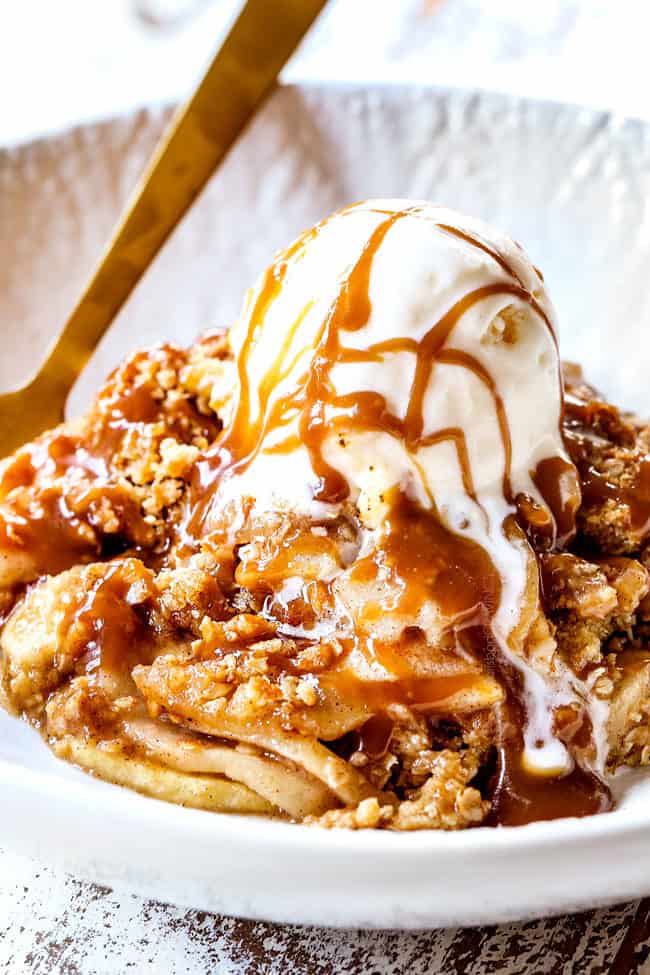
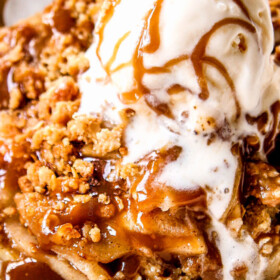
The BEST Apple Crisp recipe is served warm, fresh from the oven. It becomes exponentially more delicious with a big, cold scoop of vanilla ice cream. The cold, silky smooth ice cream mingled with the warm, sweet, crunchy cinnamon crisp is heavenly! I also love a drizzle of caramel sauce – because caramel makes everything better—but honestly this crisp doesn’t even need it!

HOW DO I STORE Apple Crisp?
Apple Crisp should be allowed to cool completely at room temperature. Once cool, cover tightly with plastic wrap and refrigerate or transfer to an airtight container. Refrigerated crisp is good for 3-4 days.

How long is Homemade Apple Crisp good for?
Apple Crisp is the very best fresh from the oven because the crisp is the crunchiest. You can certainly enjoy leftovers, but the topping will start to soften.

How to Reheat Apple Crisp with Oatmeal
• Microwave: The microwave is convenient for smaller portions but the topping won’t get as crispy as the oven – just full disclosure – but still delish. To microwave, transfer a portion to a microwave safe plate. Microwave for 30 second intervals until warmed through.
• Oven: Reheat the baking dish at 350 degrees F for 20 minutes or until heated though. You can also transfer smaller portions to a smaller baking dish or cast-iron skillet to reheat.
CAN YOU MAKE APPLE CRISP AHEAD OF TIME?
Yes and no. I do not suggest baking the Apple Crisp ahead of time for company because the topping will soften upon refrigeration. I also don’t suggest preparing and storing it completely assembled, unbaked, in the refrigerator because the topping will get soggy.
BUT you can prep both the filling and the topping ahead of time and keep them separate. Now, all you have to do is add the topping and bake!

To prep ahead:
1. Prepare filling according to recipe directions. Transfer to lightly greased
9×13 pan, cover tightly with plastic wrap and refrigerate for up to one day.
2. Prepare topping according to directions. Cover and refrigerate.
3. When ready to bake, sprinkle topping evenly over filling, breaking up clumps as needed.
4. Bake according to directions, adding an extra 5-10 minutes.
CAN YOU FREEZE APPLE CRISP?
Yes! Baked Apple Crisp freezes very well.
1. Bake Apple Crisp as directed.
2. Let crisp cool completely, then wrap it with a layer of plastic wrap • followed by a layer of foil.
3. Freeze for up to 3 months.
4. When ready to enjoy, thaw overnight in the refrigerator.
5. Warm crisp in the oven at 350 degrees F for 20 minutes or until heated through.
Homemade Apple Crisp Recipe FAQs
There are a couple Apple Crisp recipe floating around without peeled apples, but there is a reason 99% of recipes call for peeled apple! If you don’t peel your apples first, you’re left with an unpleasant tough texture as the skin doesn’t break down enough when baking.
We all know we love Apple Crisp, but how is it different than a crumble? The main difference comes down to the topping. In a crisp, the topping is made with flour, sugar, butter, oats and sometimes nuts that get sprinkled over the apples before baking. As the crisp bakes, the butter melts and mixes with the flour and sugar to create a crunchy, crumbly topping.
The topping of a crumble is very similar except it doesn’t include oats or nuts so it is more like a streusel. The topping of a crisp is coarser and crunchier and perfect for this Apple Crisp recipe!
WANT TO TRY THIS RECIPE?
PIN IT to your recipe BOARD TO SAVE FOR LATER!
FIND ME ON PINTEREST FOR MORE GREAT RECIPES! I AM ALWAYS PINNING :)!
©Carlsbad Cravings by CarlsbadCravings.com


Homemade Apple Crisp Recipe with Oats
Save This Recipe To Your Recipe Box
You can now create an account on our site and save your favorite recipes all in one place!
Ingredients
Filling
- 8 cups/3 pounds Granny Smith apples, peeled, thinly sliced (1/8”-1/4")
- 3/4 cup packed light brown sugar
- 4 tablespoons unsalted butter melted
- 2 tablespoons flour
- 1 tablespoon lemon juice
- 1 teaspoon vanilla extract
- 1 1/2 teaspoons ground cinnamon
- 1/2 teaspoon nutmeg
- 1/8 teaspoon salt
Topping
- 3/4 cup chopped pecans, optional (increase oats to 1 C if not using)
- 2/3 cup all-purpose flour
- 2/3 cup old-fashioned rolled oats (NOT quick oats*)
- 1/3 cup packed light brown sugar
- 3 tablespoons granulated sugar
- 1 teaspoon vanilla extract
- 1 teaspoon baking powder
- 1/2 teaspoon cinnamon
- 1/4 teaspoon salt
- 8 tablespoons unsalted butter, melted
Instructions
Topping:
- Add all of the topping ingredients to a large bowl EXCEPT the butter and stir until combined. Pour in the melted butter and stir with a spatula to combine then use your hands as needed to combine. Transfer to the refrigerator while you prep the filling (can be made a day ahead of time).
Filling:
- Whisk together all of the Filling ingredients in a large bowl except apples. Add apples; gently stir until apples are evenly coated. The mixture will be thick but will loosen as it mixes with the apples.
Assemble:
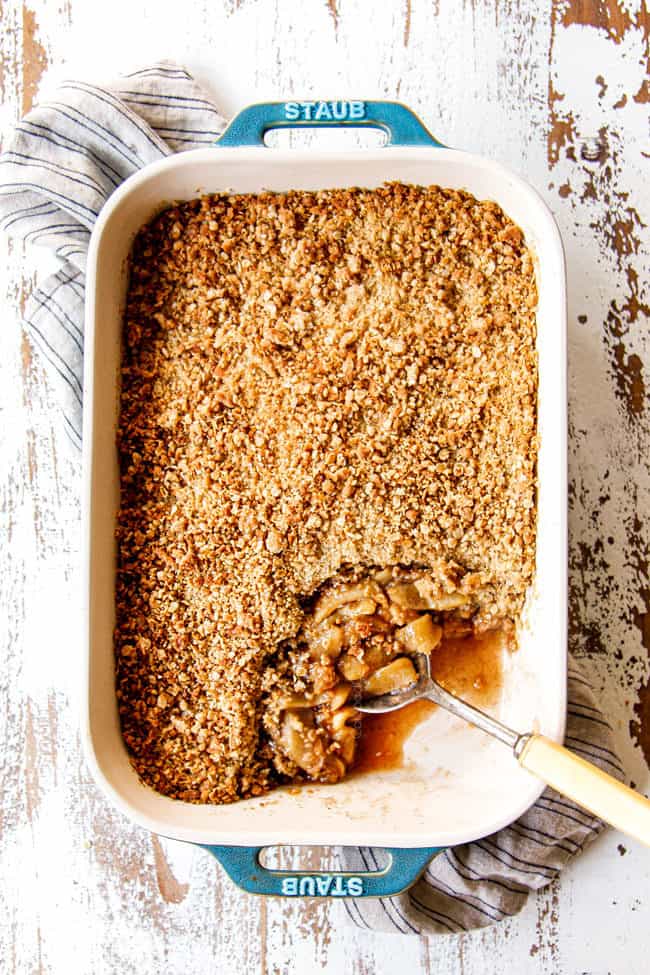
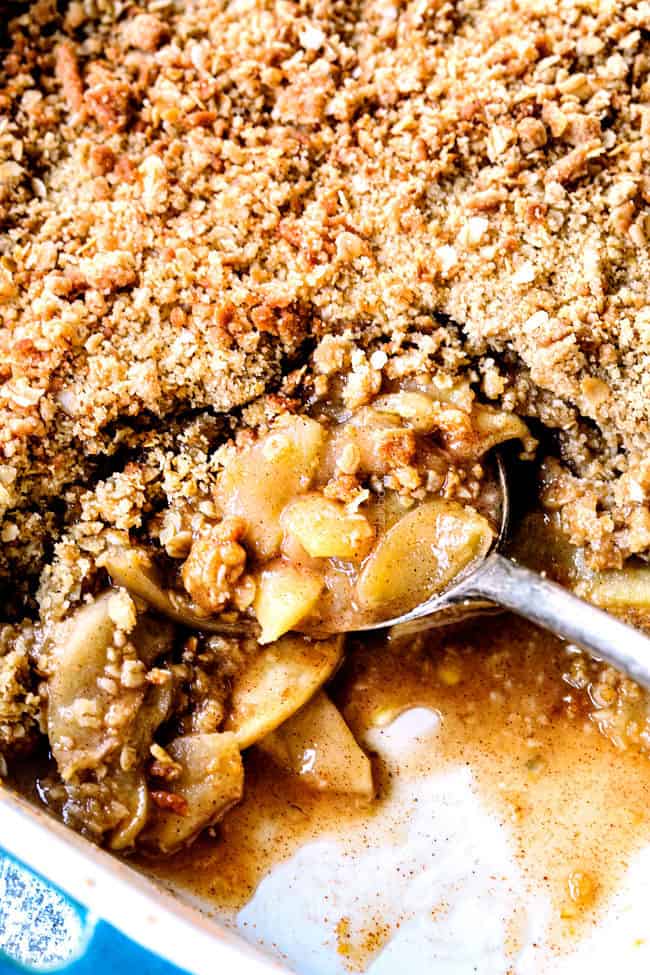
- Lightly butter a 9×13 baking dish. Transfer apple mixture to prepared baking dish and spread into an even layer. Sprinkle the topping over the filling, breaking up any large chunks (you still want some small chunks).
Bake:
- Bake uncovered at 350 degrees F for 40-50 minutes or until bubbly. For a more golden topping, move Apple Crisp to the top rack and broil for 30 seconds or so – don’t take your eyes off of it! After broiling, I like to scrape the top of the topping with a fork to loosen the crumble.
Serve
- Let Apple Crisp stand for 15 minutes before serving. Serve warm with vanilla ice cream and optional Caramel Sauce.
Video
Notes
Tips for best Apple Crisp recipe
- Use Granny Smith Apples. As previously discussed, Granny Smith Apples create the perfect tender apples without becoming mushy. Their hint of tartness also balances the sweet filling and topping so your Apple Crisp isn’t too sweet.
- Room temperature apples. If you’ve been keeping your apples in the refrigerator, make sure you take them out a couple hour before baking. Room temperature apples will bake more evenly.
- Kitchen gadgets. Peeling and slicing the apples take the majority of prep time in this Apple Crisp recipe but if you have an apple peeler and corer and/or food processor (with attachment) for slicing the apples, your prep time can be cut in half.
- Slice apples uniformly. Try and slice your apples about 1/8” but not any smaller. Uniform thinly sliced apples ensure you beautifully tender apples throughout without some crunchy ones mixed in. If you choose to slice your apples thicker, just make sure to keep them uniform size and increase the baking time.
- Use real butter. If you want the BEST Apple Crisp recipe, you must use real butter, margarine won’t have the same effect.
- Thoroughly cut in butter. You will want the topping mixture to look like small crumbs before you’re done cutting in the butter. A few bigger pieces are okay, but the smaller the crumbs, the more evenly distributed the butter and the crispier your topping will become.
- Use tools and your hands. I have found the best way to cut in butter is to start with a pastry cutter initially when the butter is still hard and then use my hands towards the end when the butter is soft because it’s faster and can make smaller crumbs.
- Make Topping First and Refrigerate. If you wonder why your toppings haven’t gotten as crispy as you like them on previous desserts, it’s likely your topping was not chilled. For the crispiest topping, the butter should be very cold before going into the oven so always make your topping FIRST and refrigerate.
- Use all the topping. It will seem like a lot of topping, but this is one of the best parts! In researching for this Apple Crisp recipe, I read comment after comment after comment on other sites that readers wish they would have doubled the topping – so I give you double the topping!
- Prevent burnt topping. I never have the problem of a burnt topping –but if it’s your first time making this Apple Crisp recipe, keep an eye on it to be safe. If the topping starts to brown too quickly, then lay a piece of foil over the top and bake on.
- Broil topping. For a more golden topping, move Apple Crisp to the top rack and broil for 30 seconds or so – don’t take your eyes off of it! After broiling, I like to scrape the top of the topping with a fork to loosen the crumble.
Storage
Apple Crisp is the very best fresh from the oven because the crisp is the crunchiest. You can certainly enjoy leftover Apple Crisp, but the topping will start to soften. To store:- Apple Crisp should be allowed to cool completely at room temperature.
- Once cool, cover tightly with plastic wrap and refrigerate or transfer to an airtight container.
- Refrigerated Apple Crisp is good for 3-4 days.
How to Reheat
- Microwave: The microwave is convenient for smaller portions but the topping won’t get as crispy as the oven – just full disclosure – but still delish. To microwave, transfer a portion of Apple Crisp to a microwave safe plate. Microwave for 30 second intervals until warmed through.
- Oven: Reheat the baking dish at 350 degrees F for 20 minutes or until heated though. You can also transfer smaller portions to a smaller baking dish or cast-iron skillet to reheat.
MAKE AHEAD
You can prep both the filling and the topping ahead of time and keep them separate; I don’t suggest completely assembly or the topping can become soggy/won’t get as crispy. Now, all you have to do is add the topping and bake!- Prepare filling according to recipe directions. Transfer to lightly greased 9×13 pan, cover tightly with plastic wrap and refrigerate for up to one day.
- Prepare topping according to directions. Cover and refrigerate.
- When ready to bake, sprinkle topping evenly over filling, breaking up clumps as needed.
- Bake according to directions, adding an extra 5-10 minutes.
How to FREEZE
Yes! Baked Apple Crisp freezes very well.- Bake Apple Crisp as directed.
- Let crisp cool completely, then wrap it with a layer of plastic wrap followed by a layer of foil.
- Freeze for up to 3 months.
- When ready to use, thaw overnight in the refrigerator.
- Warm crisp in the oven at 350 degrees F for 20 minutes or until heated through.
ORIGINAL TOPPING
If you made this recipe prior to 11/28/22 and would like the original topping, here it is (you will need to cut in the butter):Want To Make This Recipe?

Did You Make This Recipe?
Tag @CarlsbadCravings and Use #CarlsbadCravngs
Leave a Review, I Always Love Hearing From You!
Carlsbad Cravings© Original


Becca Skaggs says
Made this for a big family dinner tonight. Made it ahead and kept them separate. Turned out delicious! I put your caramel topping on top with vanilla ice cream and I loved it. Perfect topping amount! Thank you!
Jen says
You’re so welcome Becca! I’m so glad it worked well to make ahead separately and that it as a winner! The apple crisp sounds perfect with the caramel and ice cream!
Connie says
Could this recipe be cut in half? Your recipes are phenomenal everyone I try is full of flavor. Sometimes I just need a small dessert for the two of us
Jen says
Thanks Connie! Yes, you could absolutely half this recipe and use a 8×8 pan.
Christine Schneider says
this recipe looks awesome, I always use Granny Smiths for my pies. How many pounds of apples did you use? thank you!
Jen says
Hi Christine, it is about 3 pounds or 9 medium apples/7 large. Enjoy!
Boyd says
It looks like you have. Changed the recipe for the topping on the apple crisp recently. Is there anyway to get the recipe that was previously used?
Jen says
Absolutely! I will add it to the notes and leave it here:
1 2/3 cups quick-cooking oats
1 2/3 cups all-purpose flour
1 2/3 cups packed light brown sugar
1 1/4 teaspoon baking powder
1/2 teaspoon cinnamon
1/4 teaspoon salt
12 tablespoons unsalted butter chopped into ½” cubes
Grace says
Could this be made gluten free? Haven’t baked too much and was hoping I could sub the flour and oats and still use the same recipe.
Jen says
Hi Grace, I haven’t personally tried it, but I think gluten free 1 to 1 flour should work just fine. I would increase the GF flour to 1 cup if you omit the oats. Good luck!
Natalia says
Today is December 31, and your apple crisp was my dessert tonight. Wow, Jen! This apple crisp is much better than the apple crisp I usually order in restaurants. You are so talented!!! I absolutely love your recipes. Happy New Year.
Jen says
Thank you so much for the love! I’m so happy to hear you enjoyed it! Hope you are well!
Holly rice says
Hi! I was just wondering why you changed the topping recipe? Was the 1st topping recipe too sweet? I’m just trying to decide which one to go with. I love all of your recipes!
Jen says
Hi Holly, the the proportions are the same but I just reduced the overall amount. Enjoy!