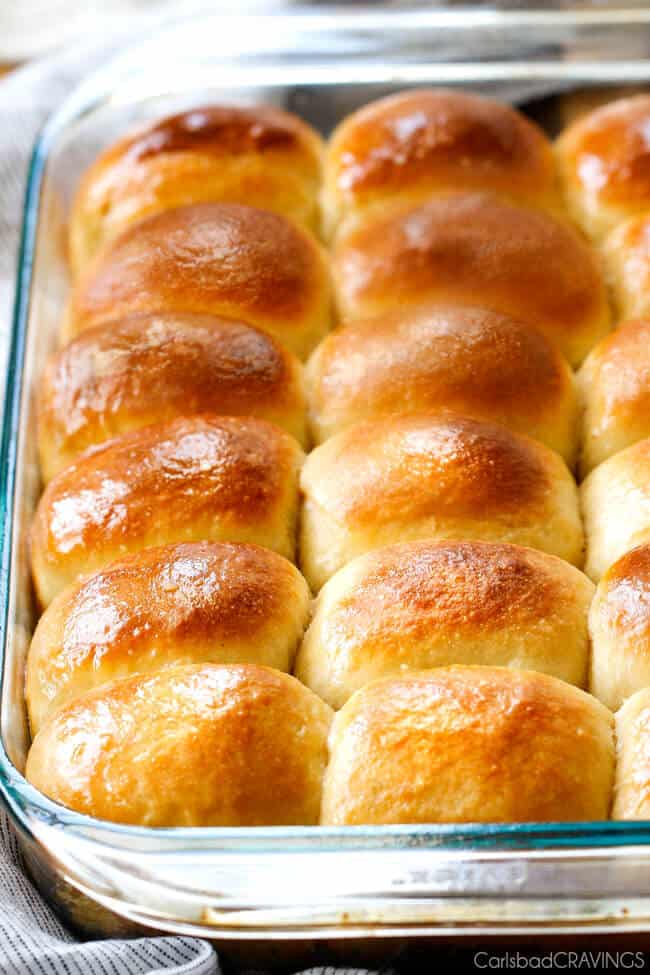
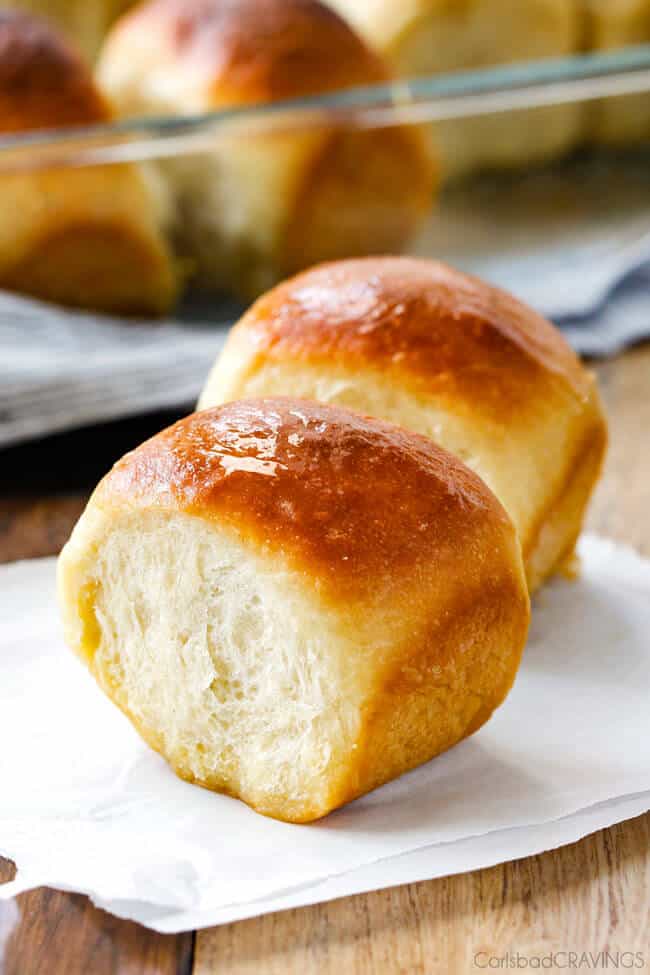
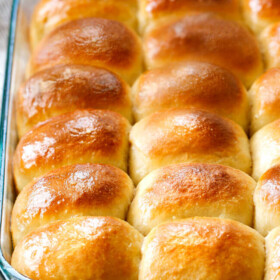
Sweet, buttery, homemade Hawaiian Sweet Rolls are super soft and fluffy infused with pineapple juice and slathered in butter! Their light tropical flavor makes these tender golden rolls ideal for sliders, potlucks and special occasions like Thanksgiving!

Whenever I think homemade sliders, I think Hawaiian Sweet Rolls.
I used to think King’s Hawaiian Sweet Rolls. Now I think these homemade big, beautiful Hawaiian Sweet Rolls. And I get giddy.

Hawaiian Sweet Rolls have always been one of my favorite rolls so to create the perfect homemade Hawaiian Sweet Rolls, I turned to the experts, Cooks Country, America’s Test Kitchen sister company. I slightly adapted their recipe to create what I think are better-than-store bought big, golden Hawaiian Sweet Rolls that are melt in your mouth addicting.
These rolls are infused with pineapple juice, honey, brown sugar, vanilla and splash of vinegar for a slightly sweet, slightly tangy tropical flavor. The pineapple juice lends these rolls its subtly fruity sweet flavor enhanced by the vanilla all balanced by the vinegar’s subtle sharpness. The dough itself is incredibly rich and more dense than traditional rolls while still incredibly tender and fluffy at the same time. The secret to nice fluffy rolls is letting them rise and double in size and this dough has two rises which also helps develop the tropical flavor.
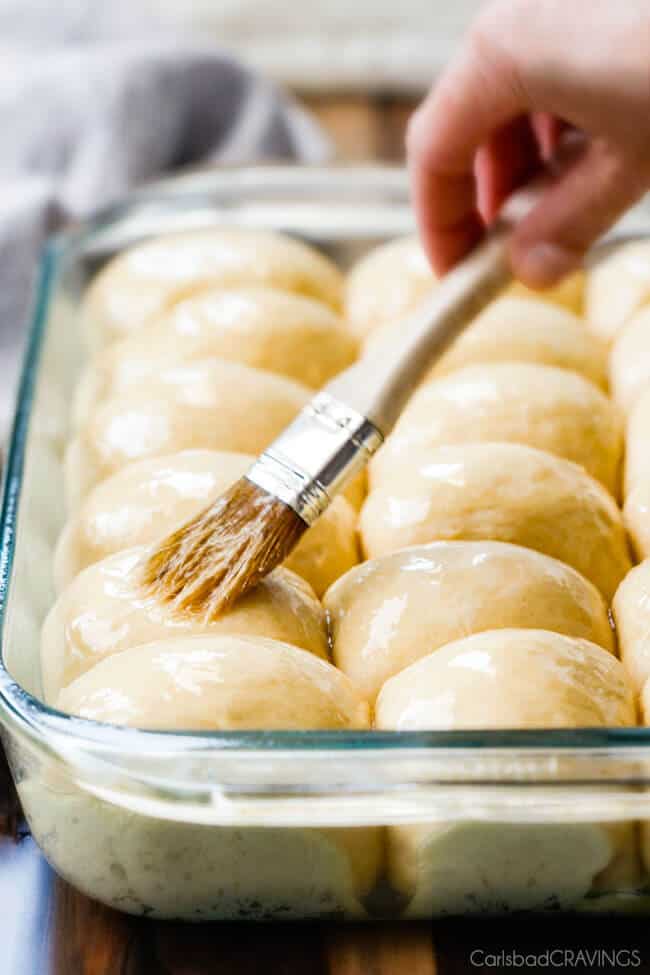
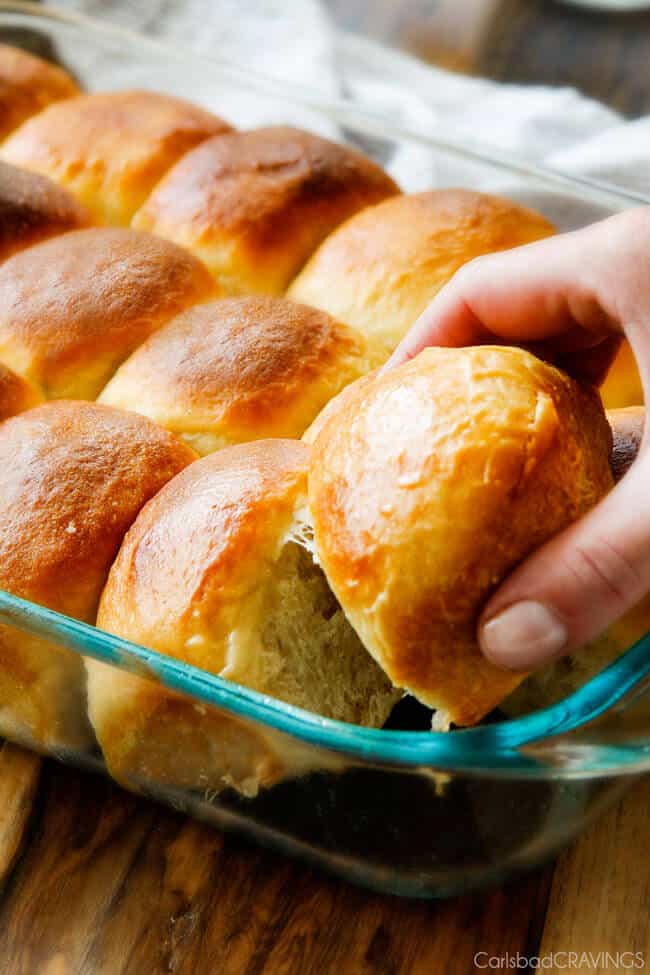
Brush the dough balls with butter before baking to help bake to golden perfection and infuse with flavor then brush the rolls again once baked to keep them soft and of course, infuse them with more buttery deliciousness.
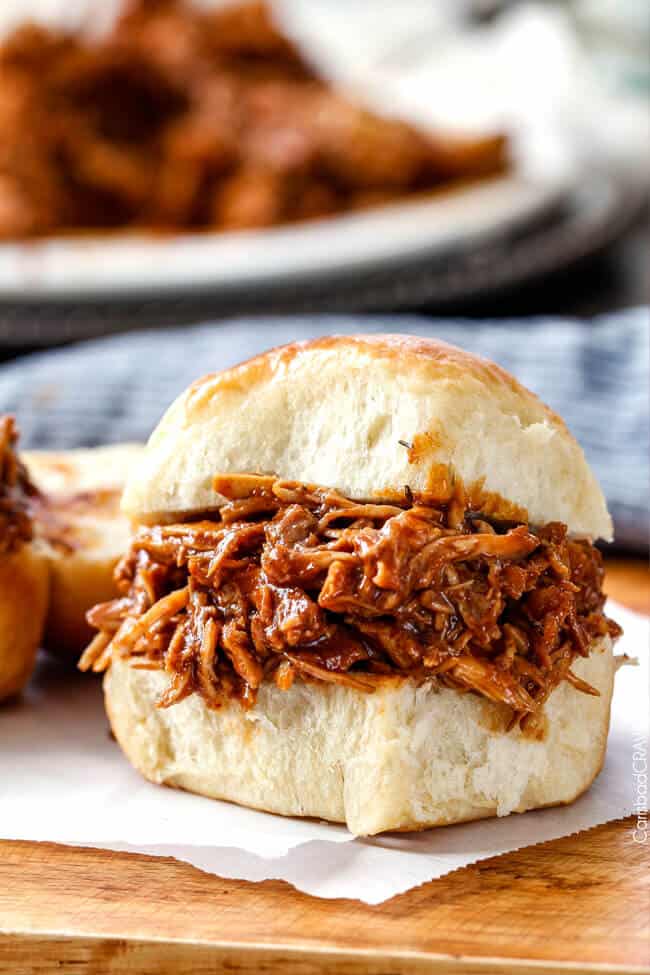
And dig into warm soft and tender sweet, buttery tropical rolls. Eat them plain, slather with more butter, douse in honey or pile high with Slow Cooker BBQ Chicken, Slow Cooker BBQ Pork or Slow Cooker Sloppy Joes. Because homemade is always better. way better.
Looking for more Bread and roll recipes?
- Perfect Soft and Fluffy Dinner Rolls
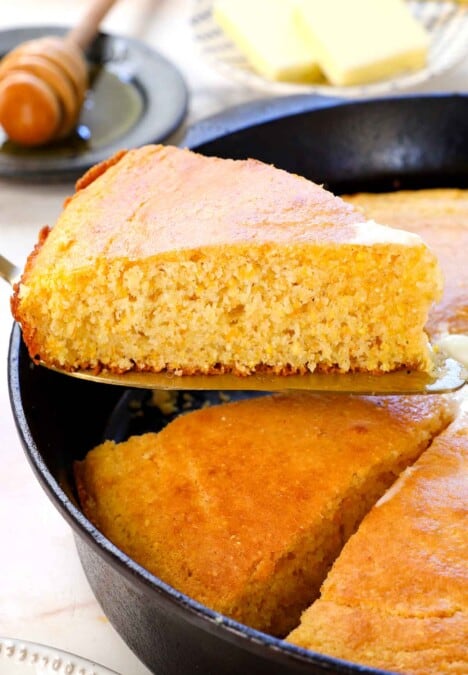
- Moist Sweet Cornbread
- Sweet Orange Roll Breadtwists
- Easy Garlic Parmesan Butter Breadsticks
- Garlic Bread
- Pumpkin Bread
Want to try these Hawaiian Sweet Rolls?
PIN IT TO YOUR BREAD OR SIDE BOARD TO SAVE FOR LATER!
Find me on Pinterest for more great recipes! I am always pinning :)!
©Carlsbad Cravings by CarlsbadCravings.com


Hawaiian Sweet Rolls
Save This Recipe To Your Recipe Box
You can now create an account on our site and save your favorite recipes all in one place!
Ingredients
- 1 cup pineapple juice at room temperature
- 1/2 cup whole milk
- 6 tablespoons unsalted butter, melted
- 1/3 cup honey (mild honey like clover)
- 5-6 cups all-purpose flour, plus more as needed
- 1 tablespoon instant or rapid-rise yeast
- 2 1/2 teaspoons salt
- 2 tablespoons brown sugar
- 1 large egg
- 1 teaspoon distilled white vinegar
- 2 teaspoons vanilla extract
Topping:
- 3 tablespoons softened butter, separated
Instructions
- Combine pineapple juice, milk, melted butter, and honey in a microwave safe bowl and microwave until mixture registers 110 degrees F, about 1 minute (Mixture may appear curdled which is okay).
- Attach the dough hook to the mixer and generously spray the hook with nonstick cooking spray. Mix 5 cups of flour, yeast, and salt on low speed until combined, about 5 seconds. Slowly add the pineapple juice mixture, followed by the brown sugar, egg, vinegar, and vanilla, and knead on LOW until the dough starts to pull away from the bowl, about 2 minutes. Increase the speed to MEDIUM-LOW (dial 4) and knead for approximately 5 to 7 minutes, or until the dough is smooth and elastic. (Dough should clear sides of bowl, but will stick to bottom, but WILL BE STICKY. Add up to 1 cup more flour, if needed, to clear the bowl. If you live in a super humid environment, you may need to add closer to 2 cups of flour.)
- Remove dough and spray mixing bowl with nonstick cooking spray. Knead the dough into a ball and place it back into your greased mixing bowl. Cover tightly with greased plastic wrap and let rise at room temperature until doubled in size, about 1 ½ -2 hours.
- Meanwhile spray a 9×13 pan with nonstick cooking spray. Set aside.
- After the dough has doubled, remove it to a floured surface (or nonstick mat) and punch it down, then lightly shape it into a rectangle of uniform thickness (overall dimensions don’t matter) using your hands. Cut the rectangle into 18 roughly even pieces, then shape into balls by folding the corners under so that the top is smooth.
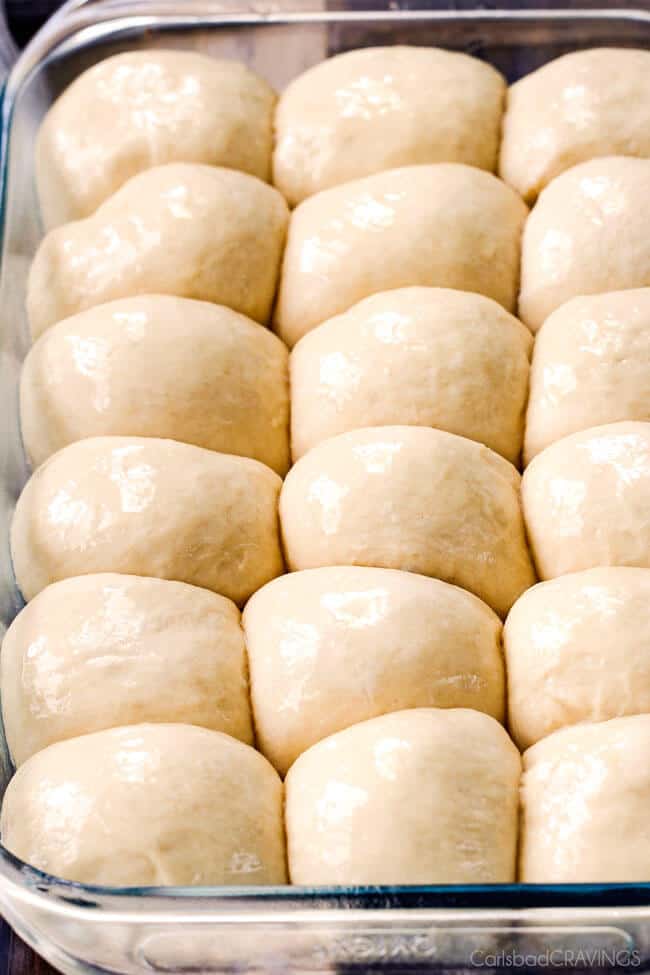
- Arrange the dough balls into 6 rows of 3 in prepared 9×13 dish and cover loosely with greased plastic. Let rise at room temperature until doubled in size, 1 to 1 ½ hours.
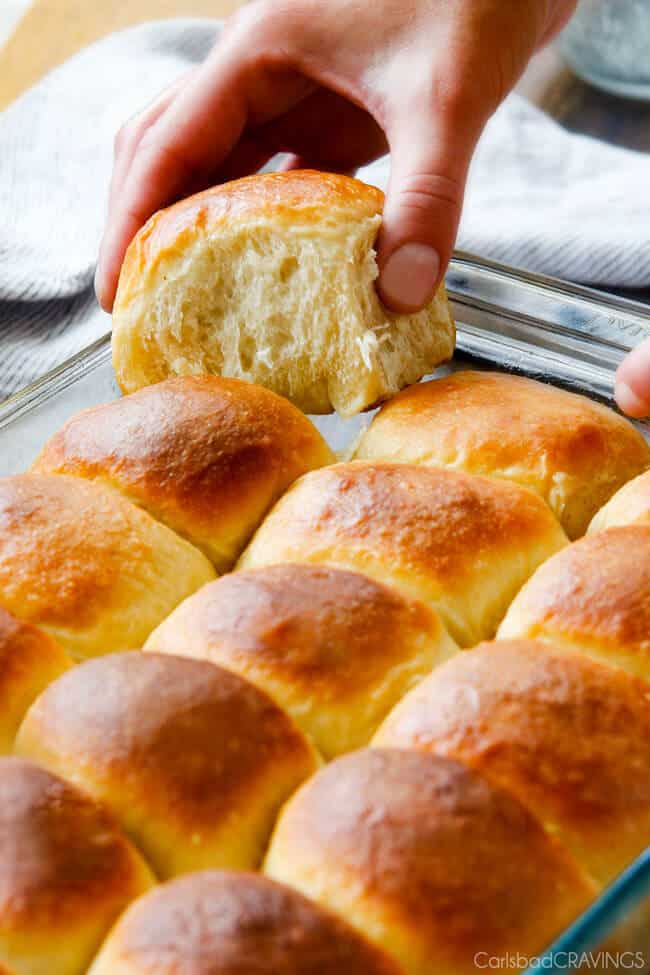
- Adjust the oven rack to the lower-middle position and heat the oven to 375 degrees F. Remove plastic and brush rolls with approximately 1 ½ tablespoons of butter. Bake until golden brown, about 20-23 minutes, rotating the dish halfway through. Let rolls cool in the dish on a wire rack for 10 minutes, then brush with the remaining butter. Best served warm.
- TO REHEAT room-temperature rolls, wrap in aluminum foil, place on baking sheet, and bake in 350-degree oven for 20 minutes
Want To Make This Recipe?

Did You Make This Recipe?
Tag @CarlsbadCravings and Use #CarlsbadCravngs
Leave a Review, I Always Love Hearing From You!
Carlsbad Cravings© Original


Courtney says
I LOVE Hawaiian Sweet Rolls and have been looking for the perfect recipe, can’t wait to try this one! Thanks Jen!
Jen says
You are so welcome Courtney! I hope your search for the perfect Hawaiian Sweet Roll Recipe stops here! 🙂
Raschell says
My mouth is watering, they look perfect! Thanks for posting Jen.
Jen says
Thank you and you are so welcome Raschell!
Dorothy Dunton says
Hi Jen! Our best friend loves Hawaiian rolls so this is a perfect recipe for me to make him some! I use my bread maker dough cycle for all the breads and rolls I make. I just take the dough out, shape it and let it do a second rise. I will try this using that method, I haven’t used the dough hook of my mixer since I got a bread maker.
Jen says
Hi Dorothy! I am so excited for you to make your friend these Hawaiian Sweet Rolls – and hopefully sneak a few for yourself 🙂 I have never used a bread maker before but it sounds wonderfully easy!
Michelle Morrison says
Can you tell me what size pan you use and do you grease it before putting the rolls in for the second rise?
Jen says
Hi Michelle, so sorry about that! It is a 9×13 pan and yes you grease it first. Enjoy!
BeccaRose says
You’re my hero Jen! These look amazing!!! MMmmmm…can’t wait to try them!
Jen says
REBECCA ROSE! We have been crazy moving but I will call you this weekend! Miss you!! xo
Edith says
I do not have access to a mixer do you think they would turn out if I kneeded by hand
Jen says
Absolutely! You will want to knead for a good 10 minutes until the dough is smooth and elastic. Enjoy!
Suzanne says
Epic fail, the dough turned into a gluey mess, measured the ingredients exact . I am a experienced bread maker. This recipe did not measure up.
Jen says
Hi Suzanne, I am so sorry! I am not sure what went wrong as this is almost the exact recipe (with my adapted instructions) from Cook’s Country (Cooking Illustrated subsidiary) and they know their stuff – I’ve never had a problem with it. Sorry!
Glenda says
Sometimes I have noticed depending on the weather. I live in California and it’s a little moist sometimes I have to add a little bit more flour. When I’m visiting in Utah it’s a little bit dry over there and it’s turns out fine. Or sometimes I think it could be the flour brand too.
Jen says
Absolutely! Thanks Glenda!
Olive says
I’m so glad I’m not the only one. I ended up adding about 3.5 cups of flour extra and am hoping the turn out.
Tim says
Made these today but used bread flour instead of AP..They came out good but are really dense. I’m assuming the gluten in the bread flour made them that way, In any case, will try them again with AP and see how that works out.
Jen says
Hi Tim! These are definitely a more dense roll but bread flour will make them much more dense as bread flour has a higher protein content which means the gluten complex that it forms is stronger, therefore creating rolls that are heavier more dense. I would also make sure you let them rise enough. Hope that helps you have lighter rolls next time! Thanks for trying them!
Robin says
Made the Hawaiian rolls…awesome!
Jen says
So happy you loved them Robin, thank you!
Amanda says
Hi,
can i prepare the dough the night before and bake them the next day?
Jen says
I haven’t tried with this particular dough but I don’t see why not! They should be great, just make sure to bring the dough to room temperature before baking the next dday.
LDouvs says
If I were to prepare these the day before, would you suggest refrigerating the dough? Also, could I have them in the 9×13 so all I have to do is let them warm up and then bake?
Jen says
I would let the dough rise the first time, shape the dough and place in the 9×13 pan as instructed. Instead of letting the dough rise at room temperature though, cover with greased plastic wrap, refrigerate overnight then bring to room temperature the next day. They should have risen mostly overnight in the refrigerator but let them rise until doubled in size in the morning. Hope this helps!
Nat says
Made these just now. I cut the yeast back to two teaspoons because I don’t like the taste of yeast, but made no other changes to the ingredients themselves.
Also, I don’t like my rolls dense, so I cut the dough into 24 pieces instead of 18, and made them on parchment paper on my baker’s half sheet.
I also don’t have a stand mixer, so I mixed the ingredients by hand. No need to over-knead the dough. Just mix, knead lightly, let rest half an hour in an oiled boil, knead lightly, and let rise for another hour. Two hours for the second rise for me. And baked at 400 degrees.
Thank you for sharing recipe. I’d give it a solid four stars for anyone reading the reviews. It’s not my favorite flavored roll, but good nonetheless.
Jen says
You are so welcome Nat, glad you enjoyed them!
Joleena Pickett says
Can these be frozen?
Jen says
Hi Joleena, I have never personally frozen them but I don’t see why not!
J-Marie Cantrell says
Would you freeze prior to the 2nd rise or let them rise the 2nd time and then freeze?
Jen says
Hi there! I would freeze them after the second rise and then the day before you want to bake the rolls, I would let them thaw overnight in the refrigerator. Hope this helps!
Petr says
Mmmmmmmmmm
Just few minutes ago I pulled these out from oven. They turned out just right. Had one still warm with glass of milk as my pre-bed snack.
And looking forward using others for my daughter as school snack with some filling. And of course as my snacks as well.
Thank you for the recipe. Will make them again pretty soon I believe.
Jen says
You are so welcome! I am so happy you enjoyed them and I’m drooling over your description of having one warm with a glass of milk -yum!
Barb says
Can these be made omitting the vinegar? Would that make a sweeter dough? Would I have to change baking time?
Jen says
Hi Barb, the vinegar helps the dough rise better and and improves the texture of the final product so I recommend using it!
Petr says
Ha ha. I was wandering whether use vinegar or skip it as well. I’m happy I followed the recipe as presented. Only small adjustments I did was using coconut milk instead of normal milk.
Lovely.
Jen says
Wonderful Petr, so happy you enjoyed them! I love your use of coconut milk! yum!
Holly says
How warm should the kitchen be for these to rise? I made some and they seemed to take forever to rise. My yeast proofed fine. It was a very cold day and while the house is comfortable, I don’t require a really warm house. so thinking my kitchen may not have been warm enough. and this happened to me once before with a different yeast recipe.
I can’t think what else it would be.
Jen says
Hi Holly, the optimal temp for rising is 80°F – 90°F, lower temperatures will definitely slow the yeast activity which will increase your rise time. You could try “oven rising” by heating your oven at the lowest setting for one or two minutes, then TURN IT OFF. The oven temperature should not exceed 90°F. Place a pan of very warm water toward the back of the oven to provide moisture, which keeps the dough soft during rising. Place the covered bowl or pan of dough on the center rack and close the door. Hope this trick works for you!
Threeboys says
I know this sounds like a simple question… do you add the dry yeast to the other dry ingredients or do you add water to the yeast first? Thanks for not laughing at me.
Jen says
That is a great question because in most recipe you do add water to the yeast first but in this recipe you will mix the flour, yeast, and salt together and THEN slowly add the pineapple juice mixture you made in step 1. Hope this helps!
Sonya says
I am making these right now and I followed directions but my dough isn’t smooth and elasticy, its kinda tough and falling apart.. What do I do?
Jen says
Hi Sonya, I am sorry but it sounds like it is past the smooth and elasticy stage and has been overkneaded. You can try and let it rise a little longer before shaping it, this might help the dough relax a little but I am afraid the rolls will still be dense and crumbly. I would suggest checking the dough more often next time to make sure it doesn’t become overkneaded. I am sorry, I am sure this is so frustrating!
Mouna L says
I made these rolls several times now and it is always a success. I also freezed them in rows of three wrapped and tucked in ziplog bags. When needed I let them thaw at room temperature and they are as soft and fluffy as the day they were baked. I am making them again today to freeze for other use. The recipe yields more than 18 rolls. Thanks for sharing this wonderful recipe.
Jen says
Hi Mouna, I am so happy you are enjoying this recipe! Thank you so much for the great tip on freezing them in rows of three – I love that idea! and I love the idea of having fresh tasting Hawaiian rolls any time!
J-Marie Cantrell says
Hello Mouna, do you allow the 2nd rise to happen prior to freezing?
GAIL says
Loved these rolls!!..made some others before bit the extra pineapple juice in theses is awesome! I paired them with a Boston Butt Pork roast..YUMMMMM!!!
Jen says
Thanks Gail, so happy you loved them and they sound amazing with your Boston Roast!
Christi Zelaya says
Has anyone attempted this recipe subbing gluten free one for one flour for the flour in this recipe? I didn’t want to try subbing bread flour, as that’s a different texture. Any suggestions? I have a niece that is dying for a good Hawaiian roll. Poor kid is 11 and that was her favorite bread ever.
Lora says
Another 5-star recipe…they even taste great when you accidentally forget to put in the honey!
Jen says
Thank you so much Lora! I’m glad they still tasted good without the honey! I hope you slathered them after 🙂
Ashley says
Should I change the recipe at all for high altitude baking?
Jen says
Hi Ashley, I am sorry I am not experienced with high altitude baking but here is a great article: https://www.kingarthurflour.com/learn/high-altitude-baking.html
Amanda says
Am I able to make them ahead? Like first rise shape then freeze them?
Jen says
Hi Amanda, I would make the rolls up through half of step 6 – cover the rolls with plastic and freeze without rising the second time. When you are ready to finish making them, they will take about 5-6 hours to thaw and then rise at cool room temperature (about 65°F to 70°F). I hope this helps!
Drew Peacock says
This recipe is fantastic!
I made split-top hotdog buns because my mother in law requested lobster rolls. Flavor and texture are spot on.
They’re also slightly less sweet than a commercial brand.
Jen says
Thank yo so much Drew for taking the time to comment! I’m thrilled your loved this Hawaiian Rolls recipe and I love the idea of using them as hot dog buns for lobster rolls – YUM!
Denise says
Can you bake these rolls in a muffin tin?
Jen says
I haven’t personally tried it, but I don’t see why not!
Chelsea says
About to make… I only have an 8oz can of pineapples, so will only have 1/2 cup pineapple juice. I do however have apple juice in the fridge… my question is can I use 1/2 cup pineapple juice & 1/2 cup apple juice?! THX!!
Jen says
Yes, that should work!
Justina says
Is it possible to make these without pineapple juice or any juice?
Jen says
Hi Justina, you could substitute with milk but it won’t have the same flavor.