White Chocolate Raspberry Cake is the show stopping cake everyone will be raving about!
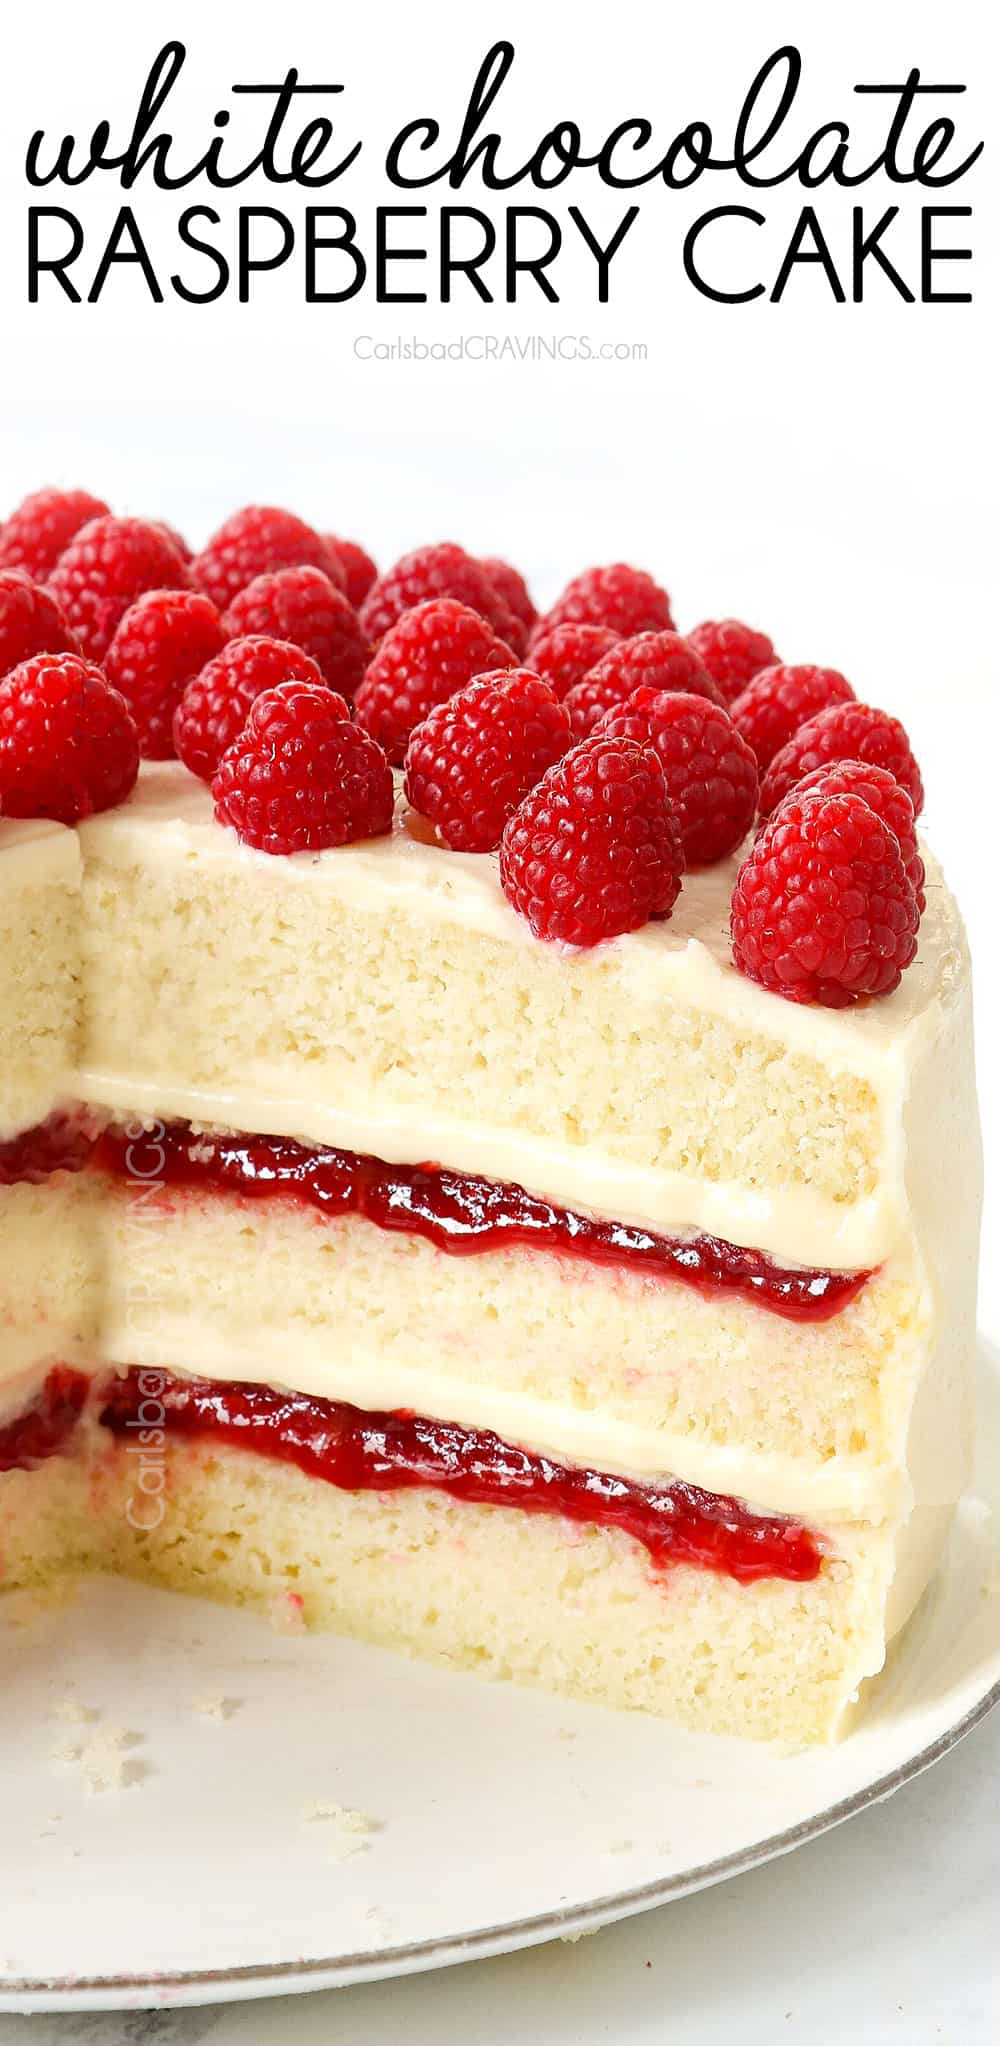
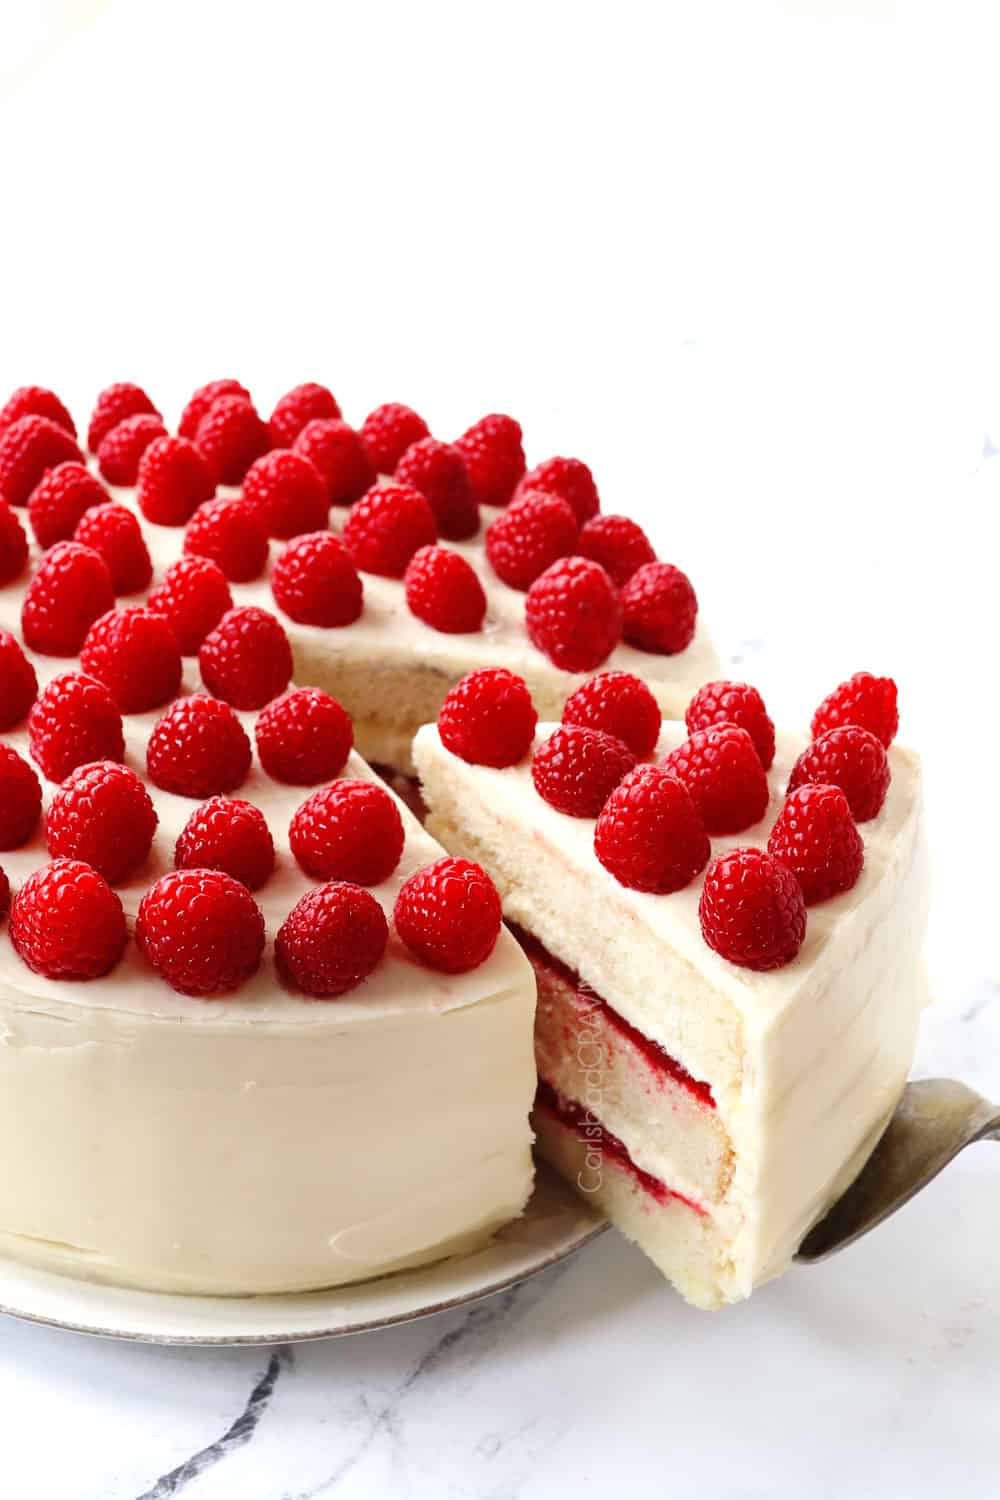
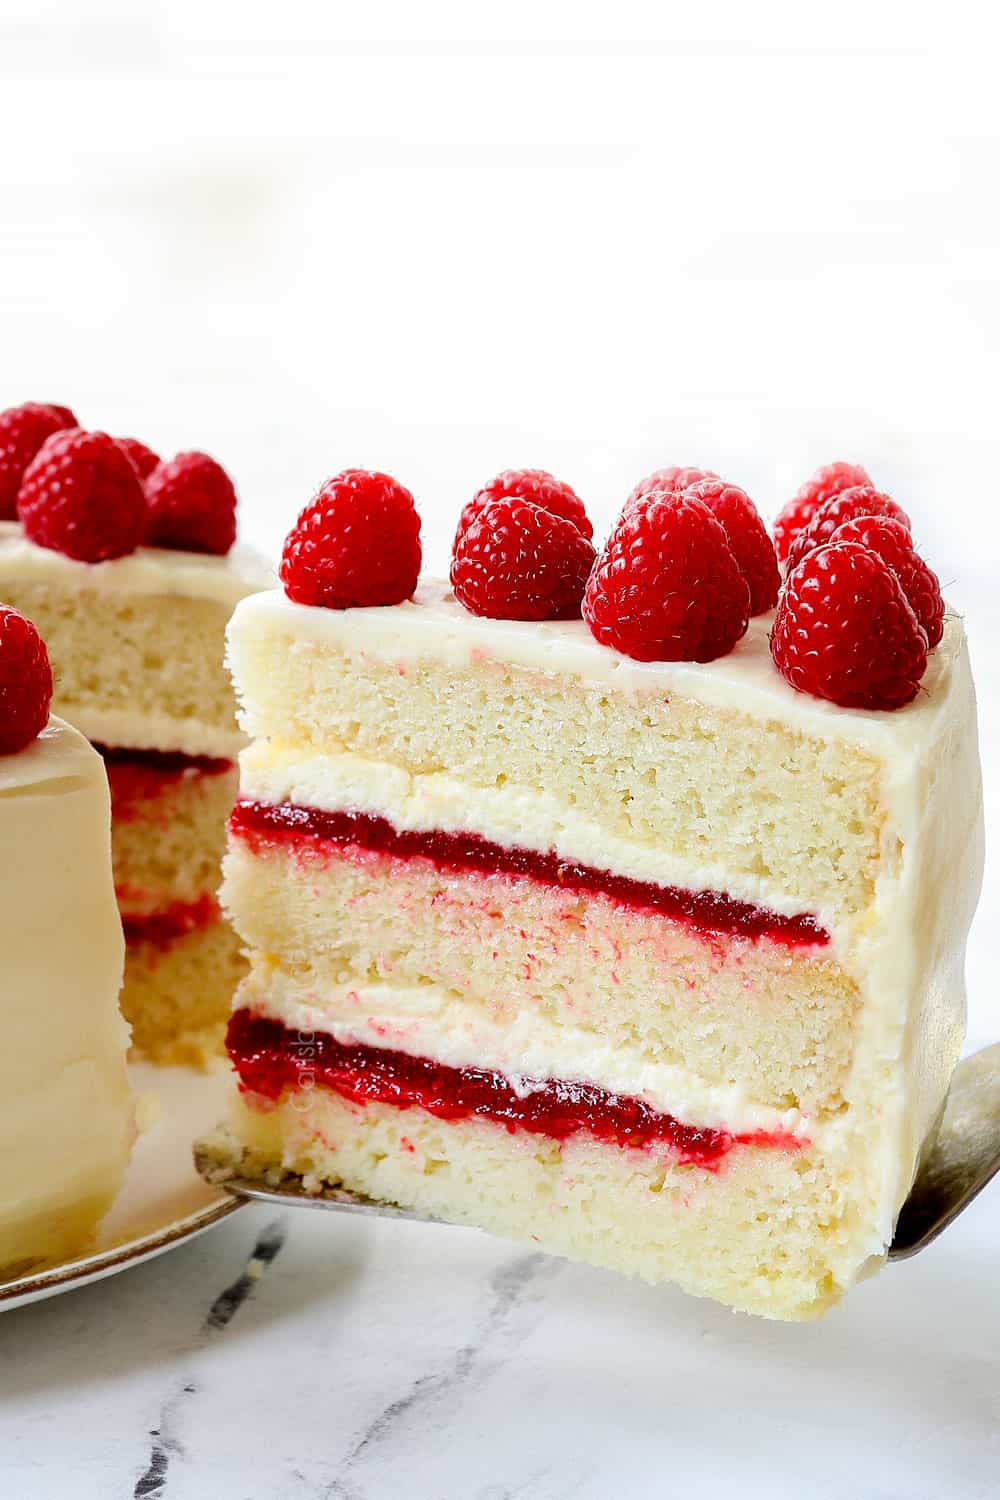
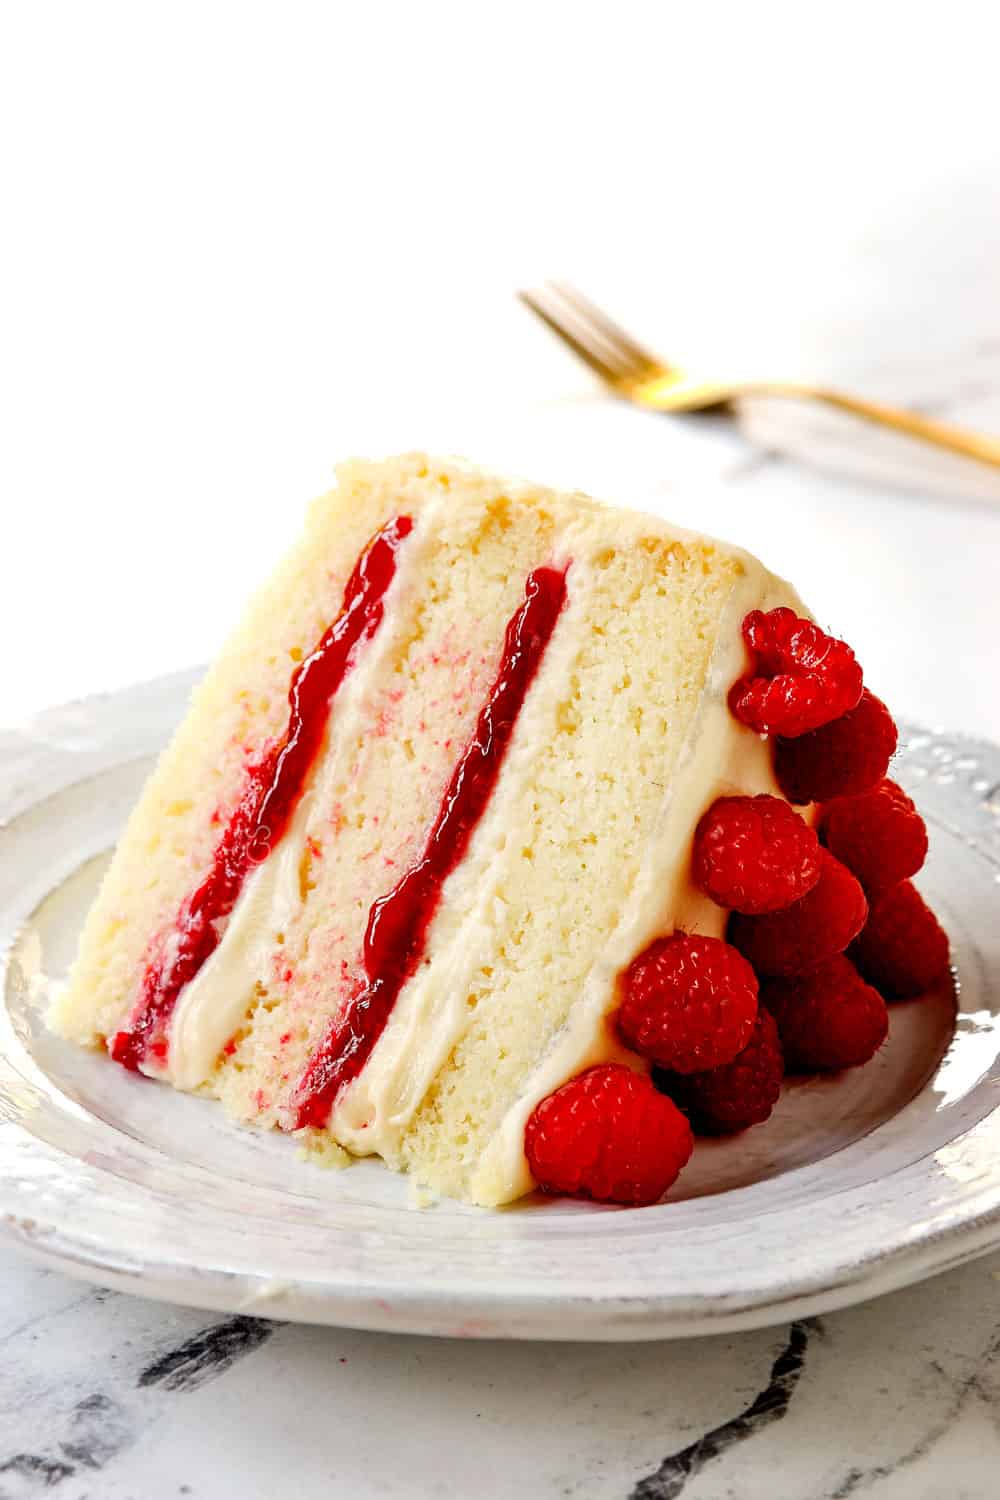
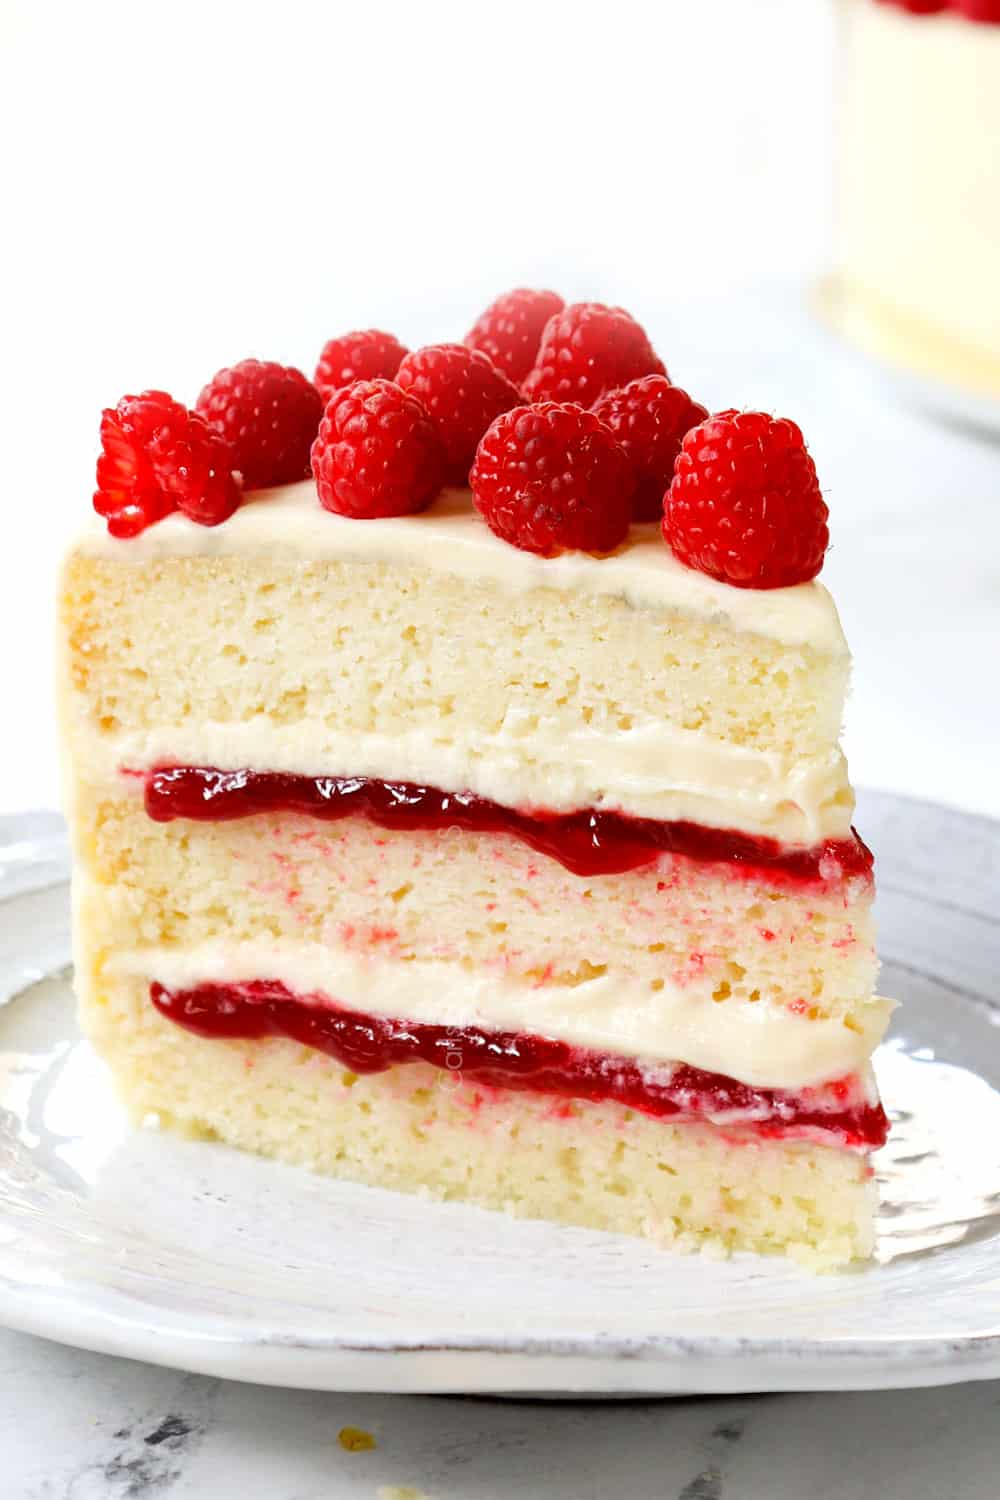
This White Chocolate Raspberry Cake is made of layers of soft, airy, buttery vanilla cake, luscious raspberry filling and white chocolate cream cheese frosting! The bakery style white cake is the BEST white cake ever — the only white cake recipe you will ever need, and becomes exponentially better (just when you didn’t think it was possible) when combined with the filling. The combination of airy cake, fresh raspberries, and luscious white chocolate frosting is indulgently rich yet fresh at the same time. You can either use homemade or store-bought raspberry jam (directions included for both) and the best part is you can make the cake a day ahead for a stress free, stunningly delicious White Chocolate Cake. Tips and tricks, Step-by-Step Photos, How to Make Video, How to Make Ahead, How to Freeze all included!
Spring and summer mean bright and fresh desserts! Some of our favorite cakes include: Lemon Blueberry Cake, Lemon Pound Cake, Chocolate Raspberry Cake, Strawberry Shortcakes, Strawberry Shortcake Cake, Hummingbird Cake, Carrot Cake with Pineapple Cream Cheese Frosting and Cream Cheese Stuffed Carrot Cake.
how to make white chocolate cake video
pin this recipe to save for later
This White Chocolate Cake Recipe with Raspberry Filling is perfection!
White Chocolate Raspberry Cake just in time for Mother’s Day! This dreamy, stunning cake will have everyone asking what bakery it came from instead of who made it! You will love this cake because of it’s:
- Soft, airy and cloud-like crumb thanks to the reverse creaming method
- Tender, fluffy and moist but sturdy enough to support the filling and not eggy
- Bright, sweet raspberry flavor – and lots of it
- Generous silky white chocolate frosting between each cake layer
- Completely from scratch OR shortcut raspberry jam filling
- Detailed recipe instructions and video for the perfect fool proof recipe
This White Chocolate Raspberry Cake is pure heaven. It is the fluffiest cake you will ever sink your teeth into thanks to the reverse-creaming method from Baking/Cooks Illustrated White Cake Recipe (and we all know Baking/Cook’s Illustrated knows their stuff). I’ll go into detail later, but all you need to know now is their method creates a cloud-like cake that’s tender, velvety with a very fine crumb laced with almond and vanilla extract.
In fact, when Patrick dove into a plain cake (practice run), he said it reminded him of angel food cake – it is that delicate and delicious in texture. If you have been searching for the perfect white cake recipe, this seriously is it.
Now for the filling. The raspberry filling tastes so fresh and bright, I highly encourage you to go the homemade route. It’s a simple simmering of raspberries, sugar, lemon juice and cornstarch to create a sweet and tangy filling to perfectly complement the sweet cake and delicate white chocolate frosting.
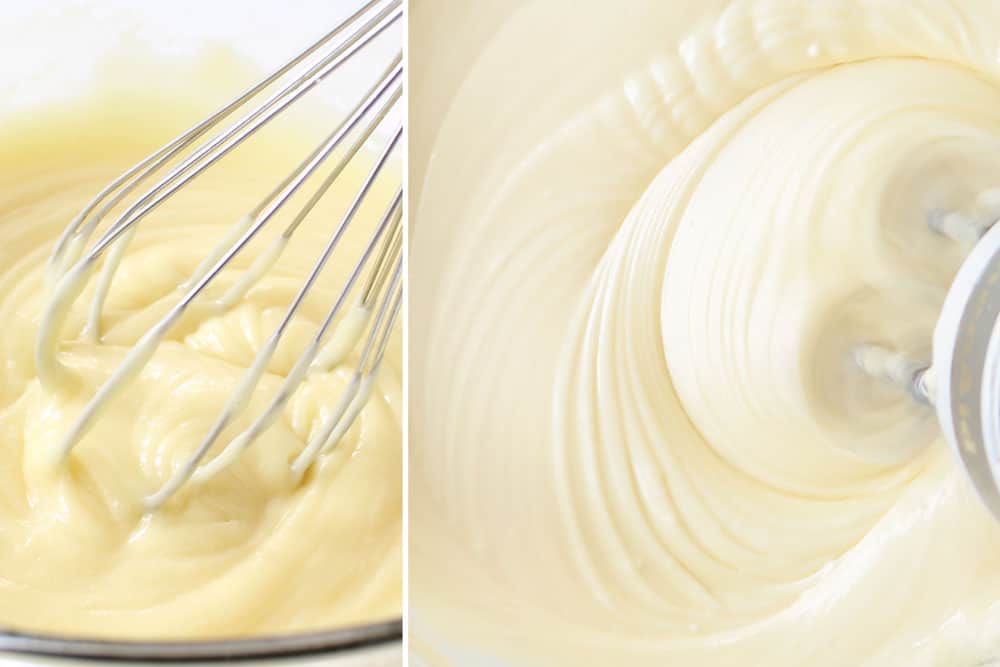
Even if you’re not a white chocolate fan, this frosting will win you over. It’s wonderfully smooth, creamy and sweet with a hint of tanginess, and subtle white chocolate flavor. The sublime frosting is made with melted white chocolate, cream cheese, butter, sugar and vanilla for a sensational creamy frosting which will have you questioning which is better, the frosting or the cake?
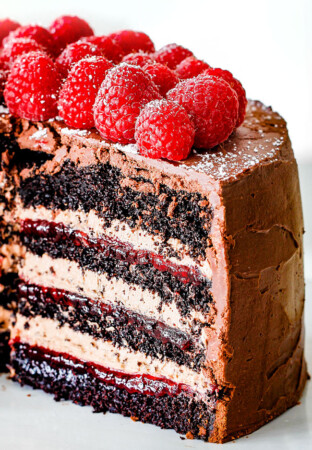
The raspberry filling and white chocolate frosting are sandwiched between the snowy white cake layers and then enveloped by more white chocolate frosting for an impressive cake that everyone will be swooning over – before and after they take a bite.
This White Chocolate Cake recipe has a few steps, but each step is easy. I’ve detailed the steps below with helpful tips and tricks. It’s more than you need to know, but everything you would ever want to know for imminent success! Happy Indulging!
WHAT IS WHITE CHOCOLATE?
White chocolate is the star of this White Chocolate Cake, so what exactly is it? White chocolate is made from cocoa butter, sugar, milk solids and often vanilla. It differs from milk and dark chocolate because it doesn’t contain any cocoa solids. Instead, the cocoa butter is separated from the cocoa solids (cocoa nibs) during production to give white chocolate its pale, ivory color. The remaining cocoa butter is combined with sugar and milk solids to create white chocolate.
Due to its mild cream/butter/yogurt flavor, white chocolate is often flavored with vanilla which gives it a delicate, subtle, slightly floral flavor that pair well with bolder flavors, especially this vibrant raspberry filling.
Vanilla Cake with Raspberry Filling ingredients
This White Chocolate Cake recipe has three components: the white cake, the raspberry filling, and the white chocolate cream cheese frosting. Here’s what you’ll need to make this recipe:
FOR THE WHITE CAKE
- Cake flour: Cake flour is almost 30x finer than all-purpose flour! It has a lower protein content (8-9%) than all-purpose flour (10-13%) so it is finer, lighter, and softer which translates into meltingly tender cake layers that are lighter and softer, with a fine, close crumb. You should be able to find cake flour in the baking aisle with the other flours, otherwise I’ve included an easy substitution.
- Egg whites ONLY: You will be using only the egg whites, not the yolks, that is how the cake stays white! The egg yoks would tint the cake yellow and increases the amount of fat and the emulsifier lecithin, which would change the texture of the cake. Egg whites deliver the softy, airy texture.
- Milk: Any kind of milk will work but use 2% or whole milk for the moistest cake.
- Granulated sugar: Sweetens the cake.
- Baking powder: Helps tenderize the cake and make it rise in the oven. Make sure it is fresh so it works!
- Salt: Enhances the flavors and cuts through the sweetness. You want to use good old table salt.
- Butter: Unsalted is typically best for baked goods so you can add the precise amount of salt. If you only have salted butter, you will need to reduce the salt in the recipe.
- Almond extract: Adds a subtly sweet almond flavor. Don’t add more than the recipe calls for because it can easily overpower the cake.
- Vanilla extract: Use pure vanilla extract for best results.
What can I substitute for cake flour?
You may substitute the cake flour with 3 cups all-purpose flour plus ⅓ cup + 1 tablespoon cornstarch.
Raspberry Jam Filling
- Raspberries: The riper, the more flavorful! You can use fresh, very ripe raspberries or thawed frozen raspberries. I also pick up extra fresh raspberries to garnish the top of the cake, but that is optional, strictly for aesthetics.
- Sugar: Granulated sugar please to sweeten the raspberries into jam.
- Lemon juice: Fresh is best but you may use bottled. Lemon juice enhances the fresh berry flavor and balances the sugar.
- Cornstarch: Thickens the jam; without it, you need twice the sugar and reducing time!
WHITE CHOCOLATE CREAM CHEESE FROSTING
- White chocolate: You will need three 4-ounce white chocolate baking bars located in the baking aisle for a total of 12 ounces. Quality chocolate chips can also work but ONLY use Guittard or Ghirardelli. Other chocolate brands don’t have enough cocoa butter and too many additives so they will not melt well. Note: 8 oz. chocolate chips is roughly 1 ⅓ cups NOT one cup.
- Heavy cream: Is melted with the chocolate so it doesn’t scorch and to create creamier chocolate. Use heavy cream and not normal milk or the chocolate won’t have the right consistency and may seize.
- Cream cheese: Its tanginess perfectly complements the sweet white chocolate, far better than using all butter. Use full-fat brick-style cream cheese for best results.
- Butter: Use unsalted butter or reduce the salt in the frosting
- Vanilla: Use quality vanilla extract for the best flavor.
- Powdered sugar: You may need to sift your powdered sugar if it’s been sitting in your pantry for a while. Add more or less to achieve the perfect consistency.
Why Use room temperature ingredients?
You’ve heard it here many times, and no doubt in other recipes, so why use room temperature ingredients when baking a cake? Is it that important? The answer is YES! It is essential that you use room temperature eggs, milk and butter for this recipe or your cake will not rise properly or be as tender. Here’s why:
- Room temperature ingredients bind together more easily than if you had some cold and some warmer ingredients – you can literally feel the difference when mixing by hand. In other words, the batter is easier to NOT overmix and overwork the gluten, which creates more lift and rises more evenly.
- Cold ingredients require longer to bind together so they are easy to overmix which over-develops the gluten making a denser cake.
- Cold eggs and milk can break the emulsion of the sugar and butter, so the batter loses air cells, resulting in a baked cake that is grainy or flat in texture, dry or dense.
- Cold ingredients also produce a thicker, colder batter which takes longer to bake which changes the entire structure and texture of the cake.
So, for the lightest, most tender cake just like the kind you find at a bakery, use room temperature ingredients!
Raspberry White Chocolate Cake variations
You can’t tweak this Chocolate White Cake recipe very much (baking is a science, after all!). But there are a few ways to subtly change it up:
- Alternate berry filling: You can swap out the raspberries for strawberries blackberries or a combination of berries to create a different filling.
- Raspberry almond filling: Add 1⁄2 cup blanched slivered almond, toasted and chopped coarse, to half of the raspberry filing and use it to spread on the first layer of cake.
- Lemon curd: Add a layer of lemon curd or use it instead of the raspberry filling. You can follow the instructions in this recipe.
- Chocolate filling: Try layering the cake with dark chocolate frosting but keeping the outside frosting white chocolate-a match made in heaven.
How to make a White Cake with Raspberry Filling
Step 1: Make Cakes Using Reverse Creaming Method
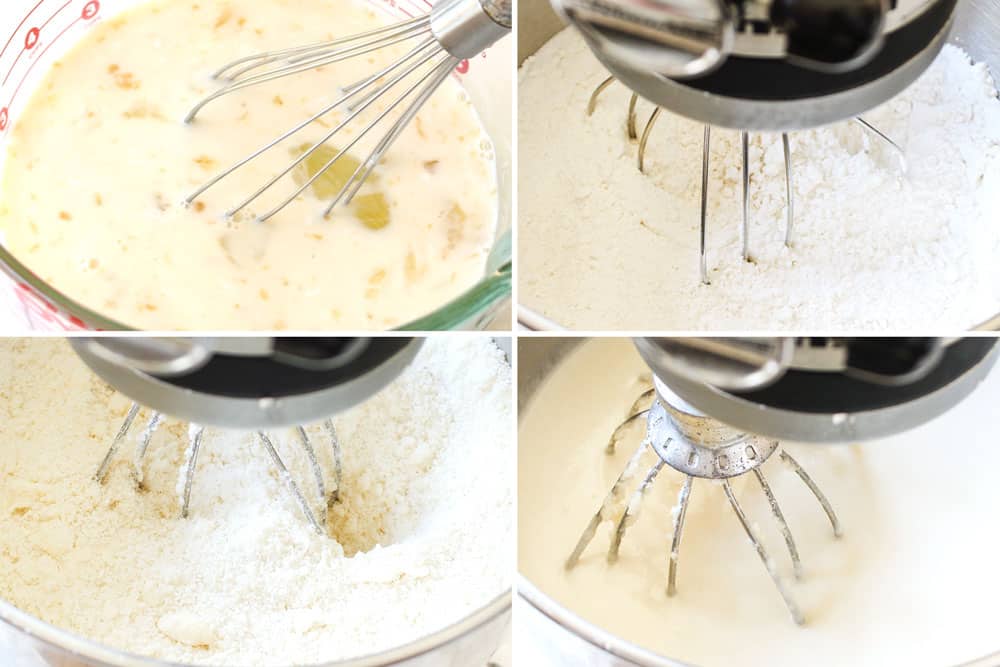
What sets this White Chocolate Raspberry Cake apart is the reverse creaming method. After dozens of experiments, Baking Illustrated found that instead of creaming the butter and sugar as usual, if you work the butter into the flour and then whisk in milk with gently whisked egg whites, you don’t get an over-glutenized cake that can be dry and riddled with small holes. Instead, the reverse creaming method delivers a wonderfully velvety, soft, moist, ultra-light cake with buttery vanilla flavor. And it works! You will be blow away at how melt-in-your mouth tender the cake are. Thank you, Baking Illustrated.
Step 2: Bake the Cakes
You will need three 9-inch pans to bake the white cakes in. If you only have two cake pans, you can bake two cakes, transfer to a baking rack then bake the third cake. This works because the batter is leavened by baking powder which is double acting, meaning it begins working immediately, but is further heat-activated by baking. It would not work if the cakes were leavened by baking soda because it is single acting, meaning it creates the gas needed for leavening as soon as it is mixed with liquid ingredients.
This knowledge isn’t an excuse to refrigerate the batter, it should still be used as soon as possible.
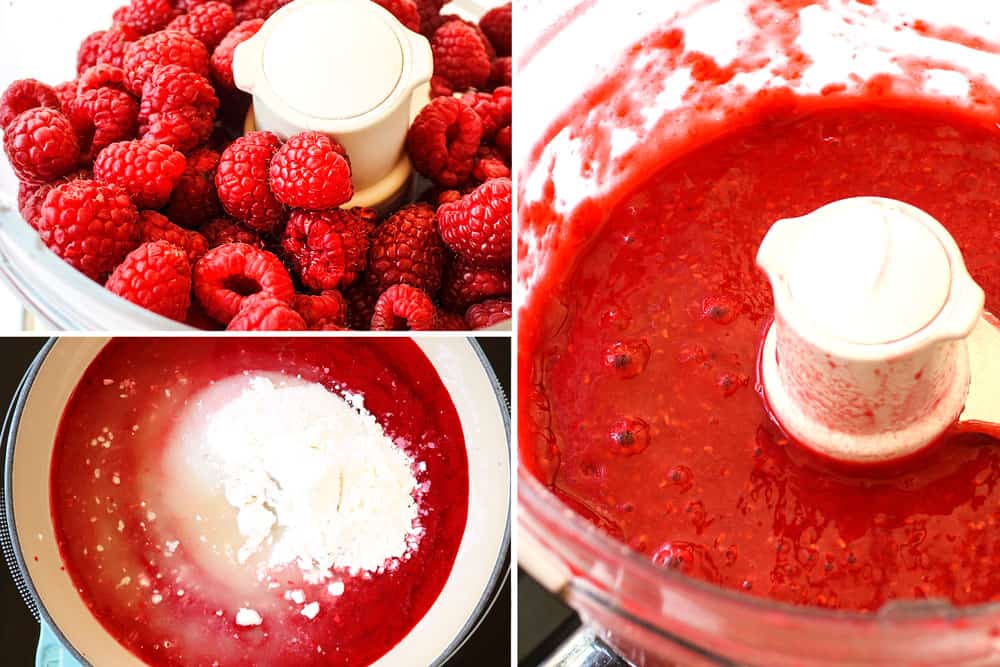
Step 3: How to make Raspberry Cake Filling
Making your own homemade Raspberry Filling is optional but highly recommended. You are welcome to use your favorite seedless Raspberry Jam instead. You will need approximately 1 ⅓ cups.
If making homemade raspberry jam, use super ripe fresh raspberries or frozen raspberries for best results. Frozen raspberries are picked at peak ripeness which means they often have more flavor than store bought raspberries which can be a gamble. When purchasing your frozen raspberries, take care your frozen raspberries do NOT have any sugar added.
To make the filling, puree the raspberries in your food process then transfer to a a fine mesh sieve over a medium saucepan. Whisk in the cornstarch, sugar and lemon juice and simmer until thickened.

Step 4: Make White CHOCOLATE cream cheese frosting
This frosting should be on the thicker side and not a thin icing so it’s thick enough to stand up against the weight of the cake layers. To achieve a thick frosting without having to add too much powdered sugar, make sure to use room temperature butter and cream cheese – not overly soft/melting from the microwave.
You’ll make the frosting like a standard cream cheese frosting by beating the butter and cream cheese together, then beating in the melted white chocolate followed by the powdered sugar.
Step 5: Assemble the cake
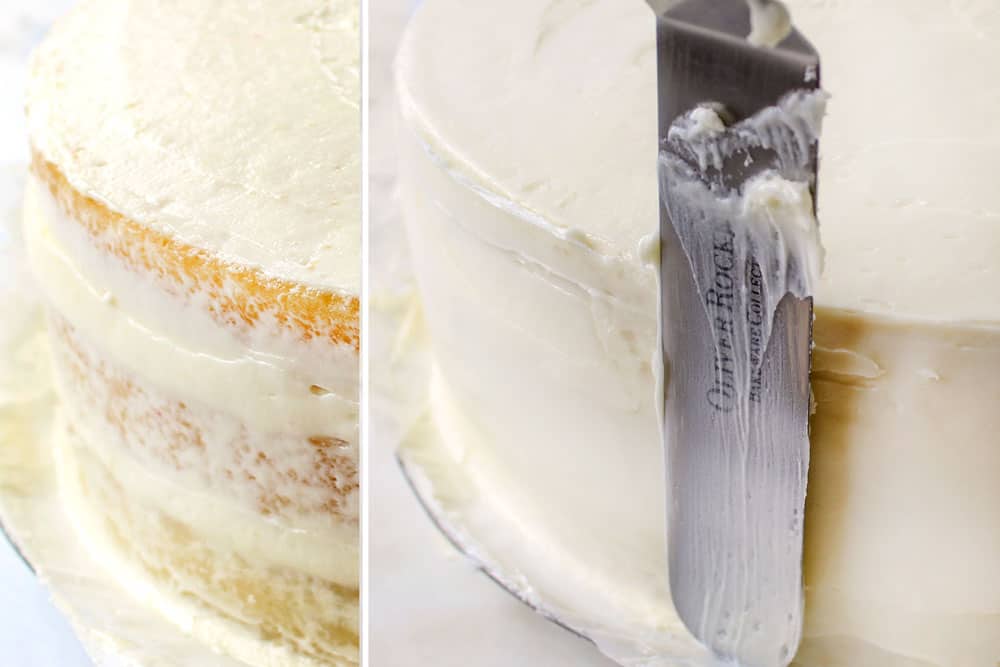
While this gorgeous cake looks impressive, it is easy to assemble! You can assemble the cakes when ready to serve or up to a day in advance, then refrigerate until ready to serve. Make sure to frost the cake on the plate or cake stand you’re going to be serving it on. You’ don’t want to risk the cake sliding apart when you’re trying to move it.
I like to place four strips of parchment paper around the edges of my cake plate or cake stand to create a square with an open space in the middle which keeps the cake stand clean while frosting.
Here’s how to assemble the cake with step by step photos:
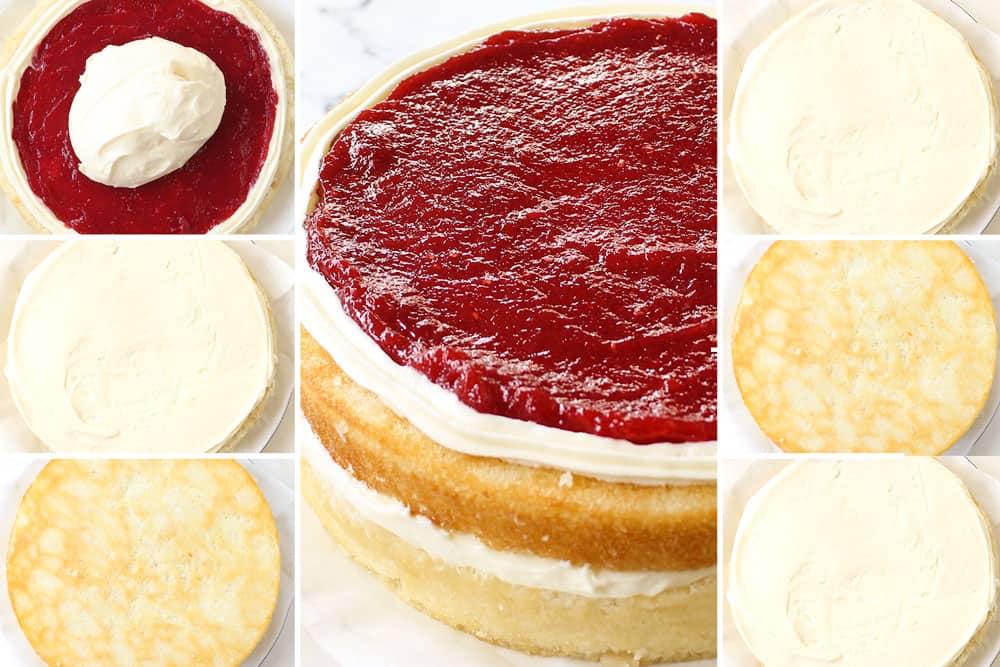
- Pipe a ring of frosting just inside the top edge of the first layer of cake to create a dam for the Raspberry Filling. The Raspberry Filling should be roughly the same height as the piping ring so try and select an icing tip accordingly.
- Next, spread half of the chilled Raspberry Filling to the edge of the piped frosting. Add 1 cup White Chocolate Frosting and spread to the edges of the cake.
- Top with second leveled cake, top side down/bake side up. Repeat procedure with piping/filling/frosting. Top with third cake, top side down/bake side up. It’s fine if some of the White Chocolate Frosting spills out the sides of the cake-it will be used in the crumb layer.
Step 6: Frost the Cake
I made sure there is plenty of frosting – so don’t be shy! The frosted cake should have about ½ cup leftover which you can use to decorate the cake if you wish.
To frost the cake, start by transfer about ¾ cup frosting to a separate container to create the crumb coat. This way you won’t contaminate all of the frosting with crumbs. The crumb coat keeps crumbs from getting in the frosting and allows you to create a smooth second layer that stays in place.
After creating the crumb layer, refrigerate the cake for 30 minutes or until crumb layer has set. Meanwhile, refrigerate remaining frosting and lightly beat again before using again. This firmer frosting will make frosting your cake much easier
.
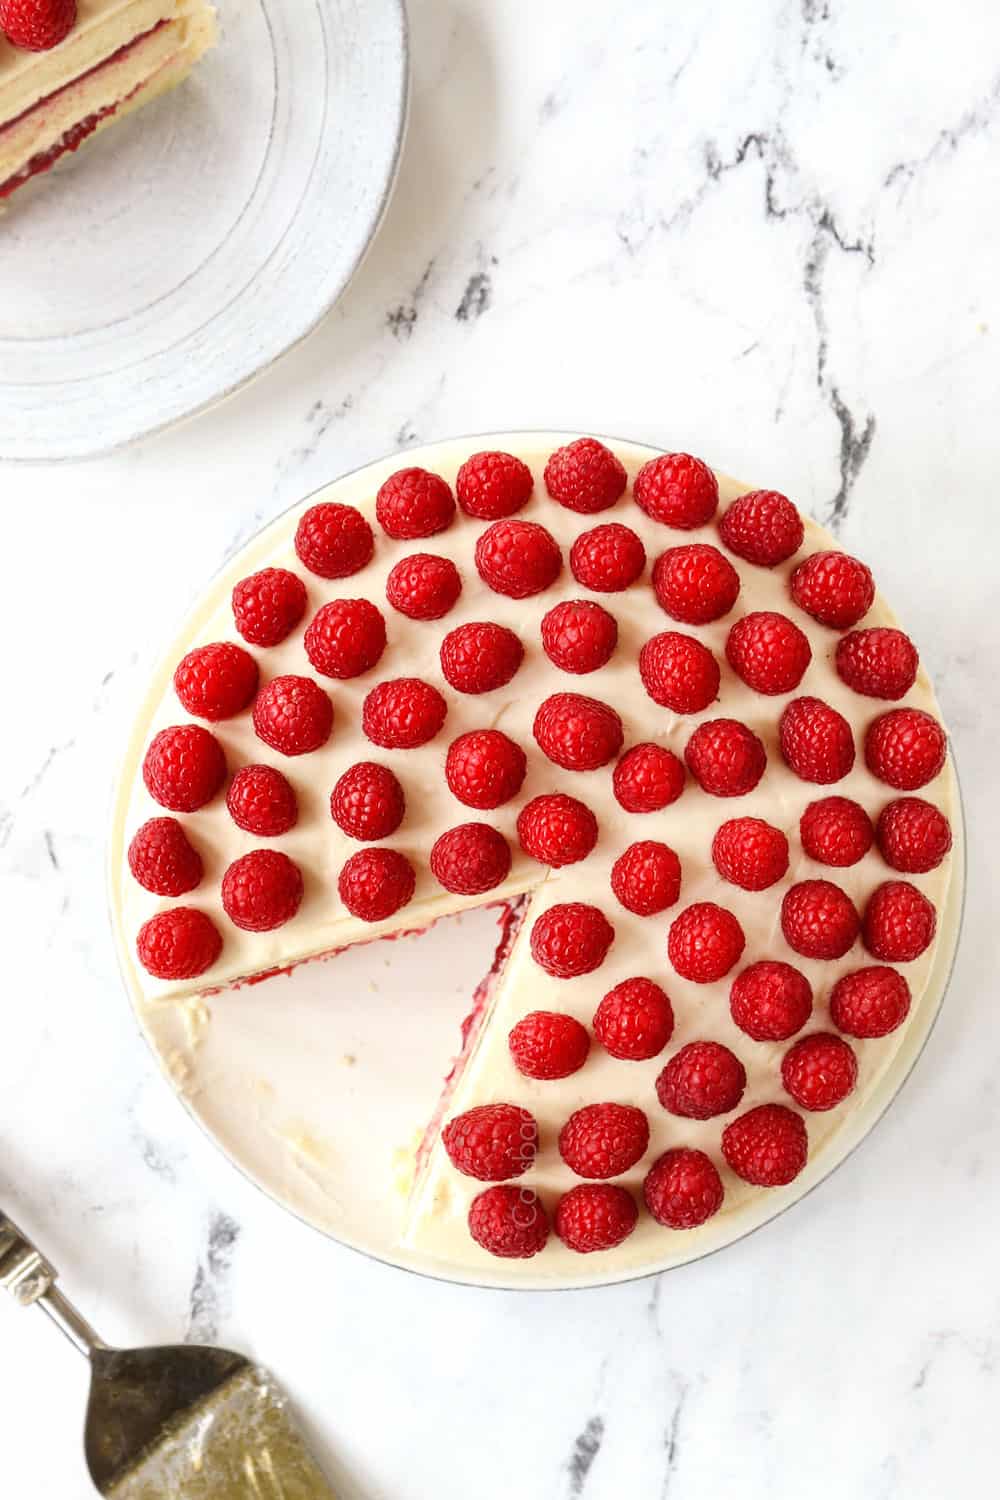
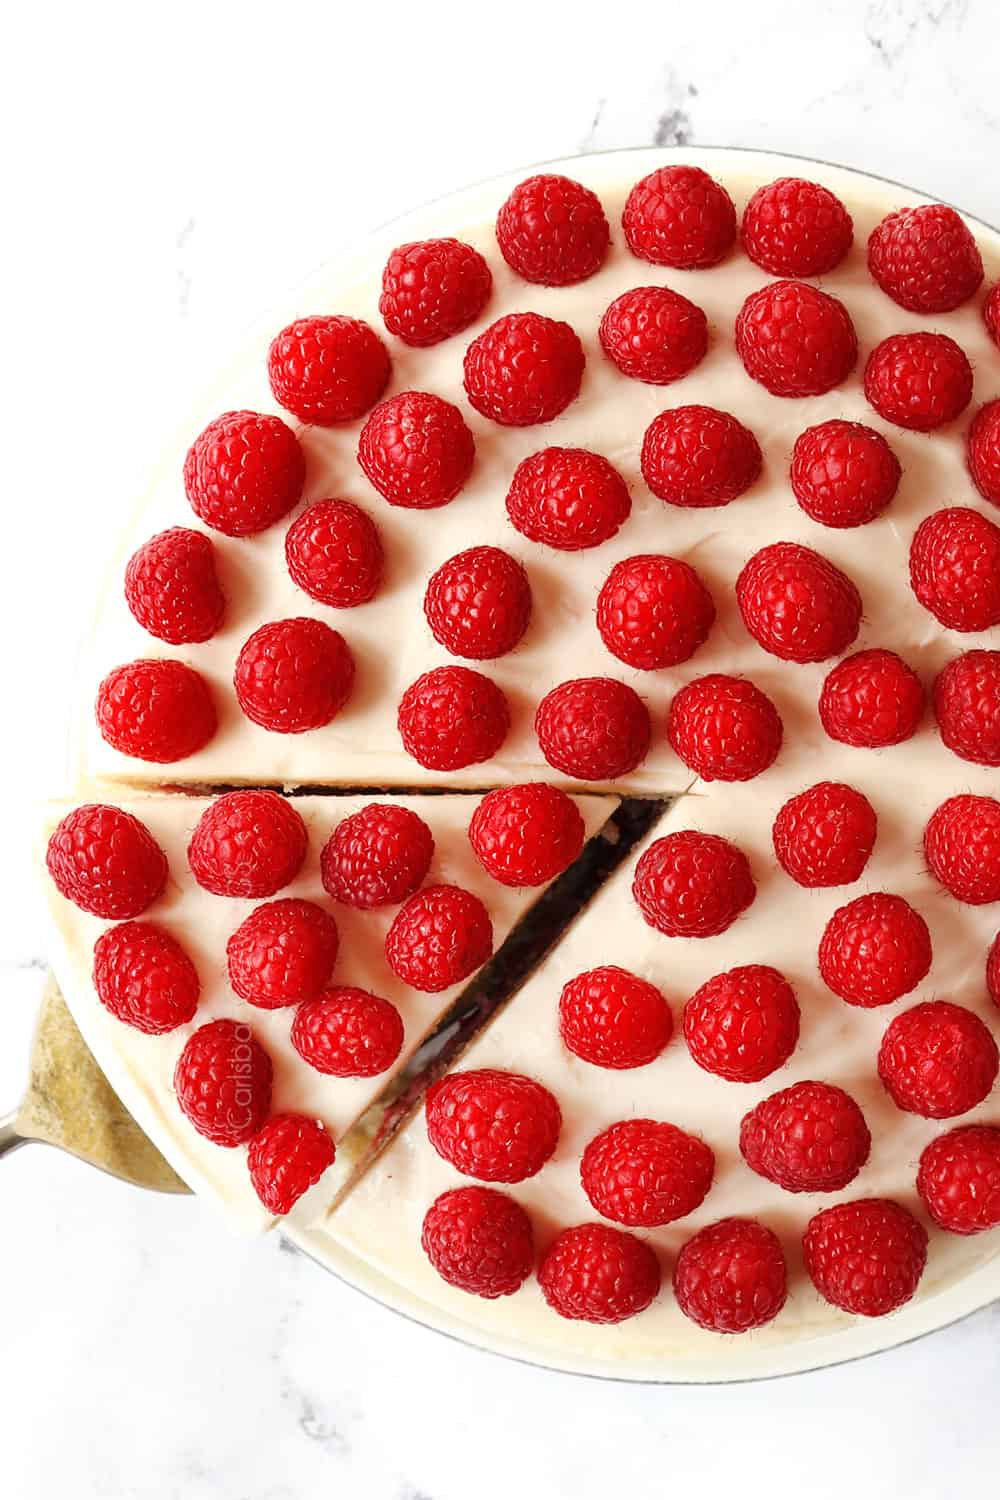
Frost the outside of cake as you desire with the remaining frosting and garnish with lots of raspberries! The fresh raspberries make this White Chocolate Raspberry Cake exponentially better even when you didn’t think it was possible.
White Chocolate Raspberry Cake tips for success
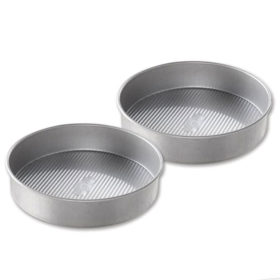
- Use the correct size pan: You will need three 9-inch cake pans for this recipe. I have not tried this recipe with 8-inch cake pans, but the batter should fit, the white cakes will just take longer to bake, closer to 27-30 minutes, and be thicker.
- Prep Ahead: As with all recipes, carefully read through the entire recipe, and prepare any special ingredients, such as room temperature butter, eggs and milk.
- Use room temperature ingredients. To quickly bring eggs to room temperature, fill a bowl with warm water (not hot) and add eggs (in their shells) and let sit 10-20 minutes. You can microwave the milk at 15 second intervals to warm, but only warm to room temperature- not hot or it will scramble the egg whites!
- Don’t pack flour: Whenever you measure flour, don’t scoop it into the flour bag/container or else the flour will compress and packed flour yields denser, drier cakes. Rather, scoop flour into measuring cup and then level.
- Add wet ingredients gradually. Resist the urge to pour all of the milk mixture into the flour mixture all at once – be patient! Add half of the milk mixture then the other half in order to keep the batter stable. If you add all of the wet ingredients at once, it can break the emulsion and cause the batter to separate.
- Do not overmix the batter. After you add the milk mixture to the flour mixture, resist the urge to over-mix, even if the batter looks a little lumpy. Instead, stop the mixer and give it a few stirs by hand. Overmixing cake batter causes the gluten in the flour to form elastic gluten strands which result in a dense, chewy texture. Overbeaten eggs can also create a fragile crust that crumbles and separates from the cake as it cools.
- Don’t open the oven doors while baking. I know it is going to be hard not to peek at your beautiful cakes, but please don’t open the door! Opening the doors can cause your cake to cook unevenly and to fall. Only check on your cakes at 22 minutes.
- Don’t overbake the cakes. One of the main reasons people complain of dry cakes is because they over bake their cake. You want to remove your white cakes when there are just a few crumbs clinging to a toothpick.
- Transfer cakes layers to the refrigerator. Time permitting, wrap the cooled cakes tightly in plastic wrap and place in the refrigerator or freezer (don’t freeze longer than 30 minutes if serving shortly) to firm up a bit before frosting. This makes the cakes more stable for frosting and less crumbly.
- The raspberry filling should be thick and barely spreadable. The raspberry filling should be thin enough to barely glide over the cake and thick enough that it stays in place and doesn’t run over the edges, otherwise, you’ll have cake layers sliding all over the place! Keep in mind the raspberry jam will thicken more once refrigerated. If the jam thickens too much, you can microwave for 10 seconds or so.
- You may use store-bought raspberry jam if you’re in a bind. You’ll need about 1 ⅓ cups seedless raspberry jam. Use 2/3 cup per layer. If your store-bought jam is too hard to spread, microwave it for 10 seconds.
- Don’t microwave cream cheese or butter! For the frosting, use cream cheese and butter softened at room temperature. If you soften them in the microwave, they don’t soften evenly and your frosting will either be too runny or lumpy.
- Use quality white chocolate for the best flavor and meltability. Use Ghirardelli or Bakers baking bars or Ghirardelli or Guittard white chocolate chips -do NOT use any other brand of chocolate chips or they won’t melt well.
- Let the white chocolate cool. Melt your white chocolate before your start making the frosting, so it has time to cool for 5-10 minutes before you add it into your frosting. If it’s too hot, it will liquify the butter and make the frosting runny.
- Thicken up frosting. If the frosting is too thin, add additional powdered sugar or refrigerate for 30 minutes or so. If it’s too thin, beat in heavy cream, 1 teaspoon at a time to reach desired consistency. If the frosting is too sweet, add a splash of lemon juice and/or salt.
What to serve with this White Chocolate Cake Recipe
This White Chocolate Cake is stand-alone fabulous but it’s also wonderful with more fresh raspberries or even a combination of raspberries, strawberries, blueberries and/or blackberries. You can also garnish it with white chocolate and/or dark chocolate shavings.
Can I make White Chocolate Cake ahead of time?
You can make the cake entirely ahead of time, or in stages, here’s how:
- Raspberry Jam: Make the raspberry jam and store in an airtight container in the refrigerator for 48 hours. You may need to microwave for 10 seconds to loosen it a little, just so it’s thick but spreadable – you do NOT want it runny!
- Frosting: Is best freshly made, but you can whip it together up to 24 hours before assembling the cake, tightly cover and refrigerate. Let it come close to room temperature before re-whipping.
- Cakes: The white cake layers can be prepared one day in advance. Let the layers cool completely then wrap each layer tightly in plastic wrap and store at room temperature.
- Crumb Coated Cake: Tightly wrap the cake in plastic wrap and refrigerate or freeze after you apply the crumb coating.
- Frosted Cake: Assemble the entire cake, cover with a cake cover or tent with foil, refrigerate, then let sit at room temperature for 1-2 hours before serving.
How to store White Cake with Raspberry Filling
The assembled and frosted cake should be covered with a cake cover or foil and refrigerated. It will stay fresh for up to 2 days, but may be stored for up to 4 days. Bring the cake to room temperature before serving.
How to freeze Vanilla Cake with Raspberry Filling
- To freeze individual cake layers: Tightly wrap the individual cake layers in plastic wrap and freeze for up to three months.
- To freeze crumb coated cake: Tightly wrap in a couple layers of plastic wrap followed by a couple layers of foil, freeze for up to two months.
- To freeze frosted cake: Tightly wrap in a couple layers of plastic wrap followed by a couple layers of foil, freeze for up to two months. Allow the cake to thaw overnight in the refrigerator then unwrap and come to room temperature on the counter for 1-2 hours before serving.
White Chocolate Raspberry Cake FAQs
Yes, refrigerating cake can dry it out out, especially if it’s not properly stored. The cold air in the refrigerator causes moisture to evaporate from the cake, resulting in a drier texture. To prevent this, it’s important to store the cake correctly:
Wrap Well: Before refrigerating, wrap the cake tightly in plastic wrap or place it in an airtight container to minimize exposure to air and moisture loss.
Frosting: Ensure the frosting covers the entire cake surface to create a barrier against moisture loss.
Short Refrigeration Time: If possible, refrigerate the cake for a shorter period, and take it out of the refrigerator about 30 minutes before serving to allow it to come closer to room temperature.
Consider Freezing: If you need to store the cake for an extended period, consider freezing it. Properly wrapped and sealed, frozen cake retain its moisture and flavor better than a refrigerated cake.
To prevent filling from soaking into cake layers, especially in layered cakes, follow these steps:
Create a Barrier: Spread a thin layer of frosting on the cake layer before adding the main filling. This acts as a barrier that helps prevent the filling from directly soaking into the cake.
Chill the Cake: Refrigerate the cake layers with the barrier frosting or filling for a short period before adding the main filling. This can help set the barrier and make it less likely to mix with the filling.
Thicken the Filling: A thicker filling will reduce its ability to soak into the cake.
Assemble Close to Serving: If possible, assemble the cake with the filling closer to the time of serving. This reduces the time the filling has to interact with the cake layers.
LOOKING FOR MORE Spring CAKE RECIPES?
You can see all my spring recipe cakes HERE. Here are a few to wet your palate:
- Coconut Cake (Triple Coconut!)
- Carrot Cake with Pineapple Cream Cheese Frosting
- Cream Cheese Stuffed Carrot Cake
- Lemon Poke Cake
- Chocolate Raspberry Cake
- Lemon Blueberry Cake
- Strawberry Shortcakes

White Cake with Raspberry Filling and White Chocolate Cream Cheese Frosting
Save This Recipe To Your Recipe Box
You can now create an account on our site and save your favorite recipes all in one place!
Ingredients
WHITE CAKE
- 1 1/2 cups milk at room temperature**
- 9 large egg whites at room temperature**
- 1 1/2 teaspoons vanilla extract
- 1 teaspoon almond extract
- 3 1/3 cups cake flour (see notes for substitution)
- 2 2/3 cups granulated sugar
- 2 tablespoons baking powder
- 1 1/2 teaspoons salt
- 18 tablespoons (2 ¼ sticks) unsalted butter, cubed small, softened
RASPBERRY FILLING
- 16 ounces frozen thawed raspberries or very ripe fresh raspberries
- 2 1/2 tablespoons cornstarch
- 2 1/2 tablespoons lemon juice
- 2/3 cup granulated sugar
WHITE CHOCOLATE CREAM CHEESE FROSING
- 12 ounces white baking chocolate, chopped small
- 1/4 cup heavy cream
- 2 8 ounce pkgs. cream cheese (16 ounces) at room temperature ***
- 1/2 cup unsalted butter at room temperature ***
- ¼ teaspoon salt, plus more to taste
- 2 teaspoons vanilla extract
- 7 cups powdered sugar, more or less as needed
Instructions
WHITE CAKE
- Preheat oven to 350 degrees F. Prepare three 9-inch cake pans by lining the bottoms with parchment paper then spraying the entire inside of the pans with nonstick cooking spray WITH FLOUR (or grease and flour pans). If you only have 2 pans, bake 2 cakes then bake the third cake immediately after.
- In a large liquid measuring cup or medium bowl, whisk together the milk, egg whites, and extracts. Set aside.
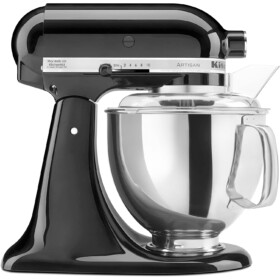
- Mix cake flour, sugar, baking powder, and salt in the bowl of electric mixer fitted with the whisk attachment at low speed. With the mixer still running, add the butter a few pieces at time. Increase speed to medium and continue to mix until the mixture resembles moist crumbs and the largest pieces are the size of small peas, about 3 minutes.
- Pour in half of the milk mixture and mix on medium-high until light and fluffy, about 1 minute. Stop the mixer and scrape down the bowl. With the mixer on low, stream in the remaining milk mixture. Mix on medium-low no longer than 30 seconds. If the batter looks a little lumpy, resist the urge to over-mix! Instead, stop the mixer and give it a few stirs by hand.
- Divide batter evenly between the three prepared cake pans. Bake at 350 degrees F until a toothpick inserted in the center comes out with a few crumbs and has no wet batter clinging to it, about for 22-25 minutes. Let the cakes rest in pans for 5 minutes then turn out onto cooling racks to cool completely before frosting, about 1 ½ hours. Meanwhile, you can make the raspberry filling and frosting.
RASPBERRY FILLING (See Notes for Store-Bought)
- Whisk cornstarch, sugar and lemon juice into the puree until cornstarch is mostly dissolved. Bring to a simmer over medium-high heat, stirring constantly, then reduce heat to medium (medium-low if your stove runs hot) and continue to cook and stir continuously until puree is thickened. It needs to be quite thick but spreadable so the cake layers don't slide around. Refrigerate until completely chilled (it will thicken as it chills).
WHITE CHOCOLATE CREAM CHEESE FROSTING
- Add chopped white chocolate and heavy cream to a microwave safe bowl. Microwave for 30 seconds, stir, then continue to microwave at 15 second intervals, stirring in between, until chocolate is completely smooth; set aside to cool for 5 minutes.
- Beat cream cheese, butter and salt at medium speed in a large bowl with a hand-held electric mixer until very creamy, 1-2 minutes. Beat in white chocolate and vanilla until smooth.
- Gradually add powdered sugar in batches, beating at low speed until blended after each addition. Refrigerate for 30 minutes or so to help thicken up. The frosting should be on the thick side after chilling to stand up against the cake layers.
- Spoon roughly 1 cup frosting into pastry bag (to use to pipe the dams of frosting). If you don't have a freezer bag, snip 1 corner of a freezer bag to make a small hole, set aside. Spoon ¾ cup frosting into a small bowl to use to create the crumb coat ("Crumb Coat Frosting"); set aside.
ASSEMBLE
- Once the cakes are completely cooled, use a large serrated knife to remove the domes from the top of the cakes so that they’re flat.
- Place four strips of parchment paper around the edges of a platter or cake stand to create a square with an open space in the middle (to keep cake stand clean). Place a small dollop of frosting in the center of the cake stand/plate to keep the cake from moving, then top with one cake, top side up.
- Pipe a ring of frosting just inside the top edge of cake. Add half of the chilled Raspberry Filling and spread it to the edges of the piped frosting. Add 1 cup White Chocolate Frosting and spread to the edges of the cake.
- Top with the second leveled cake, top side down. Repeat procedure with piping/filling/frosting. Top with third cake, top side down.
FROST CAKE
- Create a crumb coat by frosting the cake using the reserved Crumb Coat Frosting starting with the top and working down until the cake is evenly, thinly frosted, removing any excess frosting. Refrigerate cake for 30 minutes or until the crumb layer has set. Meanwhile, refrigerate remaining frosting and lightly beat again before using.
- Frost the outside of cake as you desire with the remaining frosting. Remove parchment paper then pipe a ring of frosting around the bottom of the cake. Garnish with raspberries if desired.
Video
Notes
Baking Tips for Success
- Use the correct size pan: You will need three 9-inch cake pans for this recipe. I have not tried this recipe with 8-inch cake pans, but the batter should fit, the white cakes will just take longer to bake, closer to 27-30 minutes, and be thicker.
- Cake Four: You may substitute the cake flour with 3 cups all-purpose flour plus ⅓ cup + 1 tablespoon cornstarch.
- White chocolate: Use quality chocolate baking bars such as Bakers or Ghirardelli for the best results. Quality chocolate chips can also work but ONLY use Guittard or Ghirardelli. Other chocolate brands don’t have enough cocoa butter and too many additives so they will not melt well. Note: weigh the chocolate chips and don’t use a measuring cup – it does not translate.
- **Room temperature ingredients: It is essential that you use room temperature egg whites, milk and butter for this recipe or your cake will not rise properly or be as light and tender. To quickly bring eggs to room temperature, add eggs (in shells) to a bowl of warm water (not hot) and let sit for 20 minutes. You can microwave the milk at 15 second intervals to warm, but only warm to room temperature- not hot or it will scramble the egg whites!
- Raspberry filling consistency: The raspberry filling should be chick and barely spreadable so that it stays in place and doesn’t run over the edges, otherwise, you’ll have cake layers sliding all over the place! If the jam thickens too much, microwave it for 10 seconds.
- Store-bought raspberry jam: You’ll need about 1 ⅓ cups seedless raspberry jam. Use 2/3 cup per layer. If your store-bought jam is too hard to spread, microwave it for 10 seconds.
- ***Frosting: This frosting should be on the thicker side and not a thin icing so it’s thick enough to stand up against the weight of the cake layers. To achieve a thick frosting without having to add too much powdered sugar, use cream cheese and butter softened at room temperature. I made sure there is plenty of frosting – so don’t be shy! The frosted cake should have about ½ cup leftover which you can use to decorate the cake if you wish.
Make ahead
You can make the cake entirely ahead of time, or in stages, here’s how:- Raspberry Jam: Make the raspberry jam and store in an airtight container in the refrigerator for 48 hours. You may need to microwave for 10 seconds to loosen it a little, just so it’s thick but spreadable – you do NOT want it runny!
- Frosting: Is best freshly made, but you can whip it together up to 24 hours before assembling the cake, tightly cover and refrigerate. Let it come close to room temperature before re-whipping.
- Cakes: The white cake layers can be prepared one day in advance. Let the layers cool completely then wrap each layer tightly in plastic wrap and store at room temperature.
- Crumb Coated Cake: Tightly wrap the cake in plastic wrap and refrigerate or freeze after you apply the crumb coating.
- Frosted Cake: Assemble the entire cake, cover with a cake cover or tent with foil, refrigerate, then let sit at room temperature for 1-2 hours before serving.
HOW TO STORE
The assembled and frosted cake should be covered with a cake cover or foil and refrigerated. It will stay fresh for up to 2 days, but may be stored for up to 4 days. Bring the cake to room temperature before serving.How to FREEZE
- To freeze individual cake layers: Tightly wrap the individual cake layers in plastic wrap and freeze for up to three months.
- To freeze crumb coated cake: Tightly wrap in a couple layers of plastic wrap followed by a couple layers of foil, freeze for up to two months.
- To freeze frosted cake: Tightly wrap in a couple layers of plastic wrap followed by a couple layers of foil, freeze for up to two months. Allow the cake to thaw overnight in the refrigerator then unwrap and come to room temperature on the counter for 1-2 hours before serving.
Want To Make This Recipe?

Did You Make This Recipe?
Tag @CarlsbadCravings and Use #CarlsbadCravngs
Leave a Review, I Always Love Hearing From You!


Lorraine says
HI Jennifer
I can’t wait to try this cake for my niece’s birthday, we are celebrating in the park, so hopefully the cake won’t melt…I liked your suggestion of replacing white chocolate filling with chocolate filling in the cake, it will add a nice dimension…do you have a recipe for the chocolate filling?
Jen says
What a perfect cake for your niece’s birthday! I think the chocolate mascarpone frosting in this cake would be delicious: https://carlsbadcravings.com/chocolate-raspberry-cake/ If it’s going to be super hot at the park you may want to consider partially freezing it or keeping it in a cooler. Good luck!
Mercedes Myhra says
I’m making this for my husband’s birthday but he is allergic to almond (and coconut and all tree nuts) can I just leave the almond extract out?
Jen says
Absolutely!
Amber says
I made this cake for my mom’s birthday, and it did not disappoint! It was absolutely delicious…. I had a few hiccups with it (that were my fault) and it still turned out amazing. I tried to cook all three cakes in the oven at once, and my oven must not be big enough because they had to cook much longer than the recommended time. Also, when I melted the white chocolate and heavy cream in the microwave I put it in an additional 15 seconds after the initial 30 seconds, and this over cooked it . So I had to start over and ended up melting the chocolate and cream in my Wilton chocolate warmer. It came out perfect. We will definitely I get be making this again in the future!
Jen says
Happy Birthday to your Mom! I’m so pleased it was worth the effort, even with a few stumbling blocks along the way ;).
Carol Henderson says
Just wondering, approximately how much raspberry purée you should have after putting it through the sieve.
It seems a small amount compared to the 2/3 cup sugar that is added to it.
Many thanks
Jen says
Hi Carol! I am not sure about the puree alone, but the raspberry filling will be about 1 and 1/3 cups in total. Hope you enjoy!
Megan Thacker says
This cake and recipe was AMAZING! But I made this twice and followed all of your instructions very carefully both times and all the cakes every time sank. I’m not sure why. Any thoughts?
Jen says
Thanks Megan, I’m so pleased you loved it! The most common reason cakes sink in the middle is that they’re underbaked. Try baking the cakes for a few minutes longer and see if that helps. Good luck!
Martha Morrow says
Hi Jennifer:
I will be making this cake for a wedding shower and I was a little concerned about the amount of powdered sugar called for which is 7 cups. I know you indicate to only use enough to thicken the frosting but it seemed like a lot. I’m concerned that it might have been a typo? Thank you.
Jen says
Hi Martha, it is indeed 7 cups – the white chocolate makes the frosting runnier so you need additional sugar to thicken it up. Good luck!
Sue says
I consider myself experienced enough with baking, but this took me just over 4 hours from start to finish–with no breaks, so I felt like your time estimate maybe wasn’t for the average person. I did make the raspberry jam myself so likely you didn’t calculate that into your prep time estimate, as that took quite a bit of time by itself. I also struggled a bit with the thickness of the jam, adding additional cornstarch and also the thickness of the frosting, coming out a bit thin even after adding 8 cups of powdered sugar. When I put it together, the thinness of those two parts affected the assembly. I ended up refrigerating it prior to the final frosting of the whole thing so it mostly worked out. But I would recommend refrigerating the frosting as well as the filling prior to assembly. I also had the issue of it sinking in the middle prior to removing it from the oven as another baker indicated. But the cake was done and tasted fine and the texture seemed good despite it. In the end, the cake was delicious, and everyone loved it. Just wasn’t prepared for the volume of work to prepare it and the adjustments of the recipe to get the thickness of filling & frosting correct.
Jen says
Hi Sue, I’m glad everyone loved the cake! Yes, I agree the jam and frosting need to be chilled in order to thicken which is why I include that in the recipe. I will update the preparation time.
Nini2008 says
Can I use frozen strawberries in place of raspberries? Making this for our tree-trimming & thought this would be so elegant! I’m putting silver, white & perhaps green sanding sugar on it & little trees I purchased at Dollar Tree! Thanks!
Jen says
Sorry, I am just seeing this! Strawberries would be perfect, I hope you gave it a try! I love your decoration ideas!
Laurette says
Can I use store bought egg whites in a carton?
Jen says
Hi Laurette, unfortunately this would change the structure and texture of the cake.
Casey says
I made this last year for my partner’s birthday (I needed a win after a cake disaster the year before )… it took me a couple tries to get right, mainly because my mixer wasn’t set quite right and wasn’t getting the dough at the bottom of the bowl. It ended up being the best cake I’ve ever had!! I came back to the recipe this year to remake the raspberry filling to put on top of a white chocolate cheesecake. But I’ll be making this cake again and coming back to this recipe for years to come!
Jen says
Yay! Thank you for such a kind review! I am so glad this cake was a winner!
Katie M. says
Hey! I’m making this for my friend’s wedding but the groom is lactose intolerant, what could I use to substitute the milk and butter?
Jen says
Hi Katie, that’s so nice of you to make a cake! I’m sorry but I don’t feel comfortable giving substitutions that I haven’t tried – especially for such an important event! Good luck!
Marissa says
Hi, I am needing to make 4 8-inch round cakes, so I was wondering how much I should multiply your recipe by. Thanks!
Jen says
One batch makes 3 thick 8″ round cakes so to make 4 I would do 1 and 1/3 of the recipe. You could also do a single batch and stretch the batter across 4 pans if you don’t mind the cakes being thinner. Hope this helps!