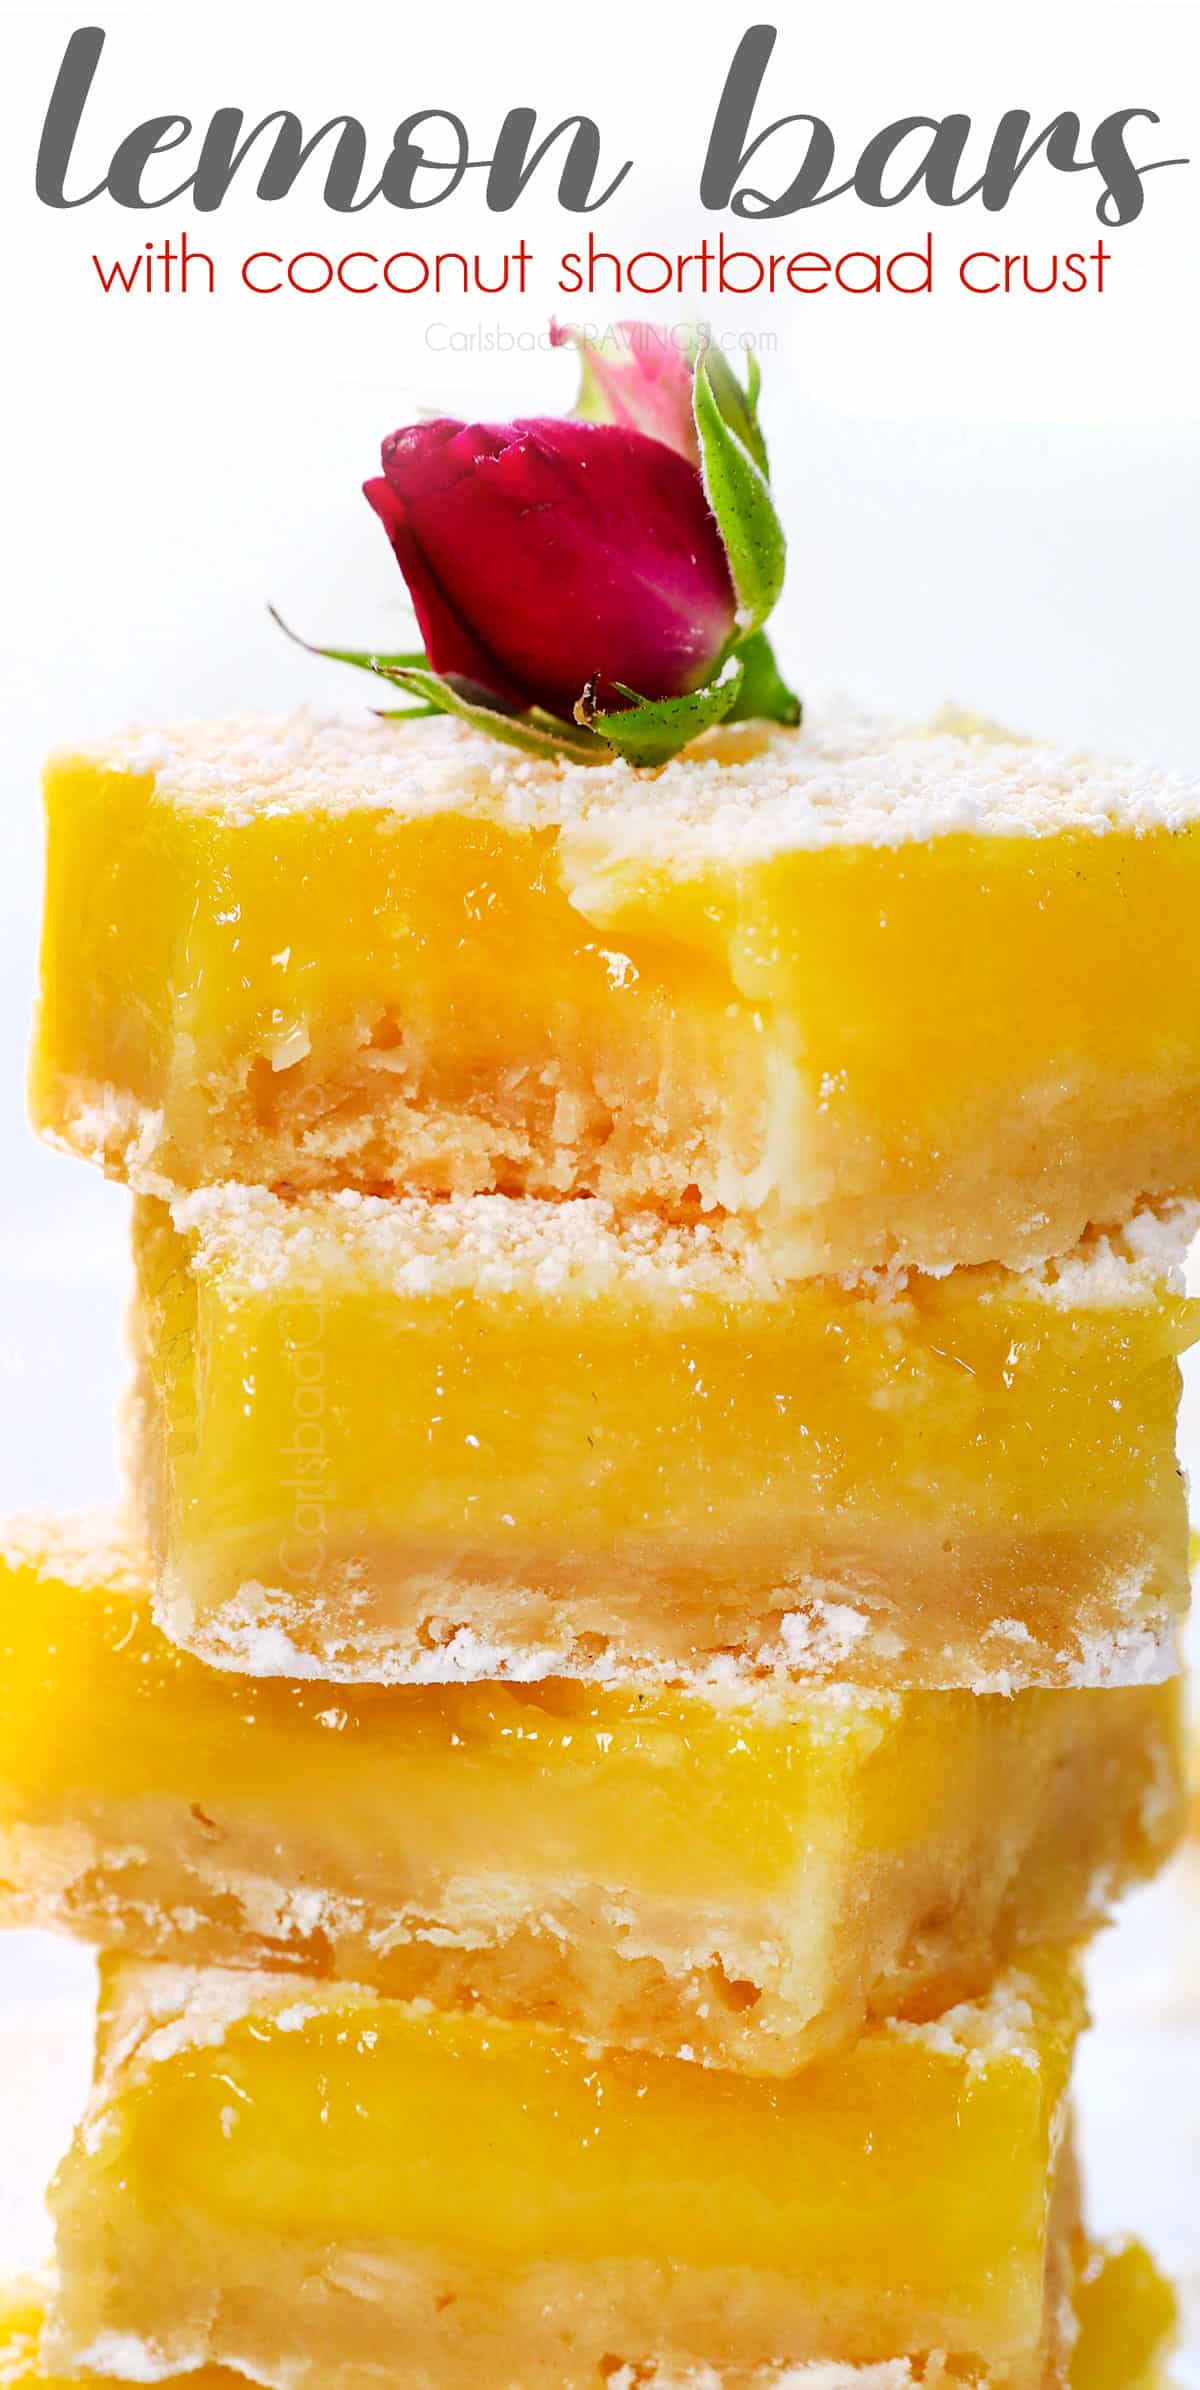
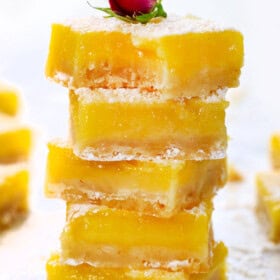
Introducing irresistible Lemon Bars with expert tips, tricks, and step-by-step photos! This recipe balances a chewy coconut-infused crust (never dry or crumbly!) with a tart, not overly sweet filling that’s creamy, stable, and not too eggy. Using a food processor to cut in butter ensures the crust remains light, while tips for achieving clean slices—like freezing—make serving a breeze!
Watch How to Make Lemon Bars

What makes this the Best Recipe for Lemon Bars


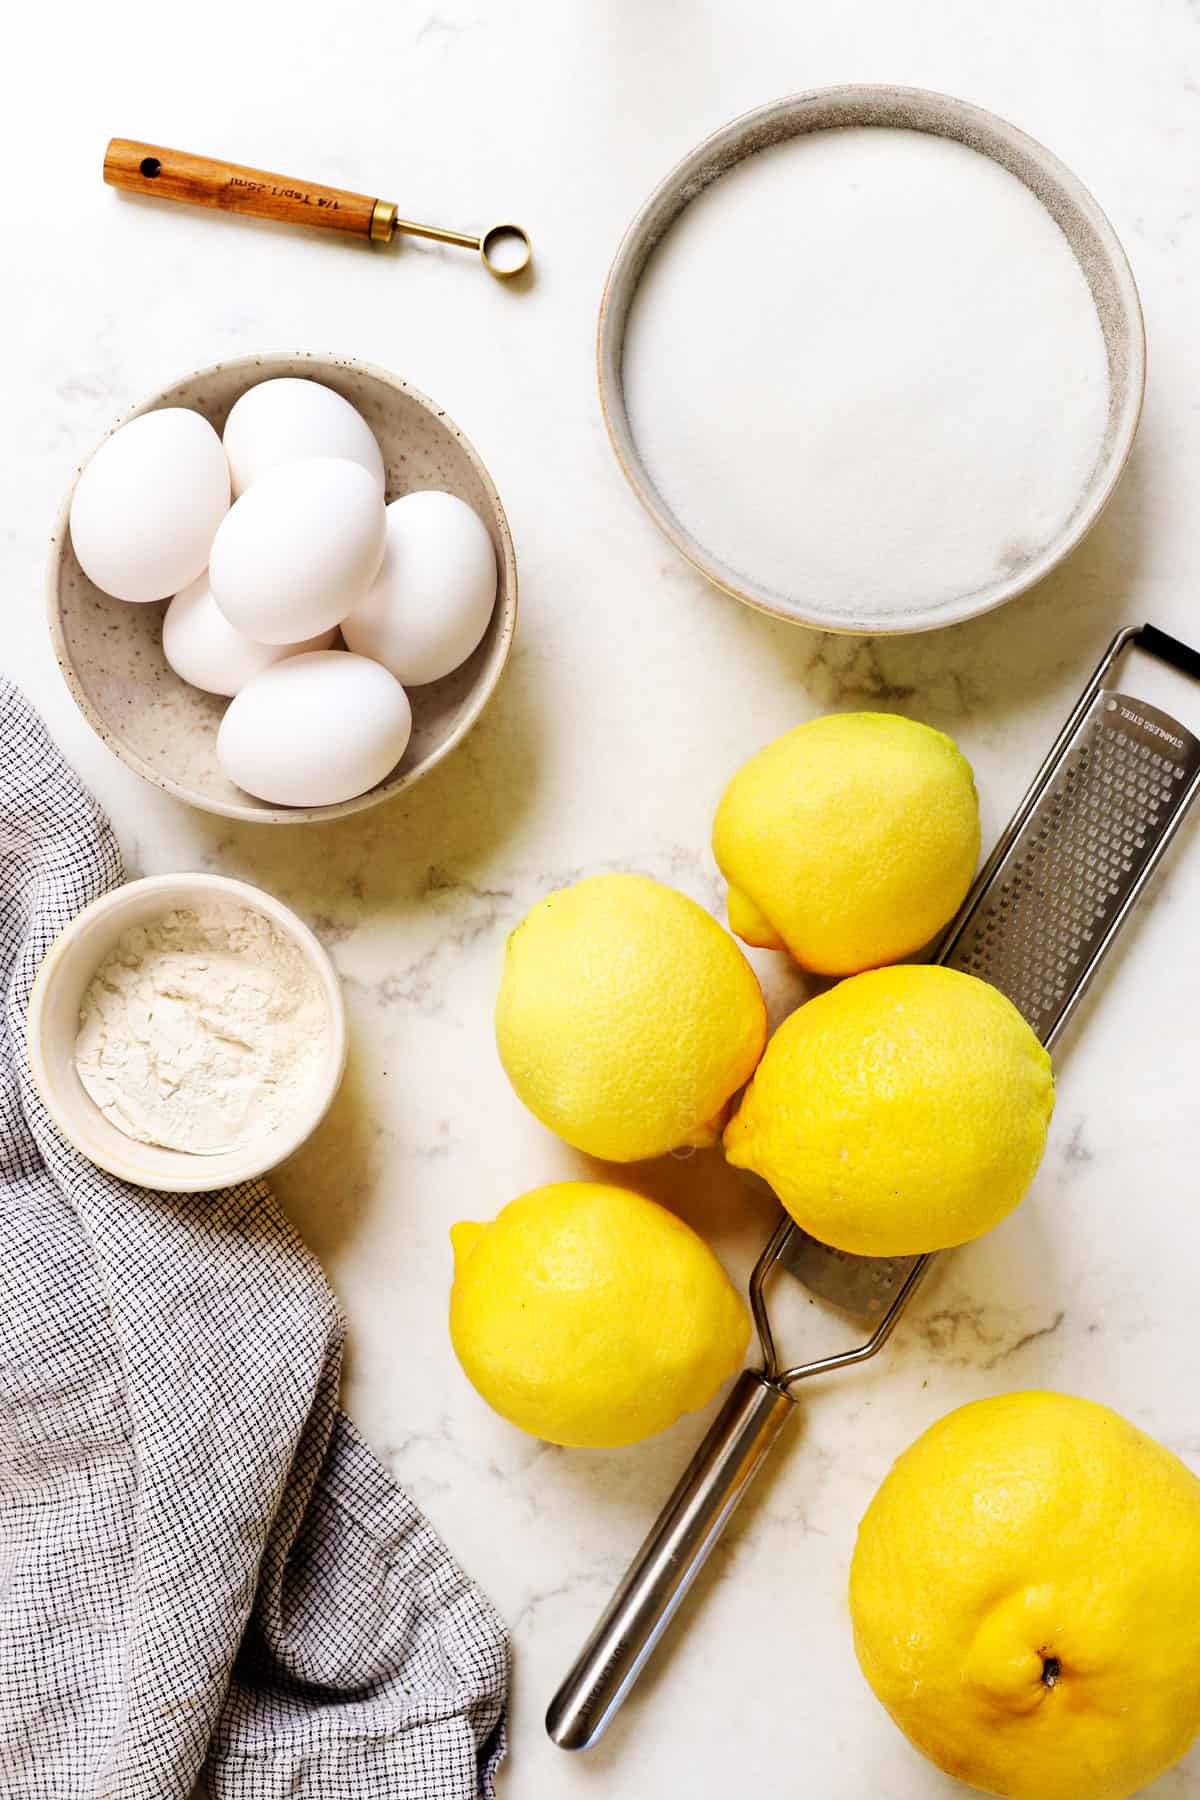
Lemon Bar Recipe ingredients
Let’s review the ingredients for this recipe and answer any questions you might have (measurements in the printable recipe card at the bottom of the post):
THE SHORTBREAD CRUST:
the Lemon TOPPING:

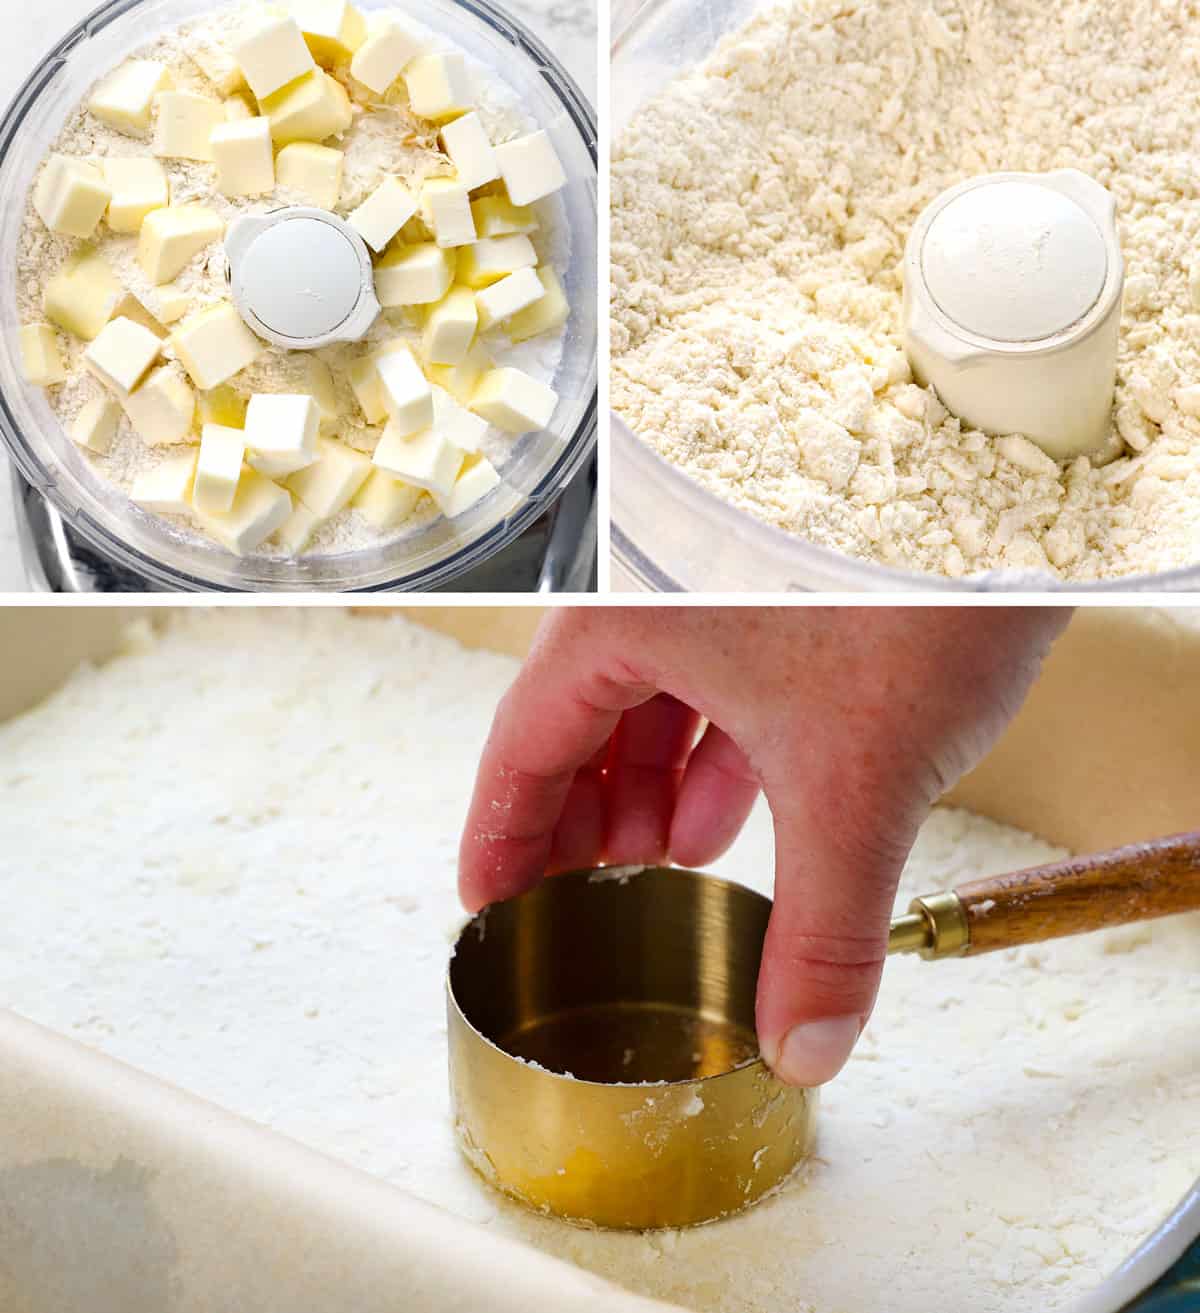
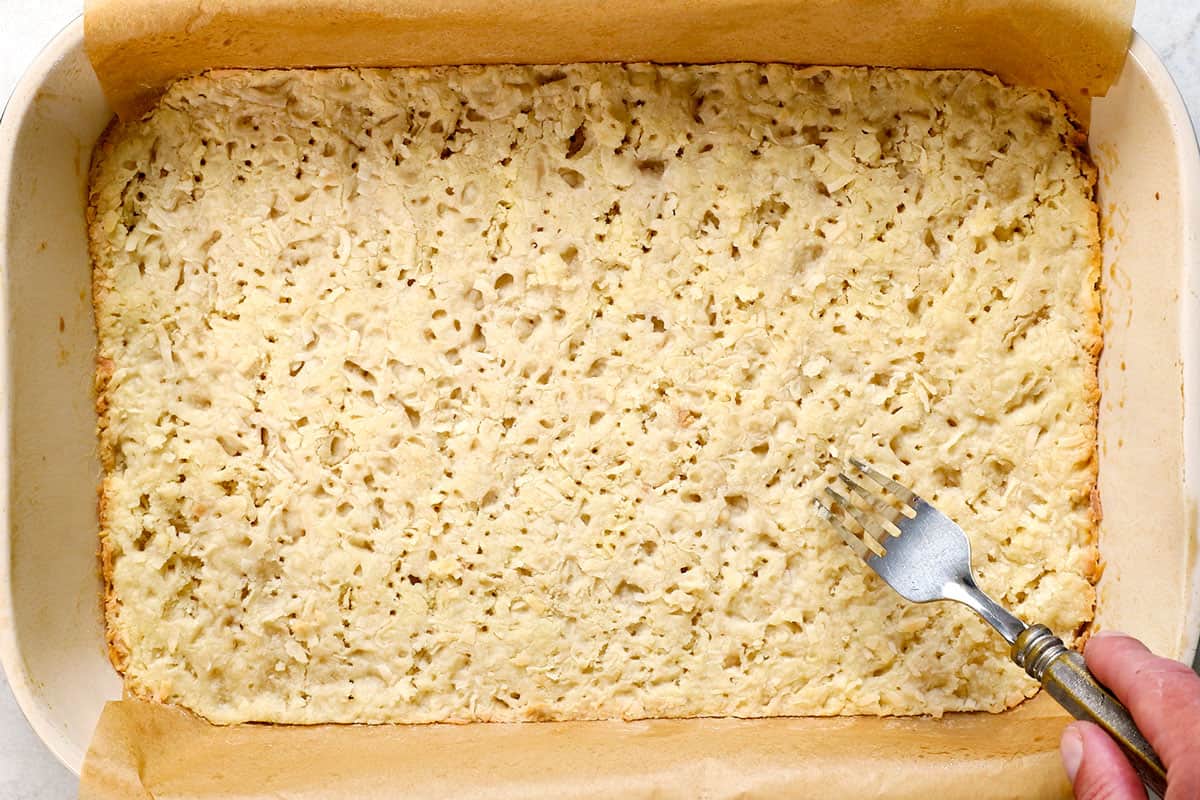
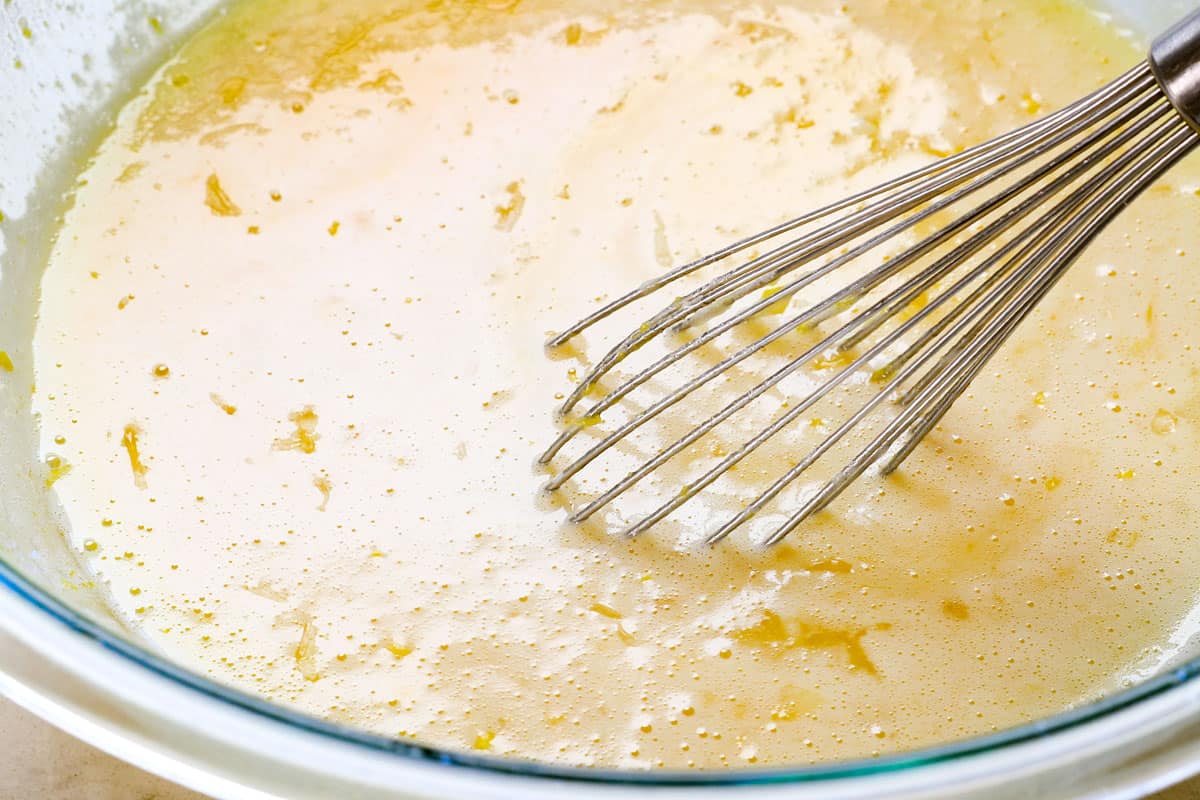
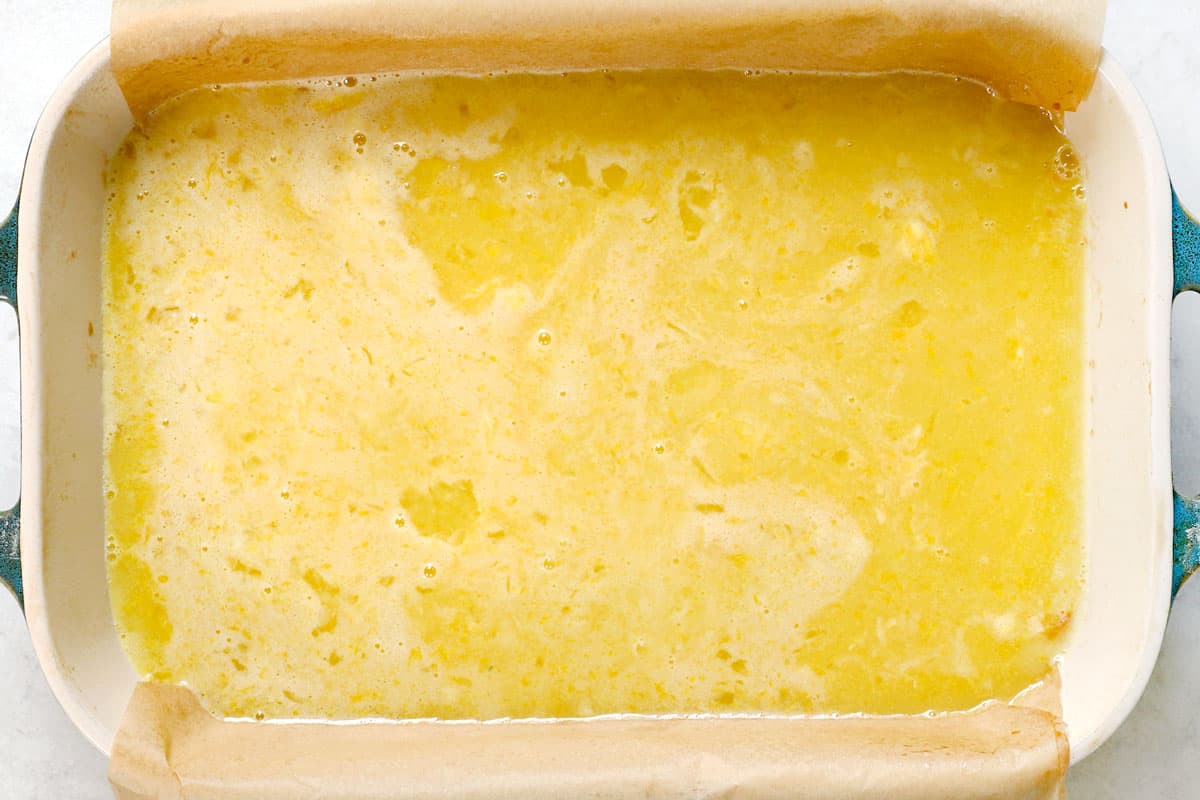
How to make Homemade Lemon Bars
Let’s take a closer look at how to make the best lemon bars with step-by-step photos (full recipe in the printable recipe card at the bottom of the post):


How to tell when lemon bars are done
To determine when lemon bars are done, look for these key indicators:
1. Set Filling: The filling should be set but still slightly jiggly in the center when you gently shake the pan. It should not be liquid or runny.
2. Firm Top: Gently touch the surface of the lemon bars; it should feel firm and not sticky. If your finger leaves an indentation, they need more time.
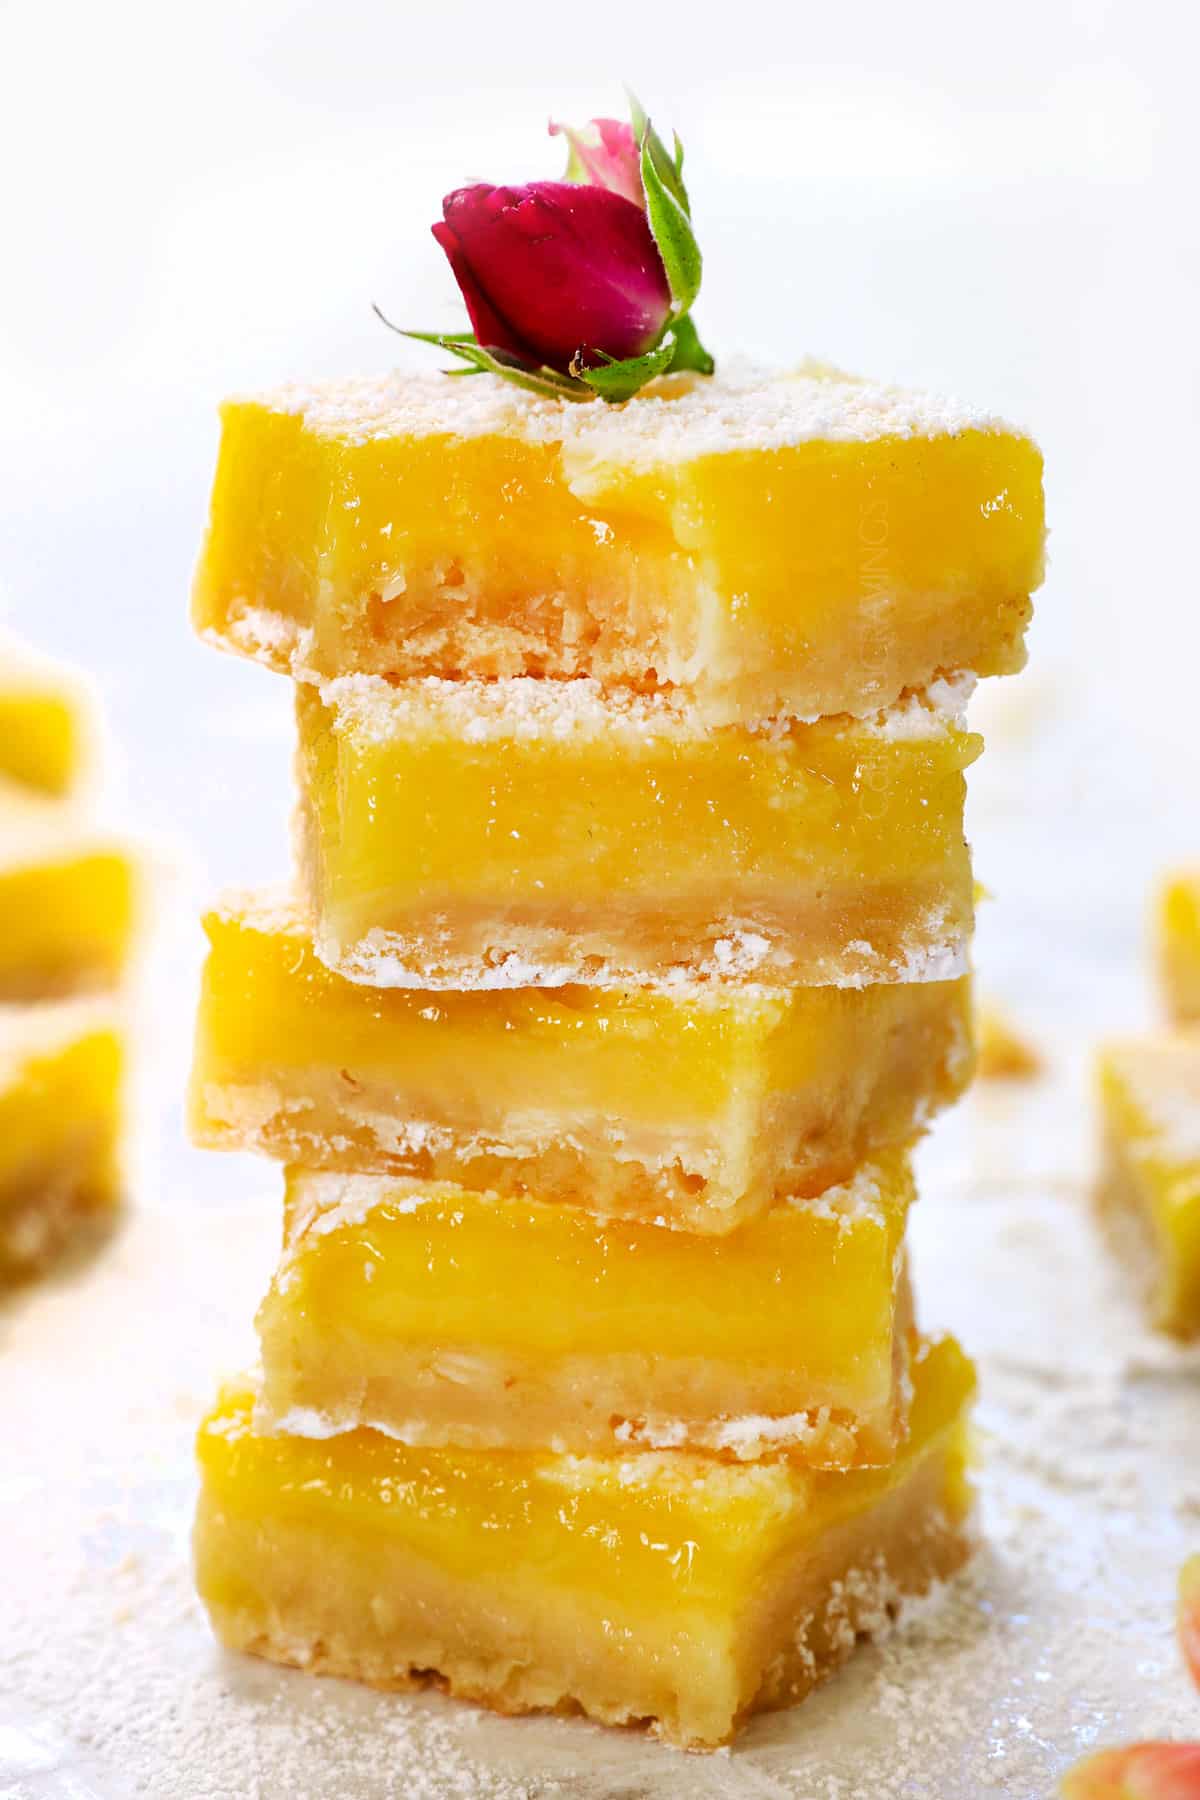
How to cut lemon bars
To cut lemon bars neatly and cleanly, follow these steps:
1. Cool Completely: Chilling the bars in the refrigerator or freezer for a few hours or overnight makes cutting much easier and helps them hold their shape. I always freeze mine-they thaw super quickly!
2. Remove from Pan: Using the parchment paper’s overhanging edges, lift the entire slab of lemon bars and place them on a cutting board.
3. Sharp Hot Knife: Use a sharp knife for clean cuts. Run the knife under hot water and dry off before slicing. Repeat as needed.
4. Clean Knife: Wipe the knife with a damp cloth or paper towel between cuts to prevent sticking and keep the edges clean.
5. Mark and Cut: Lightly score the top of the lemon bars to mark your cuts for perfectly even squares every time. Then, cut straight down, using a gentle sawing motion, when you get to the crust if necessary.


TIPS for making best lemon bars recipe
Follow these tips and tricks for the best bars every time!

Lemon Bars REcipe variations


How to store a Lemon Bar
Place the lemon bars in an airtight container or cover the pan tightly with plastic wrap or foil. If stacking, place parchment or wax paper between layers to prevent them from sticking together. Refrigerate for up to 7 days. If sharing, lightly dust the bars with powdered sugar when ready to serve for visual appeal.

Do lemon bars need to be refrigerated?
Yes, lemon bars should be refrigerated. The filling, made with eggs, sugar, and lemon juice, is perishable and can spoil if left at room temperature for extended periods. Refrigeration helps maintain their freshness and prevents bacterial growth. Additionally, refrigeration helps to preserve the texture of the bars, keeping the filling firm instead of weepy or overly gooey.
Can you freeze Lemon Bars?
You can freeze lemon bars for up to 3 months to extend their shelf life (wait to add powdered sugar). Refrigerate or freeze the pan before slicing per recipe instructions. Slice the bars, then place the slices on a baking sheet without them touching. Flash freeze for 1 hour. Wrap each lemon bar individually in plastic wrap, then place in a freezer-safe bag.
When you’re ready to enjoy them, thaw the bars in the refrigerator overnight or for a few hours, then dust with powdered sugar right before serving.
Best Lemon Bar Recipe FAQs
Not long at our house! Lemon bars typically last about 4 to 5 days when covered tightly with plastic wrap or foil and stored in the refrigerator.
If your lemon bars are browning on top, try adjusting the oven temperature, baking time, and rack position, and consider using a different baking pan if necessary. Here are some common causes and tips to prevent browning:
1. High Oven Temperature: Baking at too high a temperature can cause the top of the lemon bars to brown. Make sure you are baking at the temperature specified in the recipe. Using an oven thermometer can help verify the accuracy of your oven’s temperature.
2. Overbaking: Leaving the lemon bars in the oven for too long can lead to browning. Check for doneness a few minutes before the recommended baking time. The filling should be just set but still soft.
3. Oven Rack Position: Placing the baking pan too close to the top heating element can cause the top to brown. Try baking the lemon bars on a lower rack to prevent this.
4. Sugar Caramelization: The sugar in the filling can caramelize if exposed to high heat for too long, leading to browning. Ensure the filling is evenly mixed and the oven temperature is correctly set.
5. Uneven Heat Distribution: If your oven has hot spots, it can cause uneven browning. Rotate the pan halfway through baking to ensure even cooking.
6. Direct Heat Exposure: Using a glass or dark-colored baking pan can absorb more heat, leading to browning. Consider using a light-colored metal baking pan for more even baking.
Lemon bars should be slightly gooey – that’s part of the appeal. However, if your lemon bars are too gooey, it could be due to several factors. Here are some common reasons and tips to achieve the perfect creamy texture:
1. Underbaking: The most common reason for gooey lemon bars is underbaking. Please make sure you bake them for the full time specified in the recipe or until the filling is set and no longer jiggly in the center. The edges should be lightly browned.
2. Cooling Time: Lemon bars need adequate time to cool and set. Allow them to cool completely at room temperature before refrigerating for a few hours or overnight. Cutting into them too soon can result in a gooey texture.
3. Incorrect Oven Temperature: Ensure your oven is at the correct temperature. Use an oven thermometer to verify accuracy. If the temperature is too low, the bars may not set properly.
4. Too Much Liquid: If you add too much lemon juice or use extra-large eggs, the filling can be too liquidy. Follow the recipe measurements precisely.
5. Mixing Method: Mix the filling ingredients until just combined. Overmixing can incorporate too much air, affecting the texture.
6. Proportions: Ensure the ratio of eggs to sugar and lemon juice is correct. Too much sugar or lemon juice can prevent the filling from setting properly.
If your lemon bars look like scrambled eggs, it’s likely due to the eggs in the filling cooking too quickly or unevenly. Here are some possible reasons and tips to prevent this:
1. High Oven Temperature: Baking at too high a temperature can cause the eggs to cook too rapidly, resulting in a scrambled texture. Make sure you’re following the recipe’s specified temperature and using an oven thermometer to verify accuracy.
2. Overmixing the Filling: Overmixing can incorporate too much air, which can cause the filling to rise and fall unevenly, leading to a scrambled texture. Mix the ingredients just until combined.
3. Improper Mixing of Ingredients: Ensure the eggs are whisked thoroughly before sifting the sugar into the mixture.
4. Uneven Heat Distribution: Ensure your oven heats evenly. If your oven has hot spots, consider rotating the pan halfway through baking.
5. Baking Time: Overbaking can cause the eggs to coagulate too much. Bake just until the filling is set but still slightly jiggly in the center.


Looking for more Lemon Dessert Recipes?
Lemon Meringue Pie
Lemon Curd
Lemon Pie
Lemon Blueberry Cake
Lemon Raspberry Cake
Layered Lemon Cake
Lemon Pound Cake
Lemon Cheesecake
Lemon Cheesecake Bars
WANT TO TRY THIS Lemon Bars RECIPE?
PIN IT to your recipe BOARD TO SAVE FOR LATER!
FIND ME ON PINTEREST FOR MORE GREAT RECIPES! I AM ALWAYS PINNING :)!
©Carlsbad Cravings by CarlsbadCravings.com
Best Lemon Bars Recipe
Save This Recipe To Your Recipe Box
You can now create an account on our site and save your favorite recipes all in one place!
Ingredients
Coconut Shortbread Crust
- 2 cups all-purpose flour
- 3/4 cup sweetened shredded coconut
- 1/3 cup powdered sugar
- 1/2 teaspoon vanilla extract
- ¼ teaspoon salt
- 1 cup (2 sticks) unsalted butter, cold, cut into 1/2" cubes
LEMON TOPPING
- 5 large eggs at room temperature
- 1 egg yolk at room temperature
- 2 cups granulated sugar
- 1/3 cup (43g) all-purpose flour
- Pinch of salt
- 2-3 teaspoons lemon zest (depending on desired tartness) (zest before juicing)
- 1 cup lemon juice (4–6 lemons)
Instructions
- Note: The Lemon Topping needs to be added to the crust immediately while it’s still warm, so make sure the eggs are at room temperature and you have juiced (and zested) your lemons before you begin the recipe.
- Preheat the oven to 350 degrees F. Line a 9×13 baking pan with parchment paper so the paper overhangs the two short sides (so it can be lifted out once cooked). Spray the sides not covered in parchment with nonstick cooking spray.
- Shortbread Crust: Add the Crust ingredients to a food processor EXCEPT for the butter, then sprinkle the butter on top. Pulse 10 to 15 times until it resembles coarse pebbles. (Alternatively, whisk the ingredients together in a bowl, then cut the butter in with two forks or a pastry cutter.) Press the mixture firmly into the prepared pan to the edges, then use the bottom of a glass or measuring cup to compact it.
- Bake the Crust: Bake at 350 degrees F for 20-24 minutes until the edges are lightly golden and the center is still pale. Meanwhile, prepare the Lemon Topping to add to the crust while it’s still warm. Remove the pan from the oven and use a fork to poke very shallow holes all over the top of the warm crust. This helps bind the crust and topping together.
- Lemon Topping: Whisk the eggs in a large bowl until combined; don’t overmix. Sift in the sugar and flour. Add the salt, lemon zest, and lemon juice and gently whisk until combined. Don’t overmix, or the bars will be foamy on top. Pour the topping evenly over the warm base, then gently tap the pan on the counter to release any trapped air bubbles.
- Bake the Bars: Bake the bars for 20-26 minutes or until the center is set and the lemon topping doesn’t stick to your finger. The topping should not jiggle when you shake the pan with an oven mitt.
- Cool: Cool the bars on the counter for 2 hours, then refrigerate for at least two hours before slicing and serving. I like to freeze my bars instead (wrap the pan in plastic wrap) for the cleanest slices. The bars thaw very quickly.
- Slice: Once cool, lift the bars onto a cutting board using the parchment paper overhang. Dust with powdered sugar using a sieve. Cut into squares using a hot knife (run under hot water and dry), cleaning the knife between each cut. For sweeter bars, dust with additional powdered sugar.
Notes
- To Store: Place the lemon bars in an airtight container or cover the pan tightly with plastic wrap or foil. If stacking, place parchment or wax paper between layers to prevent them from sticking together. Refrigerate for up to 7 days. If sharing, lightly dust the bars with powdered sugar when ready to serve for visual appeal.
- To Freeze: Refrigerate or freeze the pan before slicing per recipe instructions. Slice the bars, then place the slices on a baking sheet without them touching. Flash freeze for 1 hour. Wrap each lemon bar individually in plastic wrap, then place in a freezer-safe bag for up to 3 months. Thaw the bars in the refrigerator for a few hours or overnight, then dust with powdered sugar right before serving.
Want To Make This Recipe?

Did You Make This Recipe?
Tag @CarlsbadCravings and Use #CarlsbadCravngs
Leave a Review, I Always Love Hearing From You!


leave a review