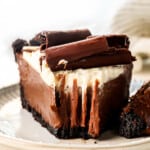
Chocolate Cream Pie
This Chocolate Cream Pie is a dizzyingly delicious dessert that will have heads turning - the ultimate rich and creamy dessert for chocolate lovers! A buttery Oreo crust is filled with silky, supremely chocolaty custard pudding filling, topped with billowy homemade whipped cream then showered with showstopping chocolate shavings. This Chocolate Cream Pie recipe can be made 100% ahead of time, including the whipped cream (thanks to my stabilized whipped cream technique) for a stress-free dessert win. This recipe requires a few steps but is easy to follow with a detailed step-by-step video, photos, tips and tricks for one of the most stunning desserts of your life!
Servings 12 servings
Ingredients
Oreo crust:
- 24 Oreo cookies (with filling)
- 5 tablespoons salted butter
Chocolate Custard filling:
- 6 tablespoons salted butter, chopped into pieces (chop BEFORE you begin)
- 6 ounces QUALITY semi-sweet chocolate (I recommend Ghirardelli's)
- 2 ounces QUALITY unsweetened chocolate (I recommend Ghirardelli's)
- 6 large egg yolks, room temperature
- 2 tablespoons cornstarch
- 1/2 teaspoon cinnamon (optional)
- 1/4 teaspoon salt
- 2 1/2 cups half and half
- 1/2 cup granulated sugar
- 1 1/2 teaspoons vanilla extract
Stabilized Whipped Cream:
- 1 teaspoon unflavored gelatin
- 1 1/2 tablespoons water
- 1 cup cold heavy cream
- 3 tablespoons powdered sugar
- 1 teaspoon vanilla extract
Instructions
Prep
- Preheat oven to 350 degrees F.
- Chop the butter for the custard into pieces; set aside.
- Add the chocolate for the custard to a food processor and process until ground. Remove and wipe the processor clean. (Alterntively, chop by hand.)
For the crust: (Can be made 1-2 days in advance)
- Add Oreos to the now empty food processor and process until finely ground. Add butter and pulse to combine. (Or crush with a rolling pin then mix with butter in a bowl).
- Pour the crumbs into a 9-inch pie plate that is at least 1 1/2 inches deep. (I use a quiche pan with a removable bottom.) Press the crumbs up the sides, then press the remaining crumbs onto the bottom; use the bottom of a measuring cup or glass to firmly press the crumbs into the bottom. If using a deep pan, you only need to press the crumbs 1 1/2-inches up the sides.
- Bake at 350 degrees F for 10 minutes. Transfer to a wire rack and cool completely before filling.
For the chocolate custard filling:
- Add egg yolks, cornstarch, cinnamon and salt to a large liquid measuring cup or mixing bowl and whisk until thoroughly combined, about 30 seconds; set aside.
- Add sugar and half and half to a medium saucepan. Bring to a simmer over medium-high heat, stirring often.
- Ladle out about ½ cup of the hot liquid (eyeball it) and very slowly whisk it into the egg yolk mixture to temper the eggs, WHISKING CONSTANLY. Repeat a few times. Never stop whisking, even while ladling.
- Gradually whisk the tempered egg yolk mixture back into the saucepan until combined (never stop whisking during this process). Bring to a simmer, whisking constantly (especially around the edges) until the mixture thickens and a few bubbles burst on the surface, about 1 minute.
- Remove from the heat and immediatley whisk in the vanilla, followed by the chopped butter until melted. Whisk in the ground chocolate a little at a time until completely melted and smooth.
- Pour the filling into the cooled pie crust and smooth into an even layer.
- Press a piece of plastic wrap directly on the surface of the filling. Refrigerate until filling is cold and set, about 3 hours, but best if overnight. You can add the Stabilized Whipped Cream anytime after the 3 hours and serve or return the pie to the fridge until ready to serve, up to 3 days.
Stabilized Whipped Cream
- Add unflavored gelatin to a microwave safe bowl then pour the cold water over top; let stand for 5 minutes. Microwave for 20 seconds. Stir the mixture, then set aside while you immediately begin to beat the heavy cream.
- Add heavy cream, powdered sugar, and vanilla extract to a large mixing bowl. Whip using an electric hand mixer just until soft peaks form (the peaks flop over when the beaters are lifted.)
- Turn the mixer to low and slowly pour in the gelatin mixture. Mix until combined then increase speed to medium and continue mixing until stiff peaks form (peaks stand straight up when the beaters are lifted).
Assemble
- Spread the whipped cream evenly over top the pie. Garnish with chocolate shavings or chocolate curls. (See post for detailed chocolate curls tutorial).
- Serve immediately or cover with a cake caddy or tent with foil and keep chilled until ready to serve, up to 3 days.
- To cut clean slices: Fill a large glass with hot water. Dip the knife in the hot water before each cut, then wipe clean with a paper towel after each cut, then repeat. You can also run the knife under hot water in between cuts.
Video
Notes
Tips and Tricks
- Use quality chocolate: Now is not the time to skimp on quality chocolate or you can ruin your Chocolate Cream Pie even if you do everything right. Use quality baking chocolate that is FRESH. I recommend Ghirardelli brand chocolate. Less quality or old chocolate will also leave you with a grainy filling.
- Can I use different chocolate?: The combination of semi-sweet chocolate and unsweetened chocolate provides the perfect, rich, chocolaty, not-too-sweet custard filling. You may play around with the semi-sweet chocolate, but you MUST maintain 2 ounces of unsweetened chocolate. Unsweetened chocolate adds structure because it boasts more cocoa solids which are rich in starches, a natural thickener.
- Can I use chocolate chips? No, it is CRUCIAL to use quality baking chocolate for this recipe or your filling will be grainy. Baking chocolate is cooled, hardened chocolate liquor with a high percentage of cocoa butter because it’s intended to be baked with and therefore melts beautifully when making the filling.
- Do I have to use stabilized whipped cream? Stabilized whipped cream is simply heavy cream that has been whipped with gelatin in order to give it structure. I am a huge fan because it allows you to prepare any dessert 100% ahead of time. It holds its shape long after the last bite is gone without weeping or melting. If you want to make traditional whipped cream, skip the gelatin and water. You must wait until serving to add the whipped cream, otherwise, it can deflate and melt.
- Vegetarian gelatin substitute: Use 1 teaspoon agar-agar instead of gelatin.
- My favorite pie pan: I highly recommend a 9-inch quiche pan with a removable bottom as seen in these photos. The removable bottom shows off the beautiful sides of the pie and allows you to slice the pie cleanly without ruining any crust or other pie slices!
- Storage: Store covered, in the refrigerator, for up to 4 days. I don’t recommend freezing.
Make Ahead
You can prepare the entire recipe ahead of time or in stages:- Entire recipe: Thanks to the stabilized whipped cream, the pie can be made and refrigerated up to 3 days in advance. Be sure to cover the pie to prevent it from drying out with tented foil or a cake caddy.
- Crust: can be baked and cooled up to 2 days in advance before filling. Cool, then wrap tightly and store at room temperature. The baked crust can also be frozen for up to 3 months.
- Filling: can be turned into the crust and covered with plastic wrap pressed directly against its surface, then refrigerated for 24 hours before topping with cream.
- Chocolate Curls: transfer the curls to the freezer to harden, then to a zip-top bag and refrigerate until you need them.