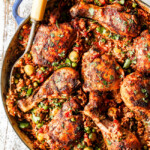
Arroz con Pollo
Arroz con Pollo “chicken with rice” bursting with robust flavor, succulent chicken, tender rice and customizable add-ins! It may look fancy, but this complete meal-in-one bakes all in one pot for an easy dinner any night of the week. The juicy chicken and seasoned rice simmer with tomatoes, bell peppers, onions, peas and olives for a flavor explosion in every bite. You can also customize your Arroz con Pollo to your family tastes with different veggies or add-ins. NOTE: this is not traditional Arroz Con Pollo specific to a certain region, but my own version which shares a similar flavor profile.
Servings 6 -8
Ingredients
Seasoning Mix
- 1 TBS Each dried oregano, ground cumin
- 2 tsp EACH smoked paprika, salt
- 1 1/2 tsp EACH ground garlic powder, onion powder
- 1 tsp EACH ground coriander, chili powder, pepper
- 1/2 tsp EACH dried thyme, ground turmeric
- Pinch - 1/4 teaspoon cayenne pepper optional
15 Minute Chicken marinade
- part Spice Mix in directions
- 3 tablespoons olive oil
- 1 tablespoon white vinegar
- 4 bone-in chicken thighs skin removed
- 4 chicken drumsticks skin removed
Rice
- 1 tablespoon olive oil
- 1 onion diced
- 1 green pepper diced
- 1 tablespoon drained capers optional
- 2 cups basmati rice well rinsed and drained
- 2 garlic cloves minced
- 2 1/2 tablespoons reserved Spices in directions
- 1 12 oz. jar roasted red bell peppers drained and chopped - optional
- 1 15 oz. can can fire roasted diced tomatoes well drained
- 2 tablespoons tomato paste
- 3 1/2 cups low sodium chicken broth
- 1 bay leaf
Finishing
- 1/2 cup pimento stuffed olives
- 1 cup frozen petite peas thawed
- chopped cilantro
Instructions
- Whisk together all of the seasonings mix in a large bowl (large enough to hold chicken). Remove 2 ½ tablespoons Seasoning to use later. To the remaining seasoning in the bowl, whisk in 3 tablespoons olive oil and 1 tablespoon vinegar (it will be thick). Add chicken and massage spices into chicken. Let sit at room temperature for 15-30 minutes or cover and refrigerate for up to 8 hours.
- Preheat oven to 375 degrees F. Heat 1 tablespoon olive oil in a large deep heavy skillet (oven proof with lid) over medium. Add chicken and cook until golden, 3-5 minutes pers side. Remove to a plate.
- Add rice, garlic and Reserved Seasonings and sauté for 2 minutes. Stir in roasted bell peppers, diced tomatoes, tomato paste, and broth. Bring to a simmer and simmer, uncovered for 3 minutes. Nestle chicken into the top of the rice in a single layer, cover, and transfer to the oven.
- Bake 20-25 minutes (stirring at 10 minutes) OR until chicken registers 175 degrees, the rice is tender and most of the liquid is absorbed. If the rice seems dry and beginning to scorch before its tender, stir in additional ¼ cup broth or water.
- Remove from oven and stir in peas and olives, cover and let stand for 10 minutes (the rice will absorb the rest of the liquid). Fluff rice with a spatula, garnish with cilantro and serve warm. If you omitted the capers, you may want to garnish with a squeeze of fresh lime or lemon juice.
Video
Notes
Don't miss the "how to make" recipe video at the top of the post!
POT:
- I use a 3 ½ quart cast-iron enamel braiser that measures 11 1/2" in diameter by 2 1/2" high. You will want to use a similar oven proof dish/skillet with a tight-fitting lid.
- If you don’t have an oven proof skillet, you can transfer the chicken and rice to an oven safe baking dish, just be aware baking times will vary.
- If you don’t have a lid, you may cover your oven proof dish tightly with foil. If your seal isn’t tight, then heat and water will escape resulting in undercooked rice and drier chicken.
- You can use all chicken thighs or all drumsticks. If you use all drumsticks, you will want to use 10 instead of 8 because they are smaller than thighs.
- I prefer to remove the skin from my chicken because I like the texture better and feel less guilty devouring multiple servings without it. I also find the chicken is just as flavorful without the skin. That being said, you can absolutely leave the skin on your chicken if you prefer. You will want to sear the chicken for a decent amount of time to render the fat, otherwise you will be left with soggy chicken and greasy rice.
- You can use boneless, skinless chicken breasts, but they will not be as juicy. If you choose to use chicken breasts, then you will want to use small chicken breasts or chicken fillets/large chicken breasts cut in half through the equator so they will cook in the allotted 25 minutes.
- I also highly recommend you brine you chicken breasts first. Brining will increase their moisture capacity and render them much more tender.
- To brine your chicken breasts, mix 4 cups warm water with ¼ cup KOSHER salt in a shallow glass dish or freezer bag. Stir until the salt dissolves. Add chicken and let sit at room temperature for 15-30 minutes – NO longer! Remove chicken from the brine, rinse in cold water and pat dry.
- You may use traditional long grain white rice, but it is not as forgiving as basmati and can become mushy easily.
- Basmati rice, on the other hand, is extremely forgiving. Basmati grains are longer than traditional white rice and cook up lighter and fluffier. The individual grains remain distinct when cooked instead of sticking together which means no more clumpy or mushy rice!