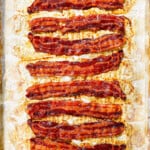
Oven Baked Bacon
Learning how to cook bacon in the oven will change your culinary life – you’ll never go back to the stovetop again! This almost entirely hands-off method results in shatteringly crispy, evenly cooked, regular or thick cut bacon without the sputtering mess of the stovetop – then just toss the foil when you’re done (NO messy wire rack needed)! Cook as few or as many slices as you like (great for entertaining), or save some to pull out for eggs, omelettes, sandwiches, salads, burgers and more!
Servings 10 bacon slices
Ingredients
- 10-12 slices bacon (regular or thick cut) per sheet (may use less)
- 13x18 rimmed baking sheet
- foil
- parchment paper
- paper towels
Instructions
- Prep: Preheat oven to 400°F. Line a rimmed baking sheet (including the sides) with foil for easy cleanup. Top with parchment paper (bacon gets crispier with parchment). You may prep and cook 2 sheets at once.
- Add Bacon: Line the parchment with desired number of strips of bacon in a single layer without overlapping (as little as you like, or typically can fit up to 10-12).
- To Cook REGULAR BACON: Bake regular bacon for 12-15 minutes, then check for doneness. Flip if needed (I always do), and continue to bake an additional 5-10 minutes or until it reaches desired crispiness. For paper thin bacon, it might be done in as little as 10 minutes, so watch carefully! If baking two racks at once, rotate their positions halfway through baking.
- To Cook THICK CUT BACON: Bake thick cut bacon for 20 minutes, then check for doneness. Flip if needed (I always do), and continue to bake an additional 5-10 minutes or until it reaches desired crispiness, flipping every 10 minutes. If baking two racks at once, rotate their positions halfway through.
- Drain: Using tongs, transfer bacon to a paper towel lined plate or wire rack in a single layer. Let cool slightly, then serve immediately or cool and refrigerate for later use (See Notes).
- To Save Grease: Let the bacon grease cool for a few minutes, then strain into a paper towel lined sieve placed over glass storage container (like Mason jars). Refrigerate for future use.
Video
Notes
To Store
- Make ahead: Follow the storage below, then just pull out slices as needed to use cold in sandwiches, salads, etc. or reheat per instructions below.
- Storage:Store bacon in an airtight container in a single layer with paper towels on the top or bottom. I wrap mine “accordion style” by placing a slice at the end of a paper towel, then wrapping, adding another piece, folding over, adding another slice, folding over, etc., then placing in a plastic bag. Store in the refrigerator for up 7 days.
- Freezing: Place the cooled bacon slices in a single layer on a baking sheet and flash freeze until firm. Once frozen, transfer the bacon slices to a freezer-safe bag or container, removing as much air as possible before sealing. Properly frozen, oven-baked bacon can last in the freezer for up to 1-2 months. When ready to use, reheat the bacon in the microwave, oven, or skillet until warmed through.
To Reheat
- Microwave: Place the desired amount of baked bacon on a microwave-safe plate lined with paper towels on the top and bottom. Microwave on high in 15-30 second increments until heated through to your liking. Be careful not to overheat, as bacon can become rubbery if cooked for too long in the microwave.
- Oven: Reheat on a foil lined baking sheet at 350°F for 5 minutes, or until warmed through. Keep an eye on the bacon to prevent overcooking.
- Skillet: Heat a skillet over medium heat. Place the baked bacon slices in the skillet and cook for 1-2 minutes on each side, or until heated through and crispy again.
- Air Fryer: Preheat your air fryer to 350°F (175°C). Place the baked bacon in the air fryer basket in a single layer. Cook for 2-3 minutes, or until heated through and crispy.