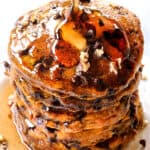
Pumpkin Pancakes
These Pumpkin Pancakes are perfectly soft and fluffy, brimming with warm fall spices of cinnamon, ginger, and nutmeg and pockets of melty chocolate chips. Finish them off with a drizzle of warm maple syrup and a dollop of whipped cream and you’ll be sinking your teeth into a steaming hot stack of the best melt-in-your mouth Pumpkin Pancakes ever! Not only are these Pumpkin Spice Pancakes delicious, they are simple, quick, made with everyday ingredients and the best way to use up that pesky leftover can of pumpkin! Make them for lazy Sunday mornings, special occasions, or breakfast-for-dinner – or pull some out of the freezer for those busy mornings too!
Servings 12 pancakes
Ingredients
- 1 3/4 cups all-purpose flour
- 1/4 cup packed brown sugar
- 1 tablespoon baking powder
- 1 teaspoon baking soda
- 1 1/2 teaspoons ground cinnamon
- 1/2 tsp EACH ground ginger, salt
- 1/4 tsp EACH ground nutmeg, ground cloves
- 1 cup pumpkin puree
- 1/4 cup unsalted butter
- 1 1/2 cups buttermilk (see DIY in notes)
- 2 large eggs
- 2 teaspoons vanilla extract
- 1 cup mini chocolate chips
Instructions
THE BATTER
- Melt the butter in a microwave safe dish; set aside to slightly cool.
- Whisk the flour, sugar, baking powder, baking soda, cinnamon, ginger, salt, nutmeg and ground cloves together in a large mixing bowl.
- In a separate large bowl, whisk together the pumpkin puree and melted butter. Whisk in the buttermilk, followed by the eggs and vanilla.
- Make a well in the center of the flour mixture. Pour the buttermilk mixture into the well and gently whisk just until just a few streaks of flour remain. Fold in the chocolate chips just until the flour is incorporated. The batter will be thick and lumpy (DON'T over-mix or you won't have soft, fluffy pancakes). Allow the batter to rest for 5-10 minutes.
TO COOK PANCAKES
- Heat a large nonstick skillet (or griddle) over medium-low heat.
- Add the batter 1/3 cup at a time, (it will be thick) and gently spread the batter into a 4-inch circle using your spatula or the back of the measuring cup.
- When edges are set and a few bubbles pop on surfaces of the pancake, flip over, about 3 minutes. Cook the other side for 1 to 2 additional minutes, until lightly browned and cooked in the middle.
TO SERVE
- Serve warm with your choice of maple syrup, whipped cream, bananas and/or toasted or caramelized pecans.
Notes
- DIY buttermilk: add 2 tablespoons vinegar or lemon juice to a liquid measuring glass. Add enough milk (not nonfat) to equal 1 ½ cups. Give it a stir and let sit 5-10 minutes in order to activate and slightly curdle.
- Canned pumpkin puree: you will need to use pure pumpkin puree and NOT pumpkin pie filling. Pumpkin puree is 100% pure pumpkin that has been cooked and pureed without any added sugar or spices. Libby’s brand is my favorite and what I have used in this recipe.
- Chocolate chips: SO GOOD, I do not recommend skipping! I have tried this recipe both with regular chocolate chips and mini chocolate chips and my whole family prefers the mini chocolate chips. The mini chips provide an accent of chocolate whereas regular chocolate chips seemed to overwhelm the pancakes.
- Adjust heat if needed: these pancakes are extra moist, so it’s important to not cook them at too high of heat or the outsides will burn before the inside is cooked. Instead, be patient and cook at over moderately low heat to ensure each pancake cooks through to a beautiful golden color. If the pancakes are darker than you like, then your pan is too hot. Reduce the heat, remove the pan, let it cool for a few minutes, then start again at lower heat.
- Flip with the correct spatula: when flipping pancakes, you need a thin spatula that will adeptly slide under the delicate pancakes without getting caught on the edges. I love my fish spatula. It is made for flipping delicate fish and its long, thin, delicate shape is also perfect for flipping pancakes!
- Don’t burn the butter: to avoid burnt tasting pancakes, wipe the skillet clean and brush with fresh butter between batches. You can also omit the butter if you have a high-quality nonstick skillet.
- Make ahead: whisk the dry ingredients together and wet ingredients together separately and store them in separate airtight containers (refrigerate the wet) the day before. Combine them in the morning when you’re ready to make the pancakes.
HOW TO STORE AND REHEAT
- Storage: let the pancakes cool completely before lining them in a single layer or stack them with parchment in between each layer. Tightly cover and refrigerate for up to three days.
- To reheat: microwave one pancake on high for 15 to 20 seconds, 2-4 pancakes for 45 seconds and 5 pancakes for 60 seconds. To reheat in the oven, spread the pancakes on an ungreased baking sheet in an even layer so they aren’t touching. Cover tightly with foil and bake for 5-10 at 350 degrees until warmed through.
- To freeze: Line cooked and cooled pancakes on a baking sheet so they aren’t touching. Place the baking sheet in the freezer for 30-60 minutes or until pancakes are solid. Place pancakes in a freezer bag. Alternatively, you can place parchment paper in between each pancake before placing in a freezer bag or store each pancake in its own resealable bag. Squeeze out as much excess air as possible to prevent freezer burn. Freeze for up to 2 months.