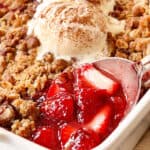
Strawberry Crisp
This Strawberry Crisp recipe is about to become your go-to strawberry dessert whether for potlucks, picnic, barbecues or for a lazy Sunday afternoon. It's not only sensational, but is one of the easiest strawberry desserts to make - less than 20 minutes of prep start to finish! The strawberries are tossed with sugar, vanilla, lemon juice and cornstarch then blanketed in an irresistible pecan, oat, cinnamon, sugar topping that bakes up super crispy (without the need to cut in cold butter!). Top the golden crumble with a big scoop of vanilla ice cream and dig into each glorious sweet, juicy, fruity, crunchy, buttery, cool and creamy bite. This Strawberry Crisp is made with pantry friendly ingredients and you can even use frozen strawberries (or berries) in the Fall and Winter months, because this is one swoon-worthy dessert you’re going to want to indulge in year-round!
Servings 6 servings
Ingredients
Strawberry Filling
- 2 pounds fresh, ripe strawberries (not soft)
- 1/3 cup granulated white sugar
- 2 1/2 tablespoons cornstarch (3 T for softer/juicier strawberries)
- 2 tablespoons lemon juice
- 1 ½ teaspoons vanilla extract
Topping:
- 2/3 cup flour
- 1/3 cup packed light brown sugar
- 3 tablespoons granulated sugar
- 2/3 cup old-fashioned rolled oats (NOT quick oats*)
- 3/4 cup chopped pecans, optional (increase oats to 1 C if not using)
- 1 teaspoon vanilla extract
- 1 teaspoon baking powder
- 1/2 teaspoon ground cinnamon
- 1/4 teaspoon salt
- zest of one lemon
- 8 tablespoons unsalted butter (1 stick), melted
Instructions
- Prep: Preheat the oven to 350°F. Lightly grease an 8x11 baking dish or a 9-inch square baking dish. Set aside.
- Topping: Add all of the topping ingredients to a large bowl EXCEPT the butter and stir until combined. Pour in the melted butter and stir with a spatula to combine then use your hands as needed to combine. Transfer to the refrigerator while you prep the filling.
- Cut Strawberries: It is important that the strawberries aren’t cut too small otherwise they can practically disintegrate! You will want to leave super small strawberries whole, halve small berries and quarter large berries. We are aiming for about 3/4-1-inch-wide pieces. Transfer sliced strawberries to a large bowl.
- Filling: Add the remaining Strawberry Filling ingredients to the strawberries and stir until evenly combined. Transfer filling to the prepared baking dish and spread into an even layer. Sprinkle the topping over the filling, breaking up any large chunks (you still want some small chunks).
- Bake uncovered, at 350°F for 35-45 minutes, until the topping is golden and the strawberry juices are bubbling vigorously around the edges. Remove from the oven and let cool on a wire rack for 10 minutes before serving. Serve with vanilla and extra cinnamon if desired.
Notes
- To use frozen strawberries: thaw the strawberries in the refrigerator overnight or at room temperature for about 2 hours. Slice and pat dry before using. Add 1 extra tablespoon of cornstarch.
- To make gluten-free Strawberry Crisp: swap the flour in the topping with gluten free flour 1 to 1 baking flour like Bob Red’s Mill. All the rest of the ingredients are gluten free.
- To make vegan Strawberry Crisp: replace the butter with vegan butter or coconut oil.
- Use a large enough baking pan. I used an 8x11 baking dish similar to this one, but you may use anything of a similar size, whether oval, square or rectangle that holds roughly 8 cups or has 80-90 square inches of surface area. A 9x9 square dish works well, but an 8x8 is too small.
- Use ripe yet firm strawberries. It is best to use firm strawberries for a soft and tender filling. Still, some strawberries will hold their shape while others will break down, that’s just the way the crisp crumbles! If you use softer strawberries, however, you can expect all of the strawberries to break down into more of a jammy consistency. If you go this route, add one extra tablespoon cornstarch.
- Don't let the strawberries sit in sugar. You also want to make the topping first so there isn't any lag time between mixing the strawberries with the sugar and popping the dessert into the oven. The strawberries will start to macerate (soften and release juices) once they're combined with sugar which we want to avoid.
MAKE AHEAD
I do not suggest assembling the fruit crisp and storing it ahead of time unbaked. The strawberries will macerate (soften and release juices) so you’ll end up with a watery filling and a soggy topping. You can, however, prep everything except adding the sugar to the strawberries. Here’s how:- Combine the sliced strawberries, cornstarch, lemon juice and vanilla. Transfer to your lightly greased baking dish, cover tightly with plastic wrap and refrigerate for up to one day.
- Prepare topping according to directions. Cover and refrigerate.
- When ready to bake, stir the sugar into the strawberry filling and crumble the topping overtop. Bake per recipe directions.
How to store and reheat
- To store: Strawberry Crisp is the very best fresh from the oven because the crisp is the crunchiest. You can certainly enjoy leftovers, but the topping will start to soften. Refrigerated fruit crisp is good for 3-4 days.
- How to freeze: Baked Strawberry Crisp may be frozen for up to 3 months but do freeze the unbaked dessert or it will bake up soggy. To freeze, let the crisp cool completely then wrap with a layer of plastic wrap followed by a layer of foil. Freeze for up to 3 months. When ready to use, thaw overnight in the refrigerator. Warm per below instructions.
- To reheat in the microwave: the microwave is convenient for smaller portions but the topping won’t get as crispy as the oven – just full disclosure – but still delish. To microwave, transfer a portion to a microwave safe plate. Microwave for 30 seconds then at 15 second intervals until warmed through.
- To reheat in the oven: reheat the baking dish uncovered at 350 degrees F for 15-20 minutes or until heated though. You can also transfer smaller portions to a smaller baking dish or cast-iron skillet to reheat.