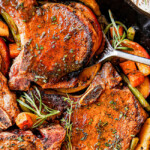
Pork Chops with Apples
This Pork Chops with Apples recipe is the epitome of Fall all in one skillet! It not only boasts pan seared pork chops and apples but green beans and butternut squash all simmered in a sweet and tangy apple cider pan sauce that’s lick the plate delicious. This cast iron pork chops recipe is incredibly juicy yet lean, fresh yet comforting, healthy yet hearty and most importantly, it’s layered with flavor and texture for days! I’ve also included tips and tricks on how to cook the juiciest pan seared pork chops EVER even if you've never made pork chops before.
Servings 4 servings
Ingredients
Brine (optional but recommended)
- 4 rib chops trimmed
- 1/4 cup kosher salt
- 4 cups warm water
- 2 tablespoons apple cider vinegar
- 2 tablespoons brown sugar
- 1 cup ice cubes
Spice Rub
- 1/2 TBS EACH paprika, garlic powder, onion powder
- 3/4 teaspoons salt
- 1/2 teaspoon pepper, cinnamon, dried mustard
Skillet
- 2 tablespoon olive oil divided
- 1 sweet apple sliced ¼” thick
- 1 cup butternut squash peeled and chopped into 1-inch cubes
- 1 cup green beans chopped into 2” pieces
Pan Sauce
- 1 cup apple cider NOT VINEGAR
- 1 tablespoon Dijon mustard
- 1 1/2 teaspoons brown sugar
- 1 teaspoon balsamic vinegar
- 1 1/2 teaspoons chopped fresh rosemary
- 1 teaspoon fresh thyme
Instructions
- BRINE (optional but recommended): Combine warm water and kosher salt together in a glass dish. Stir until the salt dissolves. Whisk in apple cider vinegar, brown sugar and ice, followed by pork. Add pork and let sit at room temperature for 15-30 minutes while you chop the apples/veggies. Remove pork from the brine, rinse thoroughly in cold water and pat dry.
- Whisk seasonings together and rub all over both sides of pork. Time permitting, let sit 15 minutes to sink in.
- Heat one tablespoon olive oil in a large cast-iron skillet over medium-high heat. Add pork chops and cook 3-4 minutes per side depending on thickness; remove to a plate. (Pork will finish cooking later).
- Add the remaining olive oil to the skillet and heat over medium high heat. Add apples, squash and green beans; cook 6 minutes or until squash is almost fork tender; push to one side of the skillet.
- Remove skillet from heat and whisk apple cider, Dijon, balsamic, brown sugar, rosemary and thyme together in empty side of pan (it will steam a lot so be careful).
- Cook over medium-high heat for 2 minutes or until squash is fork tender.
- Nestle pork chops back into the pan and cook until they reach 145 degrees and are warmed through, 1-2 minutes.
Video
Notes
Don't miss the "how to make" recipe video at the top of the post!
TIPS and TRICKS for the BEST PORK CHOPS
- Use bone-in rib pork chops. Pork is much leaner than beef, so it is important to set yourself up for success by purchasing bone-in rib chops. The bone act as a conductor and protects the pork chops from overcooking and helps the chops cook more evenly resulting in juicer pork chops. The bone also has some fat around it that makes it deeply more flavorful and more moist than boneless pork chops.
- Check the color. When choosing pork chops, look for ones with the most marbling because marbling = flavor. You can also ask the butcher for the most deeply marbled rib pork chops they have. Also look for pork chops that are deeply rosy rather than pale pink. Deeper colored pork chops mean deeper flavor and paler meat is generally less quality.
- Pork chop brine. Brining guarantees you the juiciest pork chops so please DON'T SKIP! It changes the molecular structure of the meat and keeps the pork moist and makes it more difficult to overcook. It also penetrates the pork chops with flavor. It is also essential to remove pork chops from the refrigerator 30 minutes before cooking to bring it to room temperature and cook more evenly. Brining also helps accomplish this.
- Fully dissolve salt. When making the brine, whisk the kosher salt in the warm water until it is dissolved before adding the rest of the ingredients.
- Rinse pork from brine. Rinse your pork chops thoroughly after brining to remove excess salt otherwise it will taste too salty. Do NOT substitute the kosher salt with equal amounts table salt.
- Pat pork chops by. After rinsing the pork chops from the brine, pat them very dry or the seasonings will not stick.
- Season in advance. I learned from a chef demonstration that you always want to let seasonings rest on protein, whether it’s pork chops, chicken or fish. This resting time allows the seasonings to penetrate the protein and enhance the flavor and the salt will further tenderize the meat. It also and helps the seasonings stick to the protein instead of sliding off once the pork hits the pan.
- Use a cast iron skillet. Cast iron creates the most even heat of all metals and therefore will cook the pork the most evenly resulting in a juicier interior and golden-brown crust.
- Use a hot pan. A hot pan is not to be confused with “high heat.” Instead, don’t add the pork until the oil is shimmering hot.
- Don’t disturb pork chops. Resist the urge to move the pork chops or peak underneath them until a full 3 minutes has passed as this will disrupt the sear and can cause some of the seasonings to stick to the pan instead of the pork.
- Use a meat thermometer. Pork chops are lean and therefore can dry out if overcooked so it is important to use a meat thermometer to achieve the correct temperature. You can’t depend solely on recipe cooking times because actual temperature will depend on the pork chop actual thickness, their starting temperature, temperature of pan and desired doneness/internal temperature. A meat thermometer will eliminate all of this guess work.
- Rest before serving: Let the cast iron pork chops rest full 5 minutes before slicing into otherwise you will lose valuable juices.
- Don’t overcook. Pork chops cook very quickly, so be very careful not to overcook and dry out the meat. Cook just to 145 degrees F.
- Test individual pork chops for doneness. Pork chops are often different thickness, which means they can be done at different times. If this is the case, take care to check the temperature of each chop and remove them as they finish cooking.