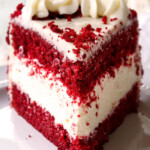
Red Velvet Cheesecake
This red velvet cheesecake combines two beloved classic desserts: red velvet cake and cheesecake to create the ultimate gorgeous, decadently delicious, show stopping dessert. This red velvet cheesecake may look impressive, but is easy to make with tender red velvet cake rounds and a luscious no-bake cheesecake filling spiked with white chocolate all slathered in a light cream cheese frosting. This red velvet cheesecake is also make-ahead friendly for a stress-free dessert everyone will be raving about. I’ve included detailed instructions, tips and tricks so this red velvet cheesecake will be the hit of your holidays!
Servings 14 -16 servings
Ingredients
RED VELVET CAKE
- 2 1/4 cups all-purpose flour
- 1 1/2 teaspoons baking soda
- Pinch of salt
- 1 cup buttermilk
- 2 large eggs at room temperature
- 1 tablespoon distilled white vinegar
- 1 teaspoon vanilla extract
- 2 tablespoons unsweetened cocoa powder
- 2 tablespoons red food coloring
- 12 tablespoons unsalted butter softened
- 1 1/2 cups granulated sugar
CHEESECAKE FILLING
- 1 1/2 teaspoons unflavored gelatin
- 1 1/2 cups heavy cream
- 6 ounces white chocolate chopped
- 1 pound (16 oz.) Cream Cheese softened
- 1/2 cups granulated sugar
- 1 tablespoons lemon juice
FROSTING
- 8 tablespoons unsalted butter softened
- 2 cups Powdered sugar
- 8 ounces Cream Cheese cut into to 4 pieces, softened
- 3/4 teaspoon vanilla extract
- Pinch of salt
Instructions
For the cake
- Preheat oven to 350 degrees F. Line two 9-inch round cake pans with parchment paper. Spray with nonstick cooking spray WITH FLOUR or grease and flour pans.
- Whisk flour, baking soda, and salt together in a bowl. Whisk buttermilk, eggs, vinegar and vanilla together in a 2-cup liquid measuring cup. Mix cocoa with food coloring in small bowl until a smooth paste forms.
- Using stand mixer fitted with the paddle attachment, beat butter and sugar on medium-high speed until pale and fluffy, 3-4 minutes. Reduce speed to low and add flour mixture in thirds alternating with buttermilk mixture, scraping down the bowl as needed. Add cocoa mixture, increase speed to medium, and beat just until incorporated, about 30 seconds (don't overmix). Give batter a final stir by hand.
- Divide batter evenly between prepared pans and smooth tops with rubber spatula. Bake until toothpick inserted in the center comes out clean, about 25 minutes, rotating pans halfway through baking. Let cakes cool in pans on wire rack for 10 minutes. Remove cakes from pans, discarding parchment, and let cool completely on rack, about 2 hours.
- Using a serrated knife, level the top of each cake. Use your fingers to crumble the tops into small crumbs; set crumbs aside in an airtight container to garnish the cake. Set 1 cake round in a parchment paper lined springform pan cut side up; set aside second cake round.
For the filling
- Sprinkle gelatin over 1/2 cup cream in a small saucepan and let sit 5 minutes. Cook mixture over low heat until edges are just bubbling. Add white chocolate and cook, stirring constant, until just melted and smooth. Let cool slightly, about 15 minutes.
- Using a clean, dry mixer bowl and whisk attachment, whip remaining 1 cup heavy cream on medium-high speed until stiff peaks form; transfer to a bowl and set aside.
- Return the now empty bowl to mixer and fit with the paddle attachment. Beat cream cheese and sugar on medium-high speed for 3 minutes, scraping down the sides of the bowl occasionally.
- Reduce speed to medium-low and add lemon juice and white chocolate mixture and mix until just combined, scraping down bowl as needed. Using rubber spatula, gently fold in whipped cream.
- Spread cheesecake filling over cake round in springform pan and smooth the top. Place reserved cake round, cut side down, on top. Cover with plastic wrap and refrigerate until set, about 6 hours.
For the frosting
- You can make the frosting anytime while the cheesecake is chilling, cover and refrigerate, then let it sit at room temperate for 15 minutes or so to soften before frosting OR make the frosting just before serving.
- Using stand mixer fitted with paddle, beat butter and sugar on medium-high speed until fluffy, about 2 minutes. Add cream cheese 1 piece at a time, and continue to beat until incorporated. Beat in vanilla and salt.
- Run a thin knife between the red velvet cheesecake and the side of the springform pan; remove pan. Transfer cheesecake to a serving plate or pedestal.
- Separate out 1/2 cup frosting (or more as needed) and create a thin crumb layer by frosting the top and the sides of the cake. Freeze cake for 30 minutes.
- Spread frosting evenly over top and sides of cake. Gently press reserved cake crumbs onto sides of cake.
Notes
Baking tips (see post for full list of tips)
- DIY buttermilk: you can also substitute with sour milk which I do all the time by adding 1 1/2 tablespoon lemon juice or white vinegar to a 1 cup (or larger) measuring cup), adding milk until it reaches 1 cup, giving it a stir, and letting it rest for 10 minutes.
- Unflavored gelatin: is a common baking ingredient and can be found next to the packages of Jell-O and pudding at your grocery store. It is what adds structure to the cheesecake without adding eggs.
- Use correct pan size: it is important that you use 9-inch round cake pans and not 8-inch cake pans because we are going to assemble the cake in a 9-inch springform pan. 9-inch diameter also creates a more pleasing ratio of cheesecake to cake.
- What if I don't have a spring form pan? You can still make this red velvet cheesecake even if you don't have a springform pan by building your own cake collar with parchment paper. Transfer the baked, cooled bottom cake round to a pedestal or serving plate and tightly encircle the cake round with parchment paper that is at least 3 inches tall. You may want to double wrap the cake so it's sturdier then secure the parchment paper to itself with tape.
- Generously level cooled cakes: the cakes will rise in the middle which is perfect for our purposes of using the leftover crumbs. Make sure the cakes are completely cool before you level them. Level the cakes so they are completely flat so they will seamlessly sandwich the cheesecake.
- Use soft cream cheese for cheesecake: the cream cheese should be soft enough that it can easily beat into a creamy consistency. If it is not soft enough, then it will yield lumpy cheesecake and will leave white specks. It is okay to microwave cream cheese for the cheesecake but not recommended for the frosting.
Make ahead
Red velvet cheesecake is the perfect make ahead dessert. I recommend chilling your cheesecake for at least 24 hours before serving because I think it tastes better/more flavorful the second day. You can also prep ahead in stages:- Cakes: prepare cakes according to recipe directions. Once the cakes have cooled, wrap them tightly in plastic wrap and store in the refrigerator for up to 3 days, or freeze for up to 2 months.
- Frosting: Can be made up to two days in advance, covered and stored in an airtight container the refrigerator. It will harden slightly in the refrigerator so let it sit at room temperature to soften before whipping again and proceeding to frost your cheesecake.
HOW TO STORE
Wrap the red velvet cheesecake with plastic wrap or use a cake carrier/storage container if you have one. Refrigerate for up to 5 days.How to FREEZE
You can freeze the cake layers before assembling or freeze the entire red velvet cheesecake:TO FREEZE THE CAKE LAYERS:
- Tightly double wrap each cake layer separately in plastic wrap.
- Freeze cake for up to 2 months.
- Allow the cakes to thaw overnight in the refrigerator then unwrap and come to room temperature on the counter before assembling.
TO FREEZE THE cheesecake:
- Place chilled cheesecake on a baking sheet and place, uncovered, in the freezer. Freeze until firm.
- Remove from the freezer and wrap cheesecake in plastic wrap followed by heavy duty aluminum foil.
- Freeze for up to 1 month for optimal flavor, 2 months is the max.
- To thaw, remove cheesecake from freezer to the refrigerator. Let thaw overnight.
- You can also freeze individual slices using the same method and packaging them separately.