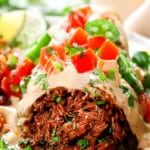
Beef Chimichangas (Baked or Air Fried)
This chimichanga recipe is the beef version of my wildly popular Smothered Baked Chicken Burritos! They're stuffed with optional cilantro lime rice and black beans, sharp cheddar cheese, juicy, spoon tender shredded beef that's been braised with a caravan of rich, earthy, fiesta seasonings, then baked or air fried to golden, crispy perfection. Finally, the piece de resistance, is the smothering of green chili sour cream sauce that will have everyone swooning! These beef chimichangas are versatile (can be made with any of your favorite proteins such as beef barbacoa, carnitas, birria, etc.), and 100% make ahead and freezer friendly for an easy walk-in-the-door dinner! Serve this recipe with chips, salsa and guacamole and a side of pina colada fruit salad and Mexican rice (pictured) for the ultimate feast!
Servings 6 chimichangas
Ingredients
Beef Chimichangas
- 1 recipe Mexican Shredded Beef <--click for recipe
- 6 burrito size tortillas (10-inch)
- 1 cup freshly shredded sharp cheddar cheese
- Optional: cilantro lime rice or regular
- Optional: black beans or pinto beans
GREEN CHILI SOUR CREAM SAUCE
- 2 tablespoons olive oil
- 1 tablespoon unsalted butter (or regular and reduce salt)
- 3 tablespoons flour
- 2 cups low sodium chicken broth
- 1/2 tsp EACH cumin, chili powder
- 1/4-1/2 teaspoon salt
- 1/4 tsp EACH pepper, garlic powder, onion powder
- 1/2 4 oz. can mild chopped green chilies, or more to taste
- 1/2 cup shredded sharp cheddar cheese
- 1/2 cup sour cream
- 1 tablespoon lime juice
- Hot sauce or cayenne pepper to taste
OPTIONAL TOPPINGS
- Pico de gallo or tomatoes/cilantro
- Guacamole
- Salsa
- Sour cream
- Hot Sauce
Instructions
Beef
- Prepare Mexican Shredded Beef according to recipe directions (click HERE for recipe). The beef can be made ahead of time and refrigerated in the juices, then reheated before using (tastes even better this way!). Drain any excess liquid from beef before using.
Chimichangas
- If baking: Preheat oven to 400 degrees F. Line a baking sheet with foil and add a baking rack on top.
- Assemble: If using, layer each tortilla with 1/4 cup rice and 1/4 cup black beans down the center. Add a heaping ½ cup shredded beef, top with desired amount of cheese and roll up burrito style (fold in the ends then roll over filling). If baking, place burritos seam side down on the prepared baking sheet. If air frying, place seam side down on parchment paper (or any flat surface will work).
- Add oil: Brush the chimichangas lightly all over with olive oil or spray with nonstick cooking spray (olive oil works better).
COOK
- To bake: Bake for 18-20 minutes at 400 degrees F or until golden. Broil to desired crispiness, flip over and broil the other side until golden. Meanwhile, make the sauce.
- To air fry: Working in batches, line chimichangas in the air fryer basket seam side down without touching. Air fry at 375 degrees F for approximately 5-6 minutes, or until golden and crispy on the top, flip over, and air fry an additional 2-3 minutes or until golden and crispy. Meanwhile, make the sauce.
SAUCE
- Melt butter in olive oil in a medium saucepan over medium heat. Whisk in flour and cook, stirring constantly for 2 minutes. Reduce heat to low, then gradually whisk in the chicken broth and spices. Bring to a simmer until thickened, about 2-3 minutes.
- Remove from heat and stir in the green chilies, followed by the cheese a handful at a time, followed by the sour cream and lime juice. Add hot sauce to taste (optional).
TO SERVE
- Top chimichangas with Green Chili Sour Cream Sauce and desired toppings. Dig in!
Video
Notes
- To meal prep: You'll want to start layering the tortilla with cheese (instead of beef) so it can shield the tortilla from any moisture to help prevent it from becoming soggy before cooking. Also, take care the beef is well drained/not wet before adding, otherwise it can make the tortillas soggy. Tightly wrap the chimichangas individually in foil or plastic wrap and refrigerate for up to 3 days or freeze for up to 3 months. Cook as directed, adding an extra minute or two.
- To store: Let the beef chimichangas cool completely before packaging to prevent them from becoming as soft. Line them in a single layer in an airtight container or wrap them individually in foil. Store in the refrigerator for up to 5 days or place foil-wrapped chimichangas in a freezer bag and freeze for up to 3 months (instructions to follow).
- To freeze: Freeze uncooked chimichangas for meal prep, or freeze cooked leftover chimichangas. Let the cooked chimichangas cool completely in a single layer. Wrap them individually in foil, then transfer to a large freezer bag and squeeze out any excess air. Freeze for up to 3 months. Reheat per instructions, FROM FROZEN, adding an additional few minutes as needed.
To reheat
- Air fryer: Place your chimichangas in the air fryer basket and air fry at 375 degrees F for 4-6 minutes, flipping halfway through.
- Oven: Place chimichangas on a baking rack placed over a baking pan. Bake in a preheated oven at 400 degrees F for 10-12 minutes or until warmed through.
- Microwave: This is my least favorite method because the exterior doesn’t crisp up, but it’s convenient for hands-off reheating. Transfer chimichangas to a microwave safe plate and microwave on high or 45 seconds then at 15-second intervals as needed. To crisp up afterwards, transfer to a nonstick pan and pan fry each side until crispy (don't use any oil).
Ingredient Prep Ahead
If you don't have time to assemble the chimichangas at once, you can get a jump start on the prep:- Season beef: The beef can be seasoned, seared and stored in the slow cooker insert with the braising ingredients in the refrigerator for up to 2 days before cooking.
- Cook beef: Alternatively, go one step further and cook the beef. Shred, then store in the juices for up to 5 days. When ready to use, reheat in the crockpot or stove.
- Filling ingredients: The rice can be cooked and the cheese shredded and stored in the refrigerator until ready to use.
- Green chili sauce: The sauce can be made and stored in the fridge for up to 3 days. Reheat the sauce in a saucepan over medium-low heat. You may need to a splash of milk if the sauce has thickened up too much after it's warmed.
- The toppings such pico de gallo and guacamole can be prepped and refrigerated up to a couple days in advance. The guacamole will keep for up to a day without changing color very much – just make sure to press a piece of plastic wrap directly against the surface to prevent oxidation/browning. I also find stirring a little sour cream into the guacamole when making works wonders at keeping it vibrant green.