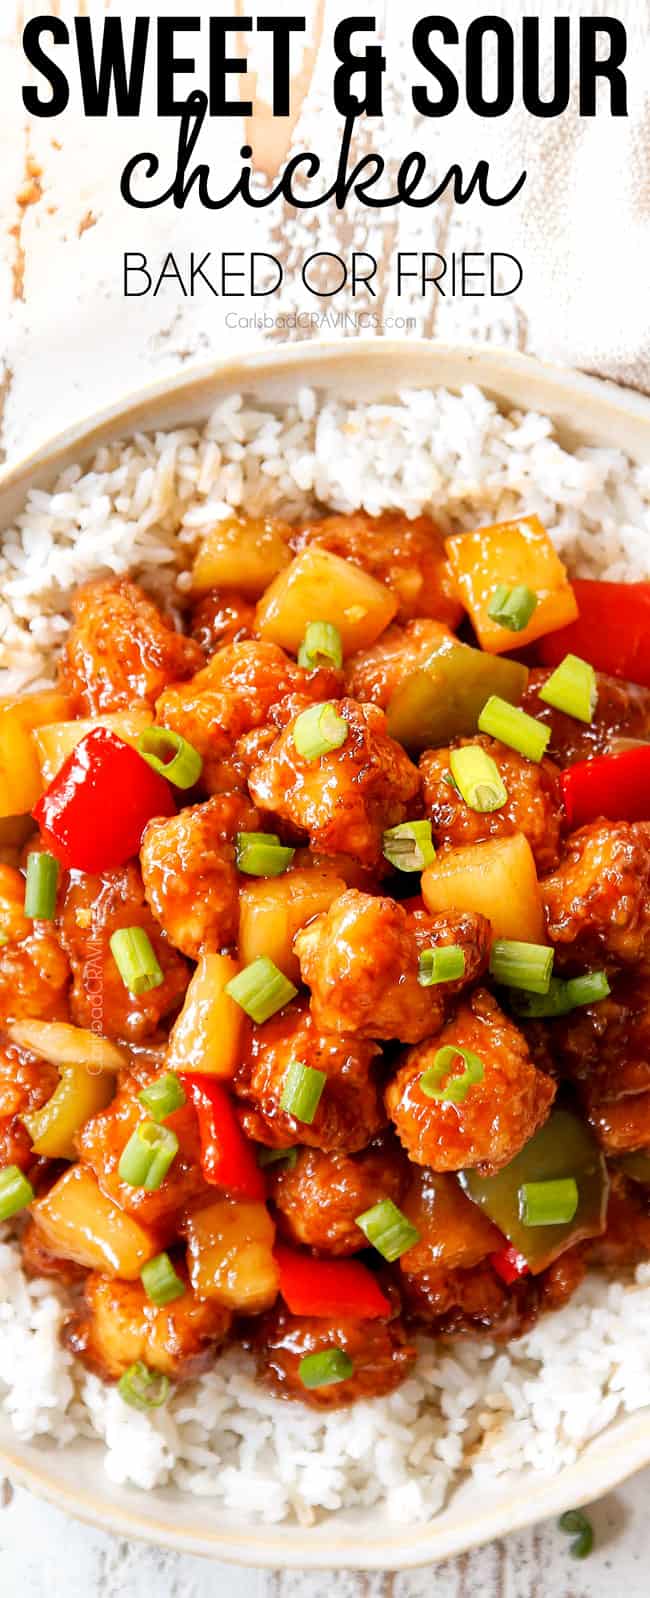
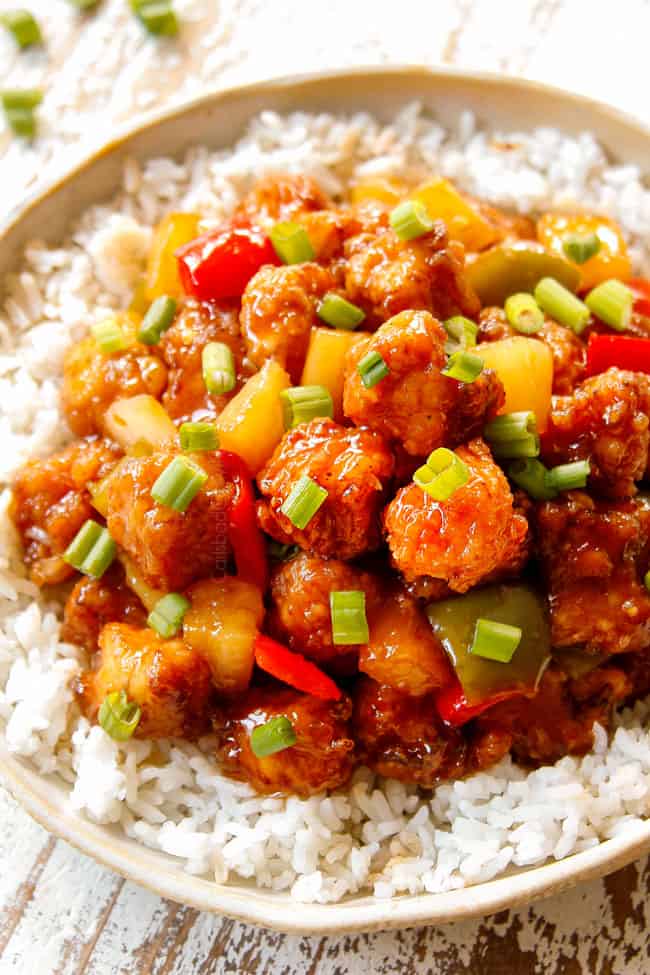
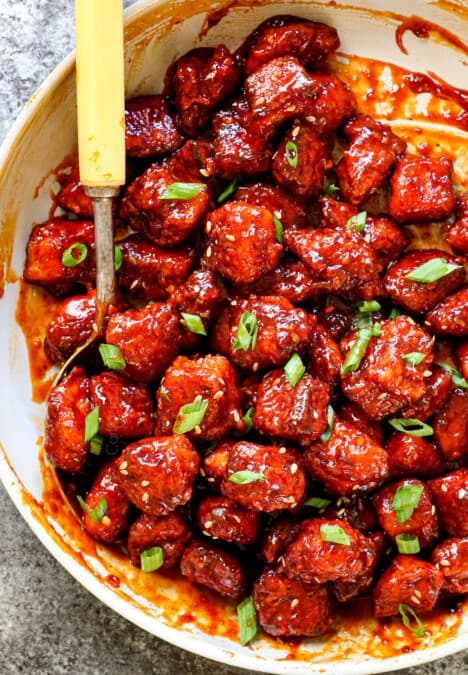
SWEET AND SOUR CHICKEN RECIPE SMOTHERED IN AN IRRESISTIBLE SWEET AND TANGY SAUCE ON YOUR TABLE IN less than 45 MINUTES!
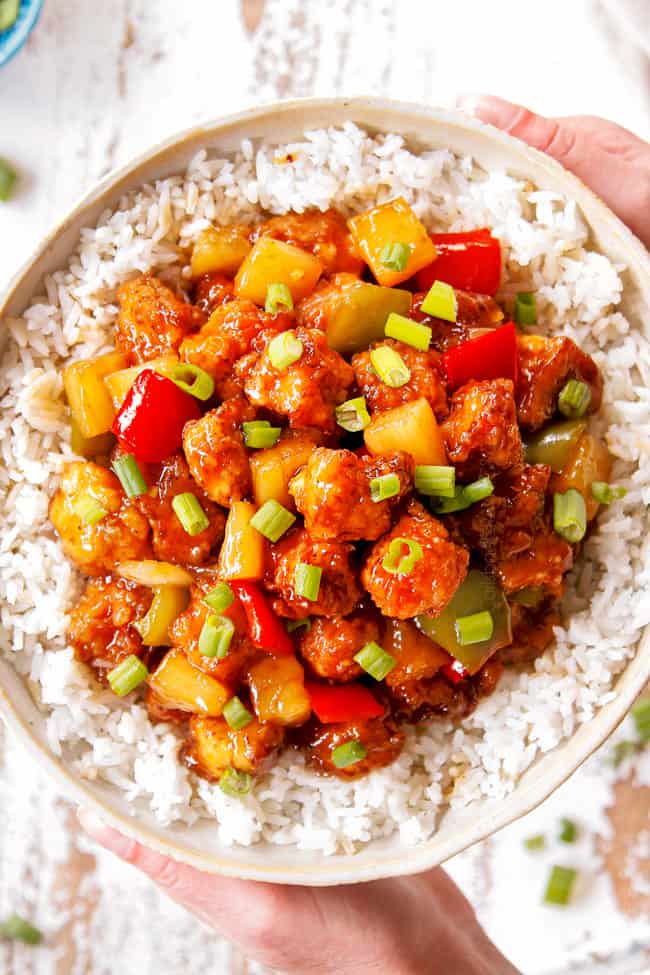
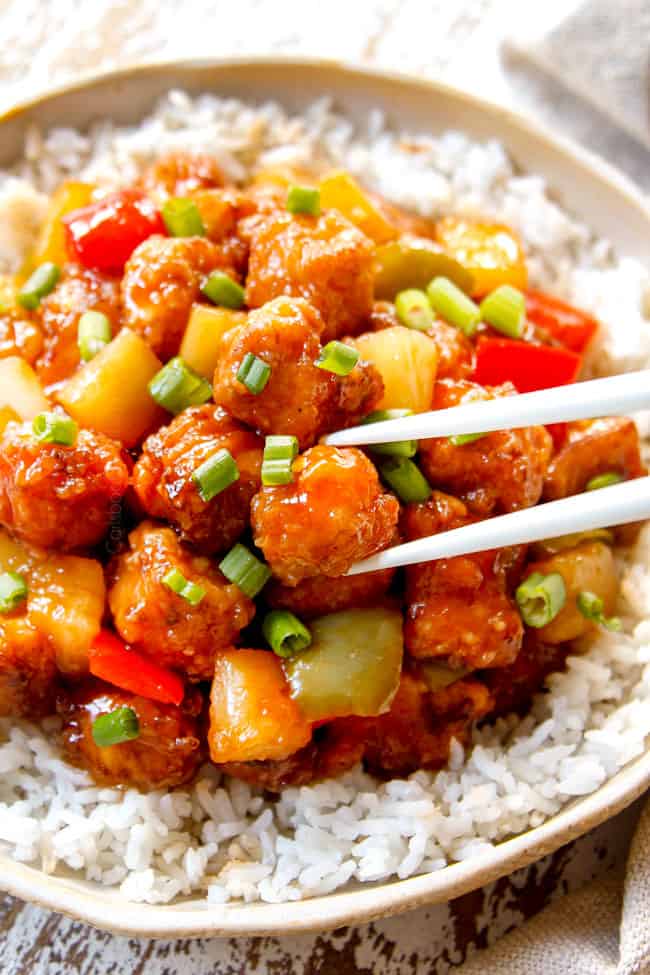
This Sweet and Sour Chicken recipe is restaurant delicious (or better!) but quick and easy to make at home! Plus, it’s healthier than takeout with the options to either pan fry or bake PLUS it’s stir-fried with veggies for a complete meal-in-one! To make this Chinese Sweet and Sour Chicken recipe, the bite-size chicken gets tossed in a simple breading then is baked or pan fried to crispy perfection then enveloped in the most intoxicating sweet and sour sauce ever! It’s sticky, sweet and tangy infused with pineapple juice, sugar, red wine vinegar, ketchup, soy sauce, garlic and ginger. The layered complex flavors combined with the crispy, juicy chicken will have everyone combing back for seconds and thirds! Serve this Chinese Sweet and Sour Chicken recipe with rice or low carb cauliflower rice and you have an easy weeknight meal your whole family will beg you to make again and again!
PIN THIS RECIPE TO SAVE FOR LATER
SWEET AND SOUR CHICKEN RECIPE
If you’ve been following me for long, you know Chinese food is one of my favorite cuisines to make at home. It’s easy, healthier than takeout, customizable and always hits the spot. Some of my favorite Chinese recipes include my General Tso’s Chicken, Beef and Broccoli, Mongolian Beef, Sweet Fire Chicken, Kung Pao Shrimp, Szechuan Chicken and on and on – and now you can add this irresistible Chinese Sweet and Sour Chicken recipe to your “must make NOW” list!
I first shared a version of Sweet and Sour Chicken my very first year of blogging that has become a readers favorite. The chicken is breaded and baked with the sauce and vegetables for 50 minutes – and it is amazing. For this Sweet and Sour Chicken recipe, however, I wanted a quicker, crispier version but with the same intoxicating sauce. So, I halved the sauce (which means half the sugar – winning!), used my favorite velveting technique so the chicken is flavorful on the inside and out and then proceeded to pan fry to for pillowy crispy results. But, that’s just the beginning. Here’s why you’ll love this Sweet and Sour Chicken recipe:
BAKED OR FRIED. This Sweet and Sour Chicken recipe gives you four cooking options: 1) bake the chicken, 3) lightly pan fry the chicken in just 3 tablespoons oil, 3) shallow pan fry in more oil or 4) deep fry. 3 of the 4 options are healthier than takeout and nothing beats fabulously fresh without all the fat.
EASY. This Chinese Sweet and Sour Chicken can be on your table in less time than it would take you to get takeout! It does require a few steps but each step is quick and easy and purposeful for the best results.
BEST SWEET AND SOUR SAUCE. Chinese Sweet and Sour Chicken would be nothing without the sauce – and this sweet and sour sauce is epic! After researching and experimenting with many different sweet and sour sauces years ago for my other Sweet and Sour Chicken recipe, I finally landed on this unapologetically delicious version. I played with different options such as sugar or honey, with or without pineapple juice, rice vinegar or red wine vinegar, with or without soy sauce, ketchup or tomato paste and the correct ratio of each of the ingredients until the BEST sweet and sour sauce was born.
TENDER FLAVORFUL CHICKEN. Most recipes simply coat the chicken in eggs and then a plain cornstarch/flour breeding. In this Sweet and Sour Chicken recipe, however, the eggs are combined with pantry friendly velveting ingredients of cornstarch, soy sauce, sesame oil, rice wine and baking soda to create a “marinade” the chicken bathes in while you prep the rest of the ingredients, resulting in the juiciest, most tender chicken. Furthermore, the breading is seasoned with salt, pepper, ground ginger, and garlic powder so our tender crispy chicken morsels are stand-alone-delicious which makes them unparalleled delicious once smothered in the alluring sweet and sour sauce.
PANTRY FRIENDLY. Don’t let the lengthy looking list of ingredients intimidate you! Most of them are just whisked together either to create the marinade, sauce or breading which is quick and easy to do. Plus, you should have almost all of the ingredients stocked except perhaps the pineapple tidbits which can be found at any grocery store. This means you can make this Sweet and Sour Chicken recipe any night of the week!
FAMILY FAVORITE! Everyone loves Chinese Sweet and Sour Chicken from adults to kids to toddlers alike! This Sweet and Sour Chicken recipe will be one of those recipes that becomes a family repeat favorite AKA it’s one for the recipe binder!
Now, you can use the “Jump to Recipe” button at the top of the page under the title or read on while I go into further detail with tips and tricks for Chinese Sweet and Sour Chicken recipe.
LOOKING FOR MORE CHINESE FAVORITES?
- Sesame Chicken
- Cashew Chicken
- Honey Lemon Chicken
- Hoisin Chicken Stir Fry
- Szechuan Beef
- Egg Roll in a Bowl
- Pineapple Ginger Chicken
- Coconut Cashew Chicken just to name a few!
WHAT IS SWEET AND SOUR CHICKEN?
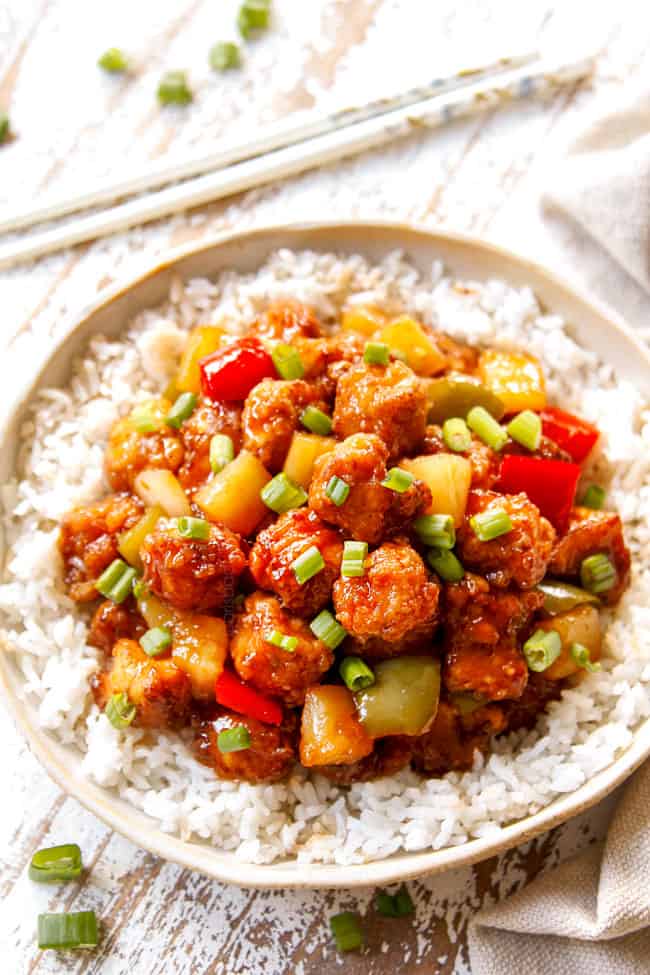
Sweet and Sour Chicken is a popular American-Chinese recipe originating from Chinese Sweet and Sour Pork. In Sweet and Sour Chicken, bite size pieces of chicken are battered in cornstarch and four then deep fried and tossed in a glossy, sweet and tangy sauce consisting of sugar, some sort of vinegar, ketchup, and chili sauce. Some versions of sweet and sour sauce will also include pineapple juice (like this recipe!), plum sauce, soy sauce, garlic and ginger. The fried chicken is then combined with stir fried vegetable and fruit such as pineapple, onions, bell peppers and carrots.
WHAT DOES SWEET AND SOUR CHICKEN TASTE LIKE?
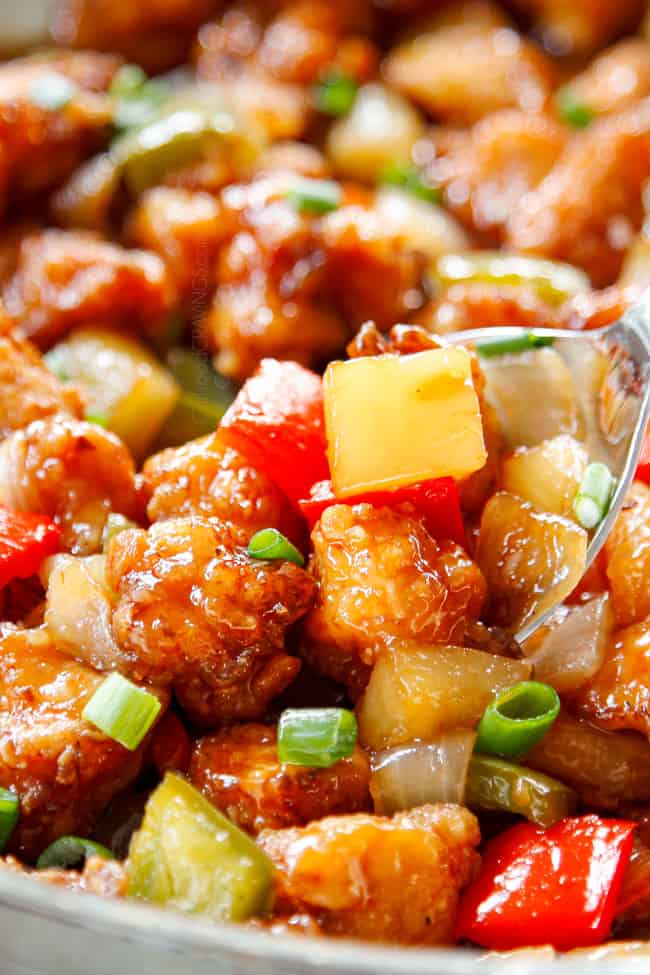
This lick-the-plate delish Sweet and Sour Chicken is made with pillows of breaded chicken that become increasable soft (but not soggy!) as they soak up the sauce. So, to me, I don’t think of Sweet and Sour Chicken – restaurant or homemade – as crispy, but rather as breaded. The breading shields the chicken from high heat which prevents it from drying out which keeps it juicy. Furthermore, it serves as a vehicle for the sweet and sour sauce as the sauce permeates every nook and cranny so each bite is laden with flavor.
As far as the sweet and sour sauce, it is sweet with the perfect balance of tanginess. It is sweet from the sugar, sour from the red wine vinegar, sweet and sour from the ketchup, grounded by the soy, zippy from the red pepper flakes, garlic and ginger with a kick of sweet and tangy citrus from the pineapple juice. In the end, it is the perfect yin and yang of intoxicating complex flavors that makes this Sweet and Sour Chicken recipe the spectacular homerun that it is.
IS SWEET AND SOUR CHICKEN FROM CHINA?
Our beloved Sweet and Sour Chicken is inspired by Chinese sweet and sour sauce but not 100% authentically Chinese as we know it. In China, early sweet and sour sauce was commonly made with sugar, rice vinegar, soy sauce, and spices such as ginger and cloves without the addition of ketchup or tomato paste like westernized sweet and sour sauce. For centuries, the Chinese have used sweet and sour sauce primarily for dipping but sometimes it is poured over proteins such as pork, ribs, fish and lobster tails (loong har kow), but rarely chicken as chicken is as common in China. Thus, you are much more likely to find Sweet and Sour Pork in China instead of Sweet and Sour Chicken.
Sweet and Sour Chicken was popularized in the Unites States after Sweet and Sour Pork (Ku lo yuk 咕噜肉) was brought over from China in the early 20th century by migrant gold miners and railroad workers. Some of these workers turned to cooking as their trade and resorted to chicken after they discovered chicken was more popular and less expensive than pork. From there, Sweet and Sour Chicken has evolved into what we know today with more modern additions such as ketchup and pineapple juice.
Is sweet and sour chicken the same as Orange Chicken?
Sweet and Sour Chicken is often compared with Orange Chicken and while they share some similarities, they taste distinctively unique.
Both of these Chinese favorites begin with bite-size chicken that is breaded and deep fried then finished in a sticky sauce. The main difference between the two favorites comes from the flavor of the sauces. Both sauces are sweet and tangy but the sweet and sour sauce is much sweeter in order to balance the vinegar, whereas Orange Chicken is more savory due to soy sauce or hoisin, with a distinctive orange citrus taste.
This Sweet and Sour Chicken recipe stays true to the classic sweet and tangy sauce and crispy chicken so now you will just have to try both!
WHAT CUT OF CHICKEN SHOULD I USE TO MAKE SWEET AND SOUR CHICKEN?
Now that we know where Sweet and Sour Chicken originated and what it tastes like, let’s get into the recipe details. Chinese Sweet and Sour Chicken can be made with either boneless skinless chicken breasts or boneless skinless chicken thighs. They are both delicious, so it comes down to personal preference as to whether you prefer light or dark meat.
- Boneless skinless chicken breasts: are leaner than chicken thighs and are what I usually use for this recipe. Just make sure you don’t cut the pieces too small or they will overcook and dry out. The chicken breasts emerge beautifully tender due to the marinade.
- Boneless skinless chicken thighs: are dark meat and therefore inherently juicier and hard to overcook or dry out.
HOW TO MAKE SWEET AND SOUR CHICKEN JUICY
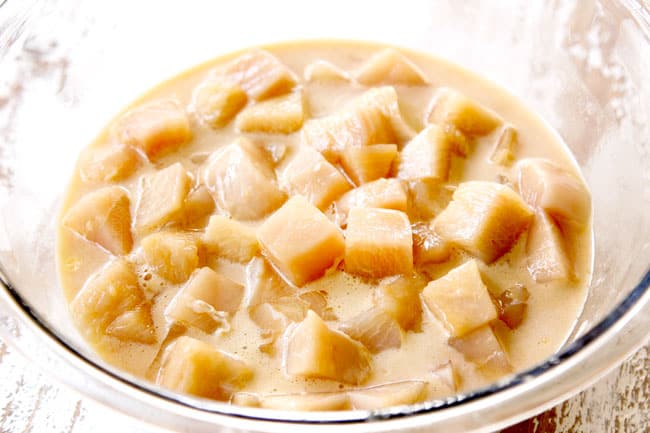
Sweet and Sour Chicken can be disappointing when all the flavor is left on the outside of the chicken giving way to a dull, bland, and even dry inside. So, instead of dredging the chicken in just eggs, I took this opportunity to infuse and tenderize the chicken. To do this, I used my culinary changing velveting technique which I use in all of my stir fries which only requires a few pantry friendly ingredients. Velveting is the technique Chinese restaurants use to attain such smooth, tender chicken – you will be AMAZED at how velvety tender the chicken is – just like your favorite takeout!
There are a few different velveting techniques, but by far the easiest and just as effective is to add the chicken to a bowl and combine with the following ingredients for preferable 20 minutes, but no more:
- 1 tablespoon cornstarch
- 1 tablespoon soy sauce
- 1 tablespoon sesame oil
- 1 teaspoon Japanese rice wine
- 1 teaspoon baking soda
The baking soda tenderizes the chicken by breaking down the chicken fibers so the chicken emerges softer on the inside like “velvet” – hence the name. You can taste the textural difference but not the baking soda! The cornstarch acts as a binder and helps our soy sauce and rice wine come together and bind to the chicken for more flavor. The salt in the soy sauce also helps break down the proteins for a more tender texture as well as add flavor along with the rice wine and sesame oil. To these ingredients, we whisk in the eggs and now your chicken will be juicy, tender and flavorful through and through.
What is Chinese sweet and sour chicken made of?
The star of Sweet and Sour Chicken is the sauce made with pantry staples in perfect proportion. Each ingredient plays a specific role in weaving the sticky, sweet and tangy tapestry – and all you do is whisk the ingredients together while the chicken is marinating! You will need:
- Red wine vinegar: adds the fruity tang which works with the pineapple juice to create the “sour” effect. Please do not substitute the red wine vinegar with a different vinegar.
- Sugar: granulated (plain white sugar) sugar provides the balancing “sweet” to the sour. Please do not use brown sugar as it adds a molasses flavor whereas granulated sugar lets the pure citrus flavors shine.
- Pineapple juice: you don’t have to purchase a separate can of pineapple juice, but you will use some of the pineapple juice from the pineapple tidbits used in the sir fry. The pineapple juice adds multidimensional fruity sweetness.
- Soy sauce: use low sodium soy sauce so we can control the salt.
- Cornstarch: helps thicken the sauce to a glossy, luscious consistency without a raw flour taste.
- Red pepper flakes: don’t worry about the red pepper flakes making your Sweet and Sour Chicken spicy – rather they add just the right kick to balance the sweetness without making the chicken spicy.
Can I use less sugar?
You might wonder if you can use less sugar but I think the recipe is perfect as is. Be aware that if you want to use less sugar, your chicken will taste more “sours.”
SWEET AND SOUR CHICKEN SAUCE IS EASY!
The Sweet and Sour Chicken Sauce is extremely EASY and can be whisked together in minutes!
- QUICK. It probably takes 3 minutes to whisk together – that’s it. Then just simmer until thickened.
- Make ahead. Sweet and Sour Sauce can be whisked together ahead of time and stored in an airtight container or mason jar in the refrigerator for up to three days. When ready to use, add to a saucepan and simmer until thickened to desired consistency.
- Adaptable. While the Sweet and Sour Sauce is just right for us, you can adjust it to make it just right for YOU and your family’s personal tastes. Just keep a note of your adjustments then whip out the perfect stir fry sauce every time.
HOW DO I THICKEN THE SAUCE?
The cornstarch in the Sweet and Sour Sauce will thicken the sauce it as it simmers. If you still would like a thicker sauce, then just keep simmering until it reaches desired consistency.
HOW DO I THIN THE SAUCE?
The Sweet and Sour Sauce will become thicker the longer it is simmers and the longer it sits before being added to the chicken. If it gets too thick don’t worry! It is easy to thin by whisking in water, a little at a time over low heat.
IS CHINESE SWEET AND SOUR CHICKEN GLUTEN FREE?
As written, this Sweet and Sour Chicken recipe is not gluten free – but almost! To make it gluten free, use gluten free flour, gluten free soy sauce or tamari. The rest of the ingredients are gluten free.
HOW TO MAKE SWEET AND SOUR CHICKEN
Now for the main event! This homemade Sweet and Sour Chicken recipe is very easy to make but does require a few steps. Here’s how:
Marinate chicken. I use the word “marinate” very loosely as it tenderizes the chicken and helps bind the flour to the chicken, but only requires 20 minutes. To marinate, whisk the eggs in a large bowl then whisk in cornstarch, soy sauce, sesame oil, rice wine and baking soda. Stir in chicken and let rest at room temperature while you prep the rest of the ingredients, preferable 20 minutes.
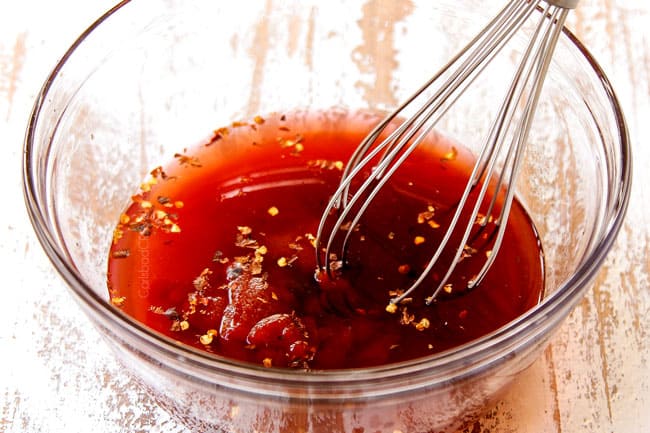
Make sweet and sour sauce. Whisk the sugar, red wine vinegar, pineapple juice, ketchup, soy sauce, salt, red pepper flakes and cornstarch together in a small bowl, set aside.
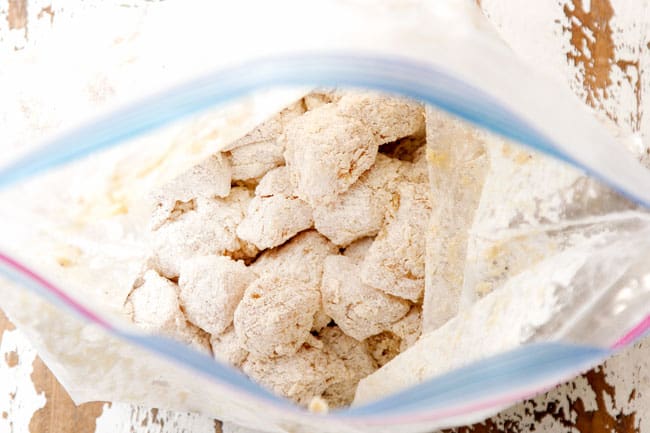
Bread chicken. Whisk flour, cornstarch, and seasonings together in a large freezer bag. You can whisk the ingredients together in a bowl, but a bag is SO easy! Remove chicken from the marinade with a slotted spoon, dab off excess egg with paper towels and add to breading. Toss chicken until well coated, pressing coating into chicken from outside the bag.
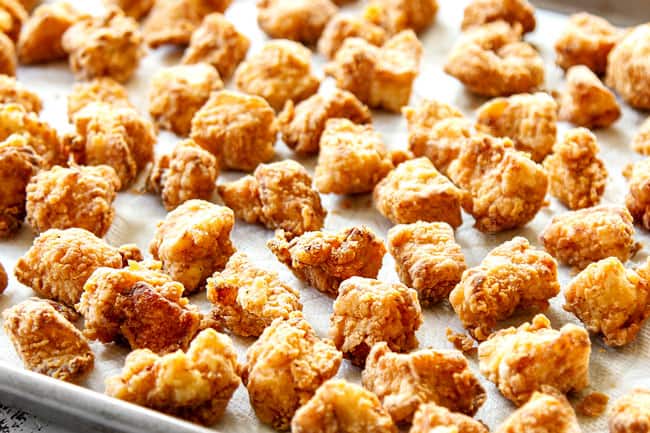
Cook chicken. You have four options when it comes to cooking your chicken depending on how much oil you want to use: bake, lightly pan fry, shallow pan fry or to deep fry. Each method will produce crispy chicken, with deep frying being the crispiest (more details below).
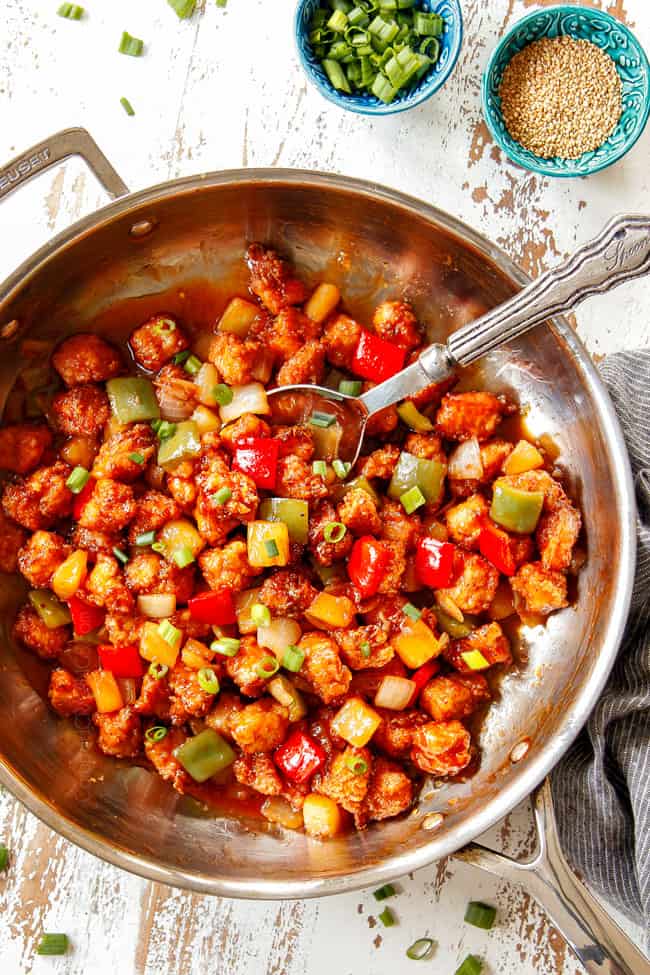
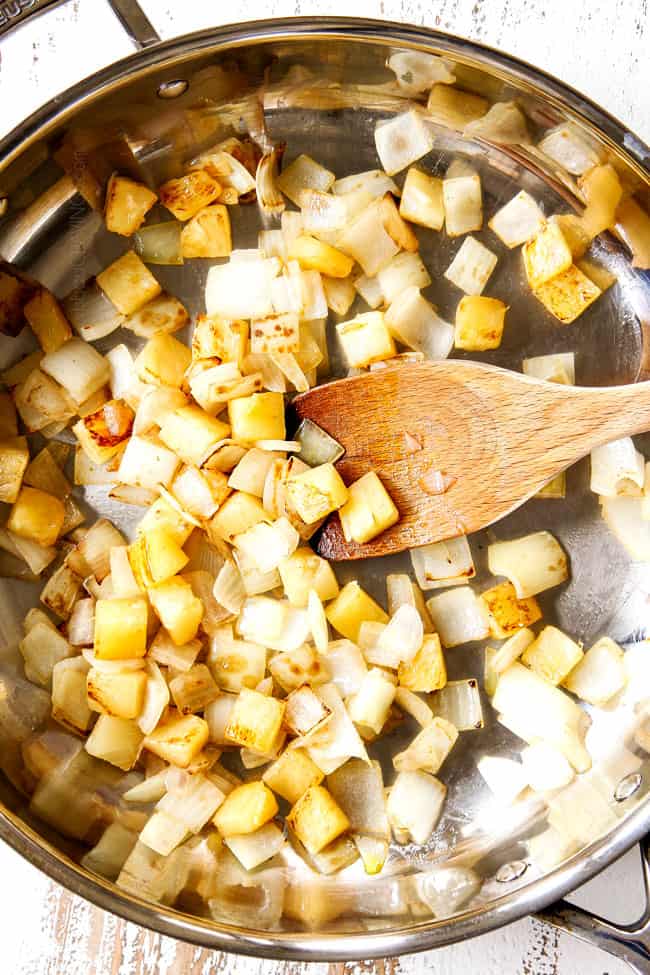
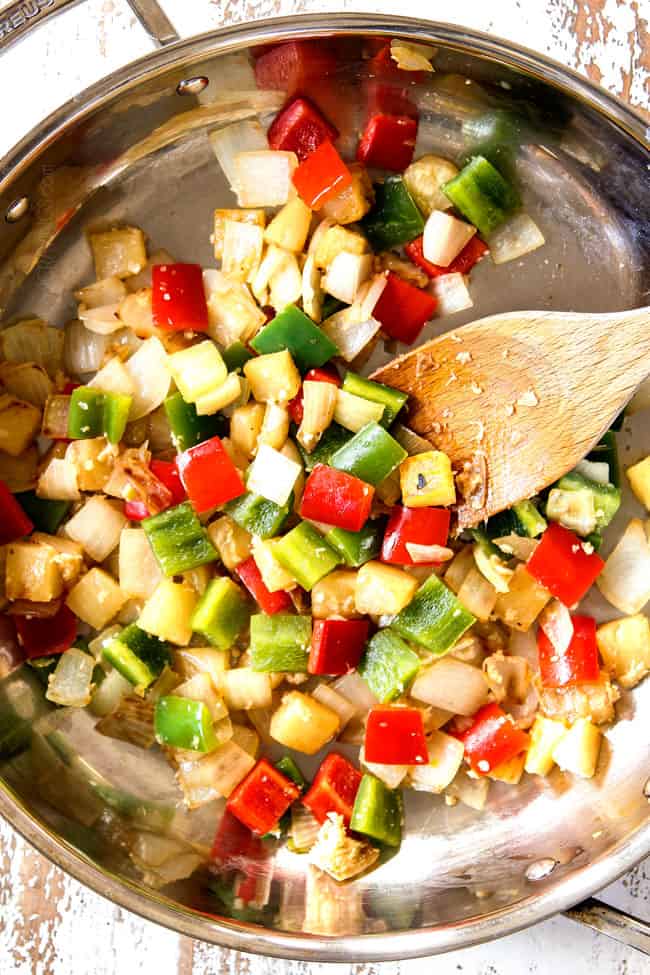
Stir fry vegetables. Heat 1 tablespoon oil in large skillet and heat over medium high heat. Add onions and pineapple; stir fry for 2 minutes. Add bell peppers, ginger and garlic and stir fry for 1 minute.
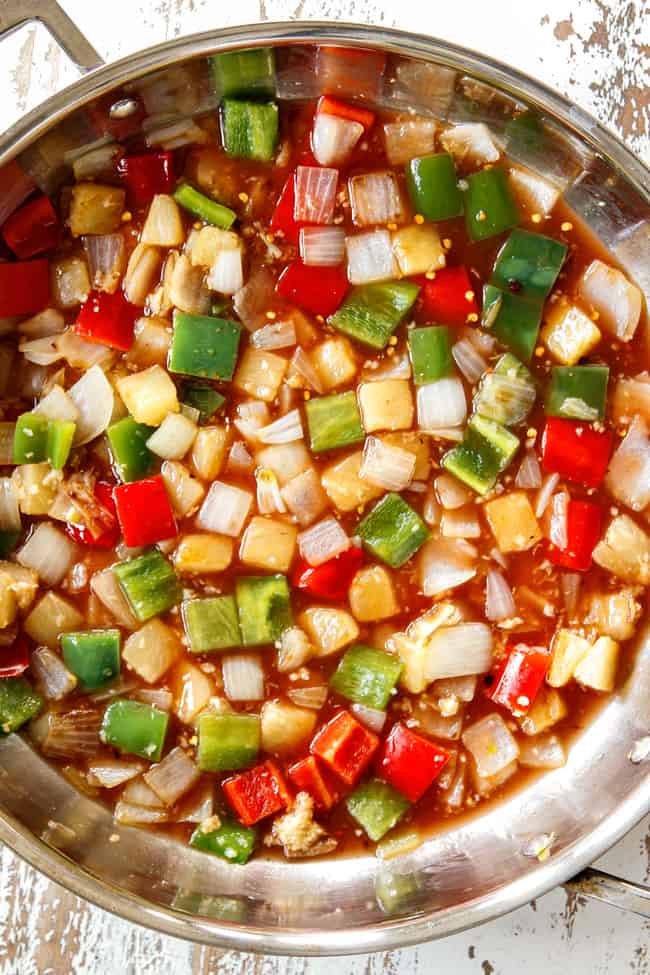
Add sweet and sour sauce. Stir sauce (to make sure cornstarch has not separated) and add to the skillet. Simmer until sauce is warmed through and thickened.
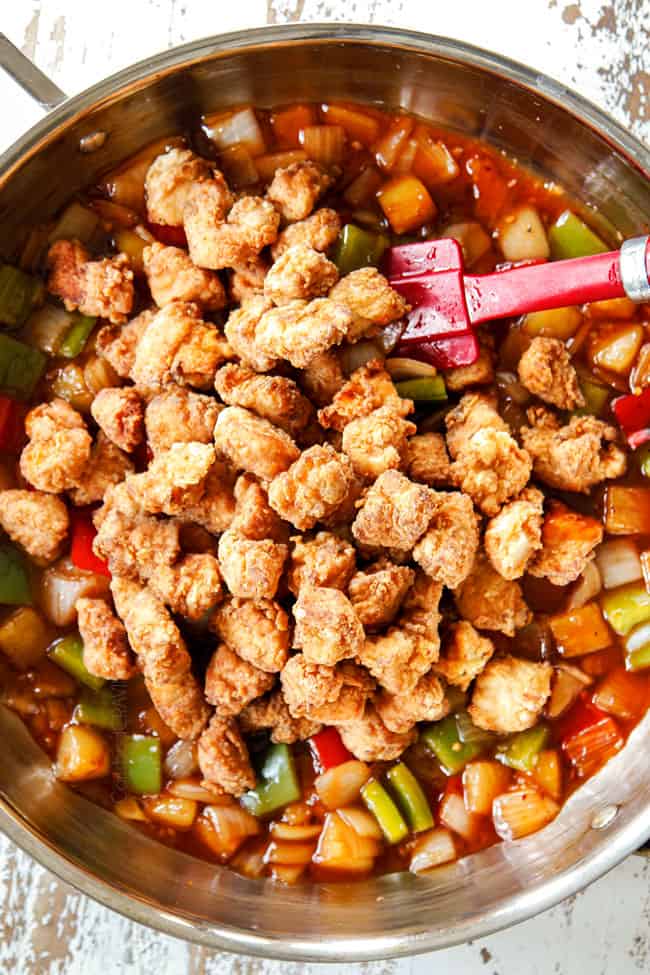
Combine. Add chicken and stir until evenly coated in the sauce. Serve immediately after serving.
How to Cook Sweet and Sour Chicken – 4 options
You have four options when it comes to cooking your Sweet and Sour Chicken: to bake, lightly pan fry, to shallow pan fry, or to deep fry. Each technique uses different amounts of oil resulting in varying amounts of crispiness, but they are all winners, especially once smothered in sweet and sour sauce.
Deep fried will obviously emerge the crispiest and “puffiest/fluffiest,” for lack of a better word, with the most even browning and a distinctively fried flavor. Baked chicken can still become surprisingly crispy and still boasts all the flavor. I typically shallow pan fry as it is a happy medium and still produces crispy chicken – but on days I want to splurge – deep fried is where it’s at.
Here are the different cooking options ordered from least oil to most oil:
TO BAKE: Carefully place chicken on the hot baking sheet in an even layer and spray generously with cooking spray. Bake at 375 degrees for 10 minutes then move the baking sheet about 8″ away from broiler and broil until crispy, watching closely so the chicken doesn’t burn (about 2-4 minutes). Flip chicken pieces over and broil another 2-3 minutes, or until crispy.
TO LIGHLTY PAN FRY: Heat 3 tablespoons vegetable oil in a large nonstick skillet heat over medium-high heat. Working in batches, shake off excess breading from chicken and add to pan in a single layer and cook undisturbed for 1 minute then continue to cook and stir until lightly browned and cooked through. Remove to a paper towel lined plate. It is important that you use a nonstick skillet when using so little oil or else your chicken will definitely stick – don’t even think about using a stainless-steel pan.
TO SHALLOW PAN FRY: Add enough vegetable oil to a large frying pan so it reaches 1/4-inch up the sides and heat over medium-high heat. Working in batches, shake off excess breading from chicken add to pan in a single layer and cook for about 4-6 minutes, turning halfway through. Remove to a paper towel lined plate. You can use a nonstick pan, or cast-iron skillet for shallow pan frying.
TO DEEP FRY: Add enough vegetable oil to a Dutch oven or frying pan so it reaches 1-inch up the sides. Heat the oil to medium-high. Once very hot, add the chicken in batches and cook until golden and cooked through, about 2-3 minutes. Remove to a paper towel lined plate.
HOW DO I MAKE BAKED SWEET AND SOUR CHICKEN CRISPY?
As I mentioned previously, I don’t consider Sweet and Sour Chicken “crispy” but more “sticky” because the breading softens as soon as it gets enveloped in the sauce – this goes for baked or fried chicken. BUT in order for your chicken to not get soggy, it has to start off crispy. To make baked Sweet and Sour Chicken, you will use all of the same ingredients, except swap the cornstarch for flour in the breading.
- Heat your baking sheet first. First line a baking sheet with foil and lightly spray with cooking spray then place this baking sheet in oven. This allows the baking sheet to get hot so when we add our chicken, it immediately begins to crisp up. In my original baked General Tso Chicken recipe, I placed the chicken on a greased baking rack on top of a baking sheet, which you are still welcome to do, but I find that method super tedious when adding and flipping the chicken to make sure they don’t fall in between the cracks. This new method gets them just as crispy as long as you broil both sides of the chicken.
- Dab off excess egg. We don’t want extra egg clinging to the chicken as it dives into the breading because it will cause gooey pockets instead of a thin binding layer. So, take care to remove the chicken with a slotted spoon then to quickly remove excess egg, dump the chicken onto a wad of paper towels before adding to the breading.
- Broil chicken: The chicken will be somewhat crispy after baking but broiling takes it to another level. I broil my chicken for almost 4 minutes on the top layer and 2 minutes once I flip the chicken over. You need less time on the second, bottom side because the broiler is all warmed up. Just watch closely so the chicken doesn’t burn!
CHINESE SWEET AND SOUR CHICKEN VARIATIONS:
If this Chinese Sweet and Sour Chicken recipe isn’t exactly how you want it, MAKE it how you want it! It is easy to customize the sauce by:
- sweeten it up with additional granulated sugar
- add sweet heat with sweet chili sauce
- spice it up with additional red pepper flakes or Asian chili sauce
- make it tangier by adding additional red wine vinegar
- amp up the garlic and/or ginger for a stronger punch of flavor
- add vegetables by stir frying additional veggies or swapping the bell peppers for what you have on hand
WHAT VEGETABLES CAN I ADD TO SWEET AND SOUR CHICKEN RECIPE?
Sweet and Sour Chicken is made for crisp-tender bell peppers. The earthy green bell peppers and the sweet red bell peppers perfectly complement each other while adding a delightful crunch to the dish. Of course, if bell peppers aren’t your thing, you can swap them out for other vegetables or add additional vegetables. Here are some favorite vegetables to stir fry:
- Broccoli
- Carrots
- Snow Peas
- Zucchini
- Asparagus
- Baby corn
- Edamame
- Bok choy
TIPS AND TRICKS FOR SWEET AND SOUR CHICKEN RECIPE
- Don’t chop chicken too small. The chicken should be chopped 1” thick, erroring on the side of larger so that it doesn’t overcook and dry out.
- Thoroughly bread chicken. If you notice any of the chicken pieces aren’t fully coated in the breading, give them another toss or use your hands to press the breading into the chicken.
- Remove excess egg/marinade. It is important to remove excess egg so the flour breading bag doesn’t become a goopy mess. To do this, I plop the chicken on a wad of paper towels before adding to the flour mixture.
- Remove excess flour. Even if you shake the chicken as you remove it from the breading, a lot of flour can end up in the pan or on the baking sheet. To remedy this, I like to place the chicken in a strainer after dredging to help shake off any excess.
- Don’t let chicken touch. Space the chicken apart either on the baking sheet or in the pan so the pieces aren’t touching – chicken will never get crispy if it’s hidden/touching other chicken.
- Keep an eye on the chicken. Don’t walk away from the chicken while it is frying or while it is broiling because it can turn from crispy to burnt in a flash!
- Serve immediately. Whether Sweet and Sour Chicken is baked or fried, it will get softer the longer it sits in the sauce. To prevent soggy chicken, serve immediately or store the chicken and sauce separately, then combine when reheating.
- Customize! Make this YOUR Sweet and Sour Chicken by making it sweeter, tangier, or spicier if desired.
DO I HAVE TO BREAD THE CHICKEN?
Classic Sweet and Sour Chicken is dredged in flour to create a crispy exterior but you can skip the battering and opt for a simple skillet stir fry chicken if you wish.
HOW TO MAKE SWEET AND SOUR CHICKEN STIR FRY
- Marinate chicken per recipe instructions with the addition of the breading seasonings: ½ teaspoon salt and 1/4 tsp EACH ground ginger, garlic powder, pepper.
- Meanwhile, whisk the sweet and sour sauce ingredients together in a medium bowl; set aside.
- Heat 1 tablespoon vegetable oil in a large seasoned skillet or wok over medium-high heat. Once very hot, add chicken in a single layer and cook until golden; flip chicken over and cook an additional 2 minutes, then continue to stir fry until cooked through; remove to a plate.
- To the now empty pan, heat 1 tablespoon oil and heat over medium high heat. Add onions and pineapple and stir fry for 2 minutes. Add bell peppers, ginger and garlic and stir fry for 1 minute.
- Stir sauce (to make sure cornstarch has not separated) and add to skillet. Simmer until sauce is warmed through and thickened. Add chicken and toss to coat.
What do you serve with sweet and sour chicken?
Chinese Sweet and Sour Chicken is traditionally served with rice because it soaks up the flavorful sauce and offers a neutral textural component. That being said, you still have a few options:
RICE OPTIONS
- Rice. I like jasmine rice or brown rice but any rice will work. Just pop the rice in your rice cooker for a hands’ off, easy side. You can also use microwave rice pouches if you’re making a serving for one or meal prep.
- Low carb. Cauliflower rice, quinoa, broccoli rice or a blend of brown rice and any of the aforementioned options. You can also use low carb noodles such as zoodles or spaghetti squash.
- Noodles. Ramen, soba noodles, rice noodles or even linguine are a fun way to mix things up!
IN ADDITION TO RICE, YOU CAN SERVE SWEET AND SOUR CHICKEN WITH:
- Appetizers: You can turn Sweet and Sour Chicken into a feast by pairing it with Chinese appetizers such as Crab Rangoons, Chicken Lettuce Wraps, Pineapple Cream Cheese Wontons, Sesame Chicken Egg Rolls, Sweet and Sour Chicken Egg Rolls or Chinese Chicken Wings. It is also delicious with potstickers, even though they are technically Japanese and not Chinese.
- Soup: Let the Chinese feast continue with soup! I love to warm up to Egg Drop Soup which is SUPER easy and always a sultry, satisfying favorite.
- Salad: This Sweet and Sour Chicken pairs wonderfully with a fresh, crunchy salad such as Crunchy Asian Salad, Chinese Salad, or Asian Pineapple Salad.
MAKE AHEAD SWEET AND SOUR CHICKEN RECIPE
Even though this Sweet and Sour Chicken is easy to make, you can still prepare it in stages if that works better for you.
- Sweet and Sour Sauce: Whisk the sauce ingredients together but do not simmer/thicken. Store it in an airtight container in the refrigerator.
- Breading: Whisk the flour breading ingredients together in a Ziploc freezer bag. You can store the breading for weeks or proceed to dredge chicken then refrigerate.
- Marinade: Whisk the marinade ingredients together but don’t add the chicken; the chicken should only marinate for 30 minutes.
- If baking: Prepare chicken through dredging but instead of placing on a baking sheet, place on a greased cooking rack placed on a baking sheet. The elevated cooking rack will help crisp up the chicken when it’s time to bake since we are eliminating the step of heating the baking rack before adding the chicken. Cover the chicken tightly with foil or plastic wrap. Let sit at room temperature for 20 minutes before cooking.
HOW TO STORE CHINESE SWEET AND SOUR CHICKEN
This Chinese Sweet and Sour Chicken recipe is best served fresh because it is at peak crispiness, sauciness and the chicken is the juiciest. You will find leftover chicken is not crispy but is still delicious.
- How to store: Store leftovers in an airtight container in the refrigerator for up to 5 days.
- How to reheat on the stove: Leftovers are best reheated on the stove, even if they are small portions. To reheat, heat a drizzle of vegetable, canola or peanut oil over medium heat. Once hot, add the chicken, stirring occasionally until warmed through.
- Reheating in microwave: Microwaving leftovers is not advised as the chicken can become rubbery and the breading will definitely not be crispy, so just take not to overcook the chicken.
CAN I FREEZE SWEET AND SOUR CHICKEN RECIPE?
If you are making Sweet and Sour Chicken specifically to freeze, then I recommend freezing the chicken and sauce separately and omitting the bell peppers so the chicken and peppers don’t become soggy.
TO FREEZE CHICKEN WITHOUT SAUCE:
- Cook chicken according to preferred directions then let cool to room temperature.
- Space chicken apart on a baking sheet then transfer baking sheet to the freezer.
- Let freeze for 1-2 hours or until the chicken is solid. This prevents the chicken from clumping together.
- Add chicken to a freezer size bag, squeeze out excess air and label.
- Add sweet and sour sauce to a separate airtight container.
- When ready to use, defrost chicken and sauce in the refrigerator overnight and chop stir fry ingredients.
TO FREEZE CHICKEN IN SWEET AND SOUR SAUCE:
If freezing leftovers, I recommend removing the bell peppers before freezing because they will become mushy when thawed.
- Let Sweet and Sour Chicken cool completely.
- Transfer chicken to either a large freezer size bag or divide into smaller size bags. Alternatively, transfer to airtight container(s).
- Press air out of the freezer bag, seal, label and freeze for up to 3 months.
- When ready to eat, defrost in the refrigerator.
- Heat on the stove until warmed through, adding fresh bell peppers the last 3 minutes or so.
Want to try this Sweet and Sour Chicken RECIPE?
Pin it to your Dinner, Chicken or Asian Board to SAVE for later!
Find me on Pinterest for more great recipes! I am always pinning :)!
©Carlsbad Cravings by CarlsbadCravings.com


Sweet and Sour Chicken
Save This Recipe To Your Recipe Box
You can now create an account on our site and save your favorite recipes all in one place!
Ingredients
Chicken “marinade”
- 2 eggs
- 1 tablespoon cornstarch
- 1 tablespoon soy sauce
- 1 tablespoon toasted sesame oil
- 1 tablespoon Japanese rice wine
- 1 teaspoon baking soda
- 1 1/2 pounds boneless skinless chicken breasts, cut into 1-inch pieces
Chicken Breading
- 1/2 cup flour
- 1/2 cup cornstarch replace with flour if baking
- 1/2 teaspoon salt
- 1/4 tsp EACH ground ginger, garlic powder, pepper
- Vegetable oil
Sweet and Sour Sauce
- 3/4 cup granulated sugar
- 1/2 cup red wine vinegar
- 1/4 cup pineapple juice from pineapple tidbits can listed below
- 3 tablespoon ketchup
- 1 tablespoon reduced sodium soy sauce
- 1/2 teaspoon salt
- 1/4 teaspoon red pepper flakes
- 2 teaspoons cornstarch
Stir Fry
- 3-4 garlic cloves minced
- 2 teaspoons freshly grated ginger
- 1/2 onion chopped into 1-inch chunks
- 1 15 oz. can pineapple tidbits in juice
- 1 green bell pepper chopped into 1-inch chunks
- 1 red bell pepper chopped into 1-inch chunks
Instructions
- IF BAKING: Heat oven to 375 degrees F. Line a baking sheet with a nonstick mat or foil and lightly spray with cooking spray. Place baking sheet in the oven to heat up.
- MARINATE CHICKEN. Whisk eggs in a large bowl then whisk in all remaining “marinade” ingredients. Stir in chicken and let marinate at room temperature while you prep the rest of the ingredients, preferable 20 minutes.
- WHISK SAUCE. Whisk the sauce ingredients together in a small bowl, set aside.
- BREAD CHICKEN. Add flour, cornstarch, and seasonings to a large freezer bag (or large bowl). Remove chicken from marinade with a slotted spoon, dab off excess egg with paper towels and add to breading. Toss chicken until well coated, pressing coating into chicken from outside the bag.
- TO PAN FRY (See notes for more cooking options): Add enough vegetable oil to a large frying pan so it reaches 1/4-inch up the sides and heat over medium-high heat. Working in batches, shake off excess breading from chicken add to hot pan in a single layer and cook for about 4-6 minutes, or until cooked through, turning halfway through. Remove to a paper towel lined plate.
- ADD SAUCE. Stir sauce (to make sure cornstarch has not separated) and add to skillet. Simmer until thickened.
- COMBINE. Add chicken and toss to coat. Serve immediately.
Notes
How to Cook Sweet and Sour Chicken – 4 options
You have four options when it comes to cooking your Sweet and Sour Chicken: to bake, lightly pan fry, to shallow pan fry, or to deep fry. Each technique uses different amounts of oil resulting in varying amounts of crispiness, but they are all winners, especially once smothered in sweet and sour sauce. Deep fried will obviously emerge the crispiest and “puffiest/fluffiest,” for lack of a better word, with the most even browning and a distinctively fried flavor. Baked chicken can still become surprisingly crispy and still boasts all the flavor. I typically shallow pan fry as it is a happy medium and still produces crispy chicken – but on days I want to splurge – deep fried is where it’s at. Here are the different cooking options ordered from least oil to most oil: TO BAKE: Carefully place chicken on the hot baking sheet in an even layer and spray generously with cooking spray. Bake at 375 degrees for 10 minutes then move the baking sheet about 8″ away from broiler and broil until crispy, watching closely so the chicken doesn’t burn (about 2-4 minutes). Flip chicken pieces over and broil another 2-3 minutes, or until crispy. TO LIGHLTY PAN FRY: Heat 3 tablespoons vegetable oil in a large nonstick skillet heat over medium-high heat. Working in batches, shake off excess breading from chicken and add to pan in a single layer and cook undisturbed for 1 minute then continue to cook and stir until lightly browned and cooked through. Remove to a paper towel lined plate. It is important that you use a nonstick skillet when using so little oil or else your chicken will definitely stick – don’t even think about using a stainless-steel pan. TO SHALLOW PAN FRY: Add enough vegetable oil to a large frying pan so it reaches 1/4-inch up the sides and heat over medium-high heat. Working in batches, shake off excess breading from chicken add to pan in a single layer and cook for about 4-6 minutes, turning halfway through. Remove to a paper towel lined plate. You can use a nonstick pan, or cast-iron skillet for shallow pan frying. TO DEEP FRY: Add enough vegetable oil to a Dutch oven or frying pan so it reaches 1-inch up the sides. Heat the oil to medium-high. Once very hot, add the chicken in batches and cook until golden and cooked through, about 2-3 minutes. Remove to a paper towel lined plate.TIPS AND TRICKS
- Don’t chop chicken to small. The chicken should be chopped 1” thick, erroring on the side of larger so that it doesn’t overcook and dry out.
- Thoroughly bread chicken. If you notice any of the chicken pieces aren’t fully coated in the breading, give them another toss or use your hands to press the breading into the chicken.
- Remove excess egg/marinade. It is important to remove excess egg so the flour breading bag doesn’t become a goopy mess. To do this, I plop the chicken on a wad of paper towels before adding to the flour mixture.
- Remove excess flour. Even if you shake the chicken as you remove it from the breading, a lot of flour can end up in the pan or on the baking sheet. To remedy this, I like to place the chicken in a strainer after dredging to help shake off any excess.
- Don’t let chicken touch. Space the chicken apart either on the baking sheet or in the pan so the pieces aren’t touching – chicken will never get crispy if it’s hidden/touching other chicken.
- Keep an eye on the chicken. Don’t walk away from the chicken while it is frying or while it is broiling because it can turn from crispy to burnt in a flash!
- Serve immediately. Whether Sweet and Sour Chicken is baked or fried, it will get softer the longer it sits in the sauce. To prevent soggy chicken, serve immediately or store the chicken and sauce separately, then combine when reheating.
- Customize! Make this YOUR Sweet and Sour Chicken by making it sweeter, tangier, or spicier if desired.
SWEET AND SOUR CHICKEN STIR FRY
- Marinate chicken per recipe instructions with the addition of the breading seasonings: ½ teaspoon salt and 1/4 tsp EACH ground ginger, garlic powder, pepper.
- Meanwhile, whisk the sweet and sour sauce ingredients together in a medium bowl; set aside.
- Heat 1 tablespoon vegetable oil in a large seasoned skillet or wok over medium-high heat. Once very hot, add chicken in a single layer and cook until golden; flip chicken over and cook an additional 2 minutes, then continue to stir fry until cooked through; remove to a plate.
- To the now empty pan, heat 1 tablespoon oil and heat over medium high heat. Add onions and pineapple and stir fry for 2 minutes. Add bell peppers, ginger and garlic and stir fry for 1 minute.
- Stir sauce (to make sure cornstarch has not separated) and add to skillet. Simmer until sauce is warmed through and thickened. Add chicken and toss to coat.
MAKE AHEAD
Even though this Sweet and Sour Chicken is easy to make, you can still prepare it in stages if that works better for you.- Sweet and Sour Sauce: Whisk the sauce ingredients together but do not simmer/thicken. Store it in an airtight container in the refrigerator.
- Breading: Whisk the flour breading ingredients together in a Ziploc freezer bag. You can store the breading for weeks or proceed to dredge chicken then refrigerate.
- Marinade: Whisk the marinade ingredients together but don’t add the chicken; the chicken should only marinate for 30 minutes.
- If baking: Prepare chicken through dredging but instead of placing on a baking sheet, place on a greased cooking rack placed on a baking sheet. The elevated cooking rack will help crisp up the chicken when it’s time to bake since we are eliminating the step of heating the baking rack before adding the chicken. Cover the chicken tightly with foil or plastic wrap. Let sit at room temperature for 20 minutes before cooking.
STORAGE
This Chinese Sweet and Sour Chicken recipe is best served fresh because it is at peak crispiness, sauciness and the chicken is the juiciest. You will find leftover chicken is not crispy but is still delicious.- How to store: Store leftovers in an airtight container in the refrigerator for up to 5 days.
- How to reheat on the stove: Leftovers are best reheated on the stove, even if they are small portions. To reheat, heat a drizzle of vegetable, canola or peanut oil over medium heat. Once hot, add the chicken, stirring occasionally until warmed through.
- Reheating in microwave: Microwaving leftovers is not advised as the chicken can become rubbery and the breading will definitely not be crispy, so just take not to overcook the chicken.
HOW TO FREEZE
If you are making Sweet and Sour Chicken specifically to freeze, then I recommend freezing the chicken and sauce separately and omitting the bell peppers so the chicken and peppers don’t become soggy.TO FREEZE CHICKEN WITHOUT SAUCE:
- Cook chicken according to preferred directions then let cool to room temperature.
- Space chicken apart on a baking sheet then transfer baking sheet to the freezer.
- Let freeze for 1-2 hours or until the chicken is solid. This prevents the chicken from clumping together.
- Add chicken to a freezer size bag, squeeze out excess air and label.
- Add sweet and sour sauce to a separate airtight container.
- When ready to use, defrost chicken and sauce in the refrigerator overnight and chop stir fry ingredients.
TO FREEZE CHICKEN IN SWEET AND SOUR SAUCE:
If freezing leftovers, I recommend removing the bell peppers before freezing because they will become mushy when thawed.- Let Sweet and Sour Chicken cool completely.
- Transfer chicken to either a large freezer size bag or divide into smaller size bags. Alternatively, transfer to airtight container(s).
- Press air out of the freezer bag, seal, label and freeze for up to 3 months.
- When ready to eat, defrost in the refrigerator.
- Heat on the stove until warmed through, adding fresh bell peppers the last 3 minutes or so.
Want To Make This Recipe?

Did You Make This Recipe?
Tag @CarlsbadCravings and Use #CarlsbadCravngs
Leave a Review, I Always Love Hearing From You!
Carlsbad Cravings© Original


Gina says
Hi JEN, Can you tell me the rice cooker that you use? I’m just looking to make rice in it, and after looking at the Instant Pot for years now it just isn’t for our family. Thank you so much for all you do we LOVE all your recipes.
Jen says
Hi Gina, I have an Aroma rice cooker and it has been great! Thank you for making my recipes!
Conrex says
Thanks for the recipe! I’ll definitely give it a try. You do such detailed work on your recipes and it’s appreciated!
Jen says
Thank you so much Conrex, I’m so glad you find it helpful! I’m excited for you to try this recipe!
Cheryl White says
Hello! I also Love Asian dishes as well, so you can understand my elation when I saw this recipe for the 1st time a couple of years ago! I see you’ve added other methods. But I especially love the original recipe where you pan fried it & finished it off by baking. Can you Please Please email me the Original Recipe?? Thank You!
Jen says
Hi Cheryl, I still have that recipe titled Baked Sweet and Sour Chicken: https://carlsbadcravings.com/baked-sweet-and-sour-chicken-pineapple-carrots-and-bell-peppers/
Patty says
Wow, very good. Followed recipe as written except we had KFC popcorn chicken in fridge, so we used that . So easy and delicious.
Jen says
Awesome Patty, I’m so happy you enjoyed it! Thank you!
Conny says
Really lovely recipe. The closest I have ever got to the Chinese. In fact it’s even better.
Jen says
Yess! Thank you for your awesome review Conny, I’m so pleased it was such a hit!
Heather says
You’ve outdone yourself! Made this last night and the whole family LOVED it! Thanks for another amazing recipe
Jen says
YAY! Thanks so much Heather, I’m so pleased it was a hit!
Sophie says
Hello, i would like to give this recipe a try but using a lighter version so can i use the airfryer to cook the chicken?
Jen says
Absolutely!
Kimberley Moore says
In the printable version of the recipe it doesnt specify what size to cut the chicken pieces or to cut at all. I am having a hard time and end up under cooking it . in the top part you said not to cut too small so I went on the bigger side, but it doesnt line up with the cooking time you stated for pan frying.
Jen says
I’m sorry for the trouble Kimberley and thanks for pointing that out! I fixed the recipe to include 1-inch pieces – this is the size I always use and they cook in 4-6 minutes at the specified heat. As always, I recommend checking a piece of chicken for doneness before you finish cooking.
Lauren says
Absolutely amazing. Best we’ve ever had. Definitely one to try 🙂
Jen says
Thanks Lauren, I love hearing that!
Mandy says
Hi! Thank you so much for your recipes! They are always delicious, and I appreciate your thoroughness in explaining how to cook them! I can’t wait to try your sweet and sour chicken. Is rice vinegar the same as rice wine vinegar, and can I use it in place of the rice wine vinegar?
Jen says
Thank you for your kind words Mandy! Yes, its the same, so you’re good to go! (Not to be confused with simply “rice wine” which is not the same/sweeter.)
Lee says
First, thank you for the recipe. For years I’ve avoided making this dish, as I assumed it was too complicated/time consuming.
I just made it and my husband, who loves S&S chicken, said it was the best he ever had.
I made the marinade mostly as in the recipe (I initially misread it and had to add the egg later!), albeit I somewhat eyballed the amounts. I also kept the chicken in it overnight (reading comprehension again) and was worried the baking soda flavor would be prominent but thankfully it wasn’t – perhaps because I added some extra ginger and five spice to both the marinade and later on to the coating mixture.
I made some modifications to the sauce, using:
– more pineapple juice, approx. 3/4 cup, as I had no use for the leftover juice and so just emptied the entire can).
– less vinegar – approx. a quarter less than the recipe called for. I was using white rice vinegar because that’s what I had at home and wasn’t sure how it’d work. I found it very sharp and cooked it out for at least 40 minutes but the end effect was lovely – very tangy but in a good way.
– I used erythritol instead of sugar to cut down on carbs and used approx. a third less than the recipe called for. While most recipes call for 1:1 erythritol to sugar, I find it very very sweet, so always use less, plus I knew it’d be sweeter from the extra juice.
– Swapped one tsp of corn starch for xantan gum for thickening.
I will be making it again. Do you think the type of vinegar makes a big difference?
And any thoughts on using fresh vs canned pineapple? I suppose I’d need to buy one of those small cans of pineapple juice if I was using fresh?
Greetings from Texas,
Lee
Jen says
Hi Lee! I prefer using red wine vinegar because it adds a fruity tang! I think fresh pineapple would be delicious too, and yes you would need some juice for the sauce. Glad you and your husband enjoyed the recipe!
Erica says
Yum! I made it exactly as written, using the oven baked method and it was a hit with the whole family. Thank you for all that you share!
Jen says
Yay! I’m so glad that you and your family loved it!