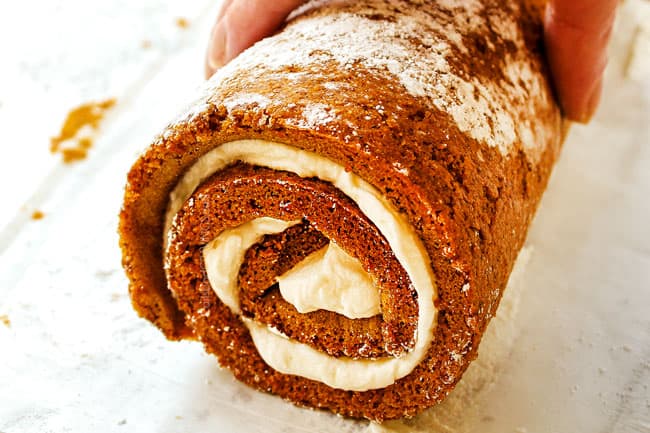
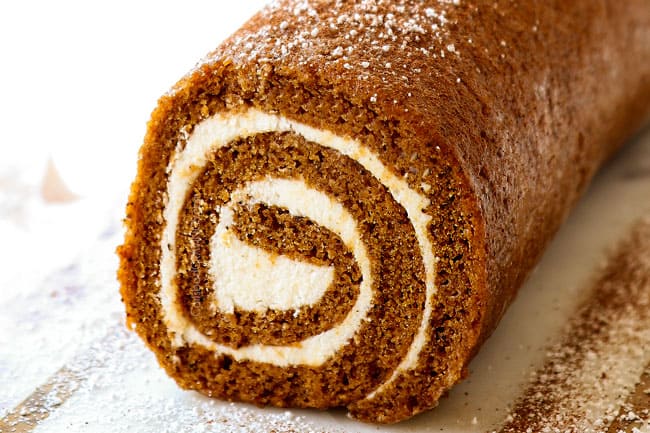
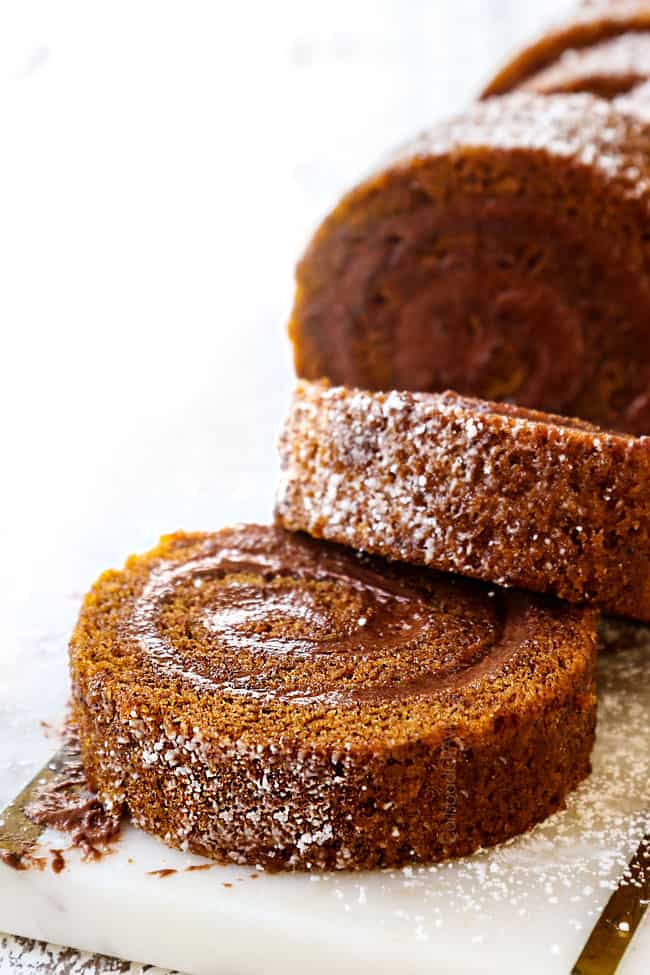
Prepare to be obsessed with this gorgeous pumpkin roll recipe that’s easier to make than you think!
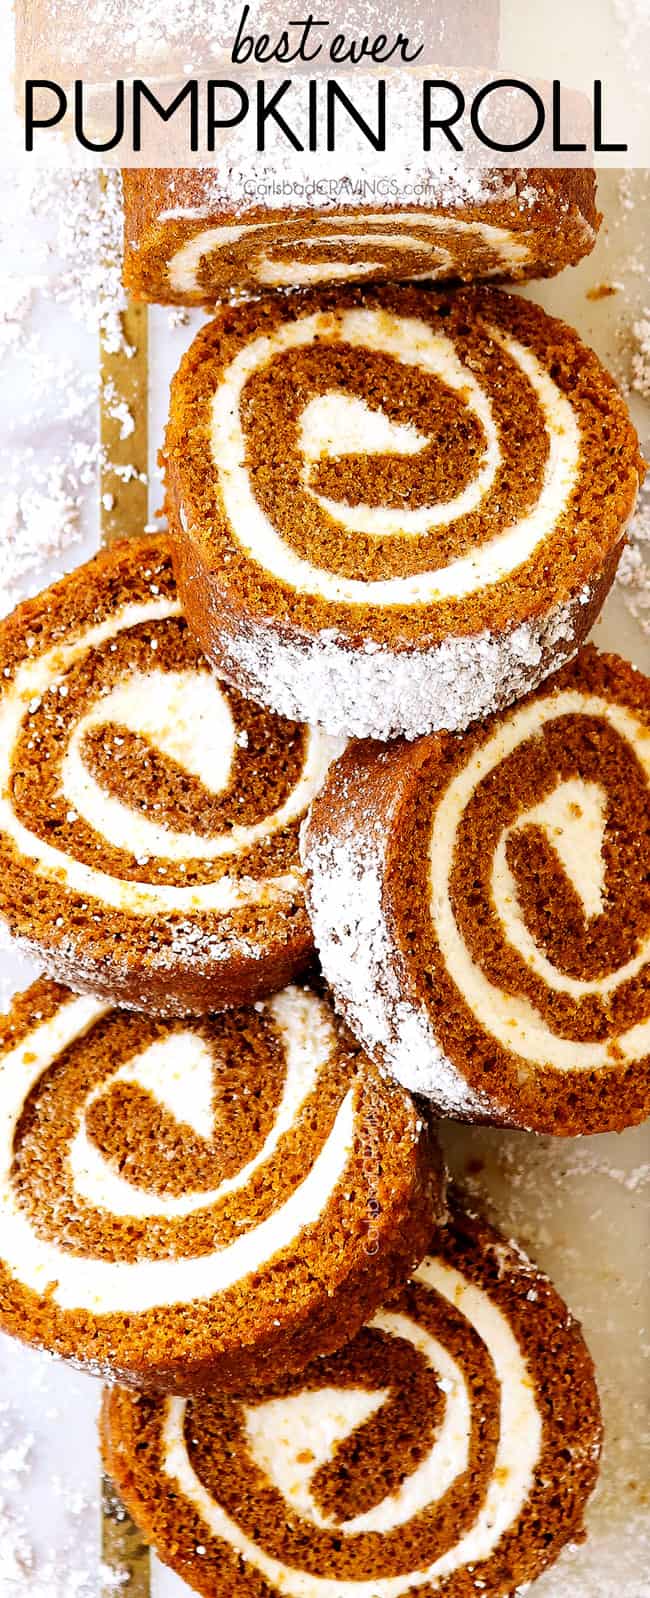
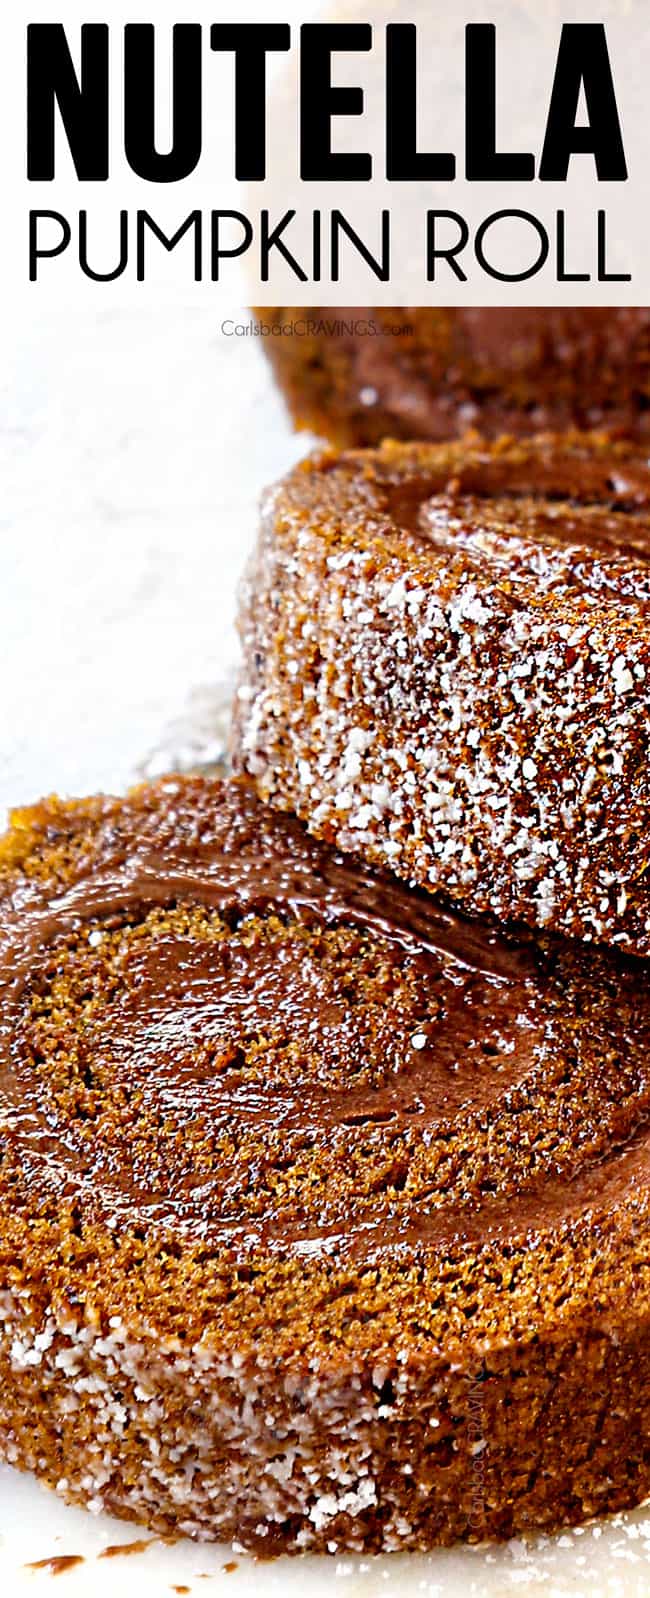
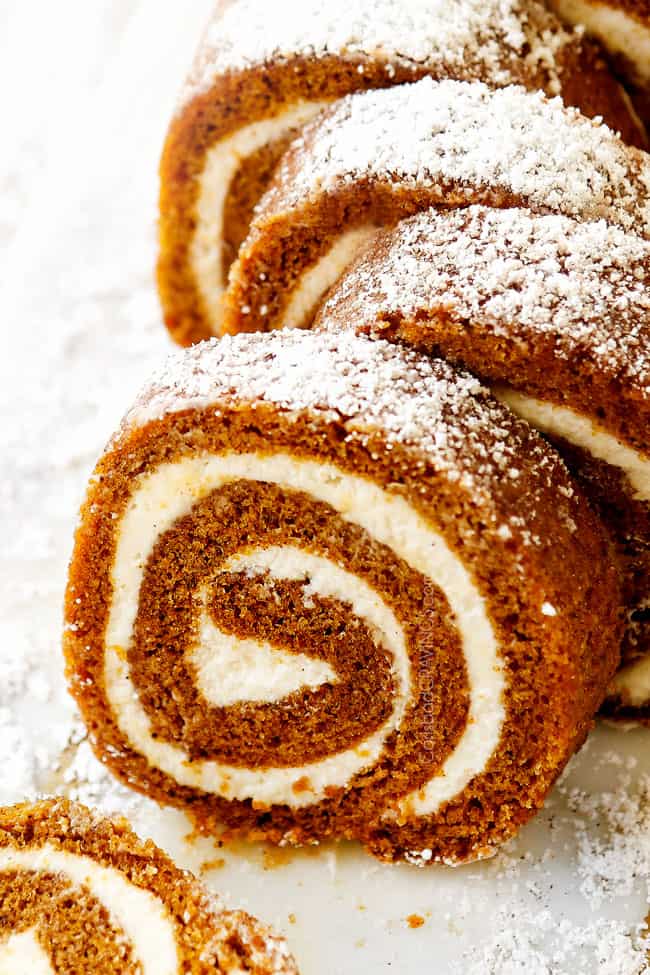
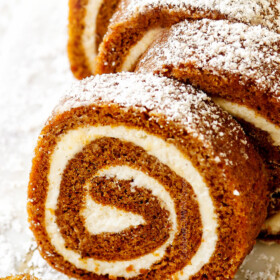
This Pumpkin Roll recipe is one of the best, must-make desserts of Fall and the perfect make ahead dessert for Thanksgiving! A soft, tender, warmly spiced pumpkin cake is slathered in luscious cream cheese frosting OR Nutella cream cheese frosting (both recipes included) then rolled up, chilled and dusted with powdered sugar. The traditional pumpkin roll is an eye-catching crowd pleaser but the Nutella pumpkin roll is beyond delicious! (100% original btw, never been done before – but now you’ll start seeing them everywhere 😉). The pumpkin roll is not only pillowy, flavorful perfection but easy to make with pantry ingredients! In this recipe post, I’ll teach you how to make a pumpkin roll with step by step instructions, tips and tricks as well as a “how to make” video for the ULTIMATE pumpkin roll every time.
I love Fall because that means everything pumpkin! I look forward all year to making pumpkin bread, pumpkin muffins, pumpkin cookies, pumpkin cheesecake, pumpkin Bundt cake and now this pumpkin roll recipe!
How to Make Pumpkin Roll Video
PIN THIS RECIPE TO SAVE FOR LATER
Pumpkin roll RECIPE
Pumpkin, pumpkin, pumpkin! If you’re wondering if you need yet another pumpkin recipe, the answer is YES – especially because this recipe makes a traditional pumpkin roll AND a Nutella pumpkin roll! This subtly sweet, warmly spiced, beautifully swirled dessert tastes just as gorgeous as it looks and will be the centerpiece of every gathering and holiday table!
Honestly, I have always been intimidated by making a pumpkin roll. And it turns out, I’m not the only one. After I shared some slices with a friend, she was still gushing about it days later and asked:
“Do you think I can make it? Like an ordinary person?”
My answer is YES! Anyone can make this easy pumpkin roll recipe!
Pumpkin rolls might look and sound intimidating, and it’s true, they weren’t always as easy or foolproof. The original Libby’s pumpkin roll recipe relied on a kitchen towel and powdered sugar to bundle up the roll and hope it didn’t stick or crack. Today, I’m sharing with you my easy, more reliable method of using parchment paper as well as other handy tips and tricks for a successful pumpkin roll every time.
What else makes this recipe the best?
With all the pumpkin roll recipes out there, you might be wondering why this one? Because I’ve taken all of the guess work out for you! I have researched dozens of pumpkin roll recipes and discovered every single one of them has the same ingredients down to the same measurements (other than spices), modeled after Libby’s pumpkin roll (if it’s not broke, don’t fix it!). The differences between recipes came down to spices and techniques.
This pumpkin roll recipe is seasoned to perfection with extra cinnamon, cloves, nutmeg and ginger – no bland pumpkin here – which is needed to cut through the rich filling. I’ve also detailed other tips such as the proper pan size, using parchment paper instead of a towel, using powdered sugar before and after rolling, rolling the cake while it’s still warm, utilizing America’s Test Kitchen Method of making cream cheese frosting so it’s extra fluffy and chilling for the proper amount of time.
To further demystify the pumpkin roll, I’m sharing a step-by-step video as well as step by step photos with detailed explanations for the BEST pumpkin roll!
What about this Nutella Pumpkin Roll?
Like I mentioned, every pumpkin roll recipe is essentially the same – but I wanted to do something different, so I literally dreamt up this new version. My mind wandered to my favorite (and readers favorite) pumpkin bars with Nutella cream cheese frosting (the first pumpkin recipe I make every year) and got giddy over the prospect of rolling up that fabulous filling in a pumpkin roll. The verdict – insanely delicious. So, while I love both pumpkin roll versions, this Nutella version takes the cake for me.
The good news is, you don’t have to choose! This pumpkin roll recipe is so easy, you can literally make two pumpkin rolls with less than one can of pumpkin and pop one in the freezer. You can also half both of the frosting recipes and spread half on one side of the roll and half on the other. Winning at life! Because that’s how we roll…😉
How to Make a Cake That’s Flexible Enough to Roll
The reason Libby’s pumpkin roll recipe has stood the test of time is because the ingredients are in perfect proportions to create an easy-to-roll, pliable cake. Roll cakes require a thin, flat cake that’s flexible enough to roll without breaking or tearing. To accomplish this, the batter has a higher ratio of eggs to flour which creates more structure and moisture at the same time, without butter or oil to weigh it down. This allows the cake to remain light, spongy and sturdy.
PUMPKIN ROLL Recipe INGREDIENTS
You will need just a handful of ingredients for this easy pumpkin roll recipe:
- Pumpkin: the most important part of this recipe is to use the right pumpkin! You will need pure pumpkin puree and not pumpkin pie filling. The ingredient list should only list “pumpkin.” I stock up on cans of Libby’s 100% pure pumpkin puree at the end of every season, that way I can start making glorious pumpkin everything in August and September, long before the shelves are stocked. You are also welcome to make pumpkin puree from scratch if you prefer, instructions to follow.
- Sugar: I use a mixture of brown sugar and granulated sugar to add both sweetness and flavor to the cake. Brown sugar also creates a more tender, moist cake.
- Eggs: provide structure and moisture. Use room temperature eggs because they bind together more easily and promote a fluffier cake.
- All-purpose flour: is the best for this pumpkin roll recipe. Skip the cake flour, bread flour and wheat flour. I have not made this recipe with gluten free flour, so I can’t speak to whether it will work here. If you try it, please let me know!
- Baking powder and baking soda: help the cake rise. Make sure they are fresh so they work!
- Spices: I used a blend of cinnamon, nutmeg, ginger and cloves to make this pumpkin roll truly taste just like fall. You may also substitute with 1 tablespoon pumpkin pie spice, but I don’t think it’s quite the same.
CREAM CHEESE FILILNG
- Cream cheese: use full-fat cream cheese for the best results.
- Powdered sugar: make sure to sift the sugar before making the frosting, otherwise you’ll wind up with lumpy frosting.
- Vanilla extract: adds so much flavor! Use quality extract for the best results and skip the imitation kind.
- Butter: unsalted is typically best for baked goods and should be used unless a recipe specifies salted butter.
Nutella Variation:
You will need the same ingredients above used in the cream cheese filling plus:
- Nutella: ½ cup will do the trick! Use leftover Nutella in these muffins, bars, cookies, crepes or smore’s pie (SO good!).
- Cocoa powder: Use unsweetened cocoa powder.
HOW TO MAKE PUMPKIN PUREE
You are welcome to use your own fresh pumpkin instead of canned pumpkin puree. My only caution is that you cannot use a carving pumpkin (like the pumpkin you carve for Halloween), but need to use a sugar pumpkin. Carving pumpkins are raised for their durability and not their taste and have much more moisture than sugar pumpkins and less flavor. To make pumpkin puree:
- Preheat oven to 325 degrees F.
- Cut the pumpkin in half from the stem to base.
- Remove all the seeds and pulp.
- Cover the cut side of each pumpkin half with foil.
- Bake, foil side up, for 1 hour OR until tender.
- Scrape out pumpkin flesh and add to a blender
- Strain puree through a fine mesh sieve to remove any stringy pieces
- Store in the refrigerator for up to 3 days.
PUMPKIN PURÉE VS PUMPKIN PIE FILLING
Take care you are using pumpkin puree and NOT pumpkin pie filling because they are not the same thing. Pumpkin puree is cooked and pureed pumpkin without any added sugar or spices. Pumpkin Pie filling, however, is sweetened and seasoned with Fall spices.
Both pumpkin puree and pumpkin pie filling can be found in the baking aisle of your grocery store, so make sure you are grabbing the right can! For this recipe you will need ¾ cups pumpkin puree. You can freeze the rest, make another pumpkin roll or use it any of my other pumpkin recipes.
You will also need:
For the perfect pumpkin roll:
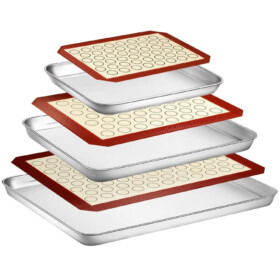
- 10 x 15-inch jelly roll pan: is a half sheet pan with 1-inch high sides. You must use the correct size pan so the cake is the proper thickness. The cake needs to be thin enough so it rolls up easily but not too thin that it cracks.
FOR A MESS-FREE PUMPKIN ROLL:
- Parchment paper: use a roll of parchment paper and not sheets so you can make one long piece to cover the jelly roll pan with a slight overhang. Parchment paper is used to create a mess-free pumpkin roll by baking the pumpkin roll on parchment so it easily comes out of the pan and again to roll up the baked cake and again to roll up the cooled cake once it’s spread with cream cheese frosting.
- Cooking spray: is used to spray the jelly roll pan so the parchment paper sticks, even in the corners. It is used again to grease the parchment paper so the cake will easily release.
- Powdered sugar: is not only used to dust the cake after it’s baked but also to dust the parchment paper before the baked cake is rolled up. You might think powdered sugar isn’t necessary because we’re using parchment paper instead of the original towel method, but I have tried it both with and without the powdered sugar and with is hands down better. The powdered sugar absorbed excess moisture from the cake so it peels off much more cleanly from the parchment.
RECIPE VARIATIONS
Pumpkin rolls are like pumpkin bread – you can pretty much add anything! Just take care to chop any add-ins finely so the cake can still easily roll up. Also, don’t add too much, just 1 cup or so, so they’re isn’t a lot of extra bulk which can make the cake tear. Here are some add-in ideas:
- Chocolate chips: are always divine paired with pumpkin. Use mini chocolate chips so they are absorbed by the cake and can easily roll.
- Walnuts or Pecans: chop finely and fold into the batter or sprinkle onto the cake before baking if you want them to be visible on the outside of the rolled cake.
- Dried fruit: chopped raisins, dried cranberries, dried cherries, dried apricots, etc. if that’s your thing.
- Coconut: sweetened, toasted coconut flakes could be folded into the batter or even added to the cream cheese filling.

How to Make a Pumpkin Roll
Step 1: Prepare the pan
Grease a jelly roll pan with nonstick cooking spray then line it with parchment paper, leaving about a 1-inch overhang on the short ends. Spray the top of the parchment with cooking spray; set aside.
- Tip: Use the correct pan size. A 15 x 10-inch jelly roll pan is the ONLY size pan that works for this recipe. No conversions available here! If you use a large pan, then the cake will be too thin and brittle. If your pan is too small, the cake will be too thick, difficult to roll and only roll a couple times.
- Tip: Don’t skip the parchment or greasing. A fool-proof non-stick surface is a crucial when making this cake. The parchment overhang will also allow you to easily lift the cooked cake out of the pan.
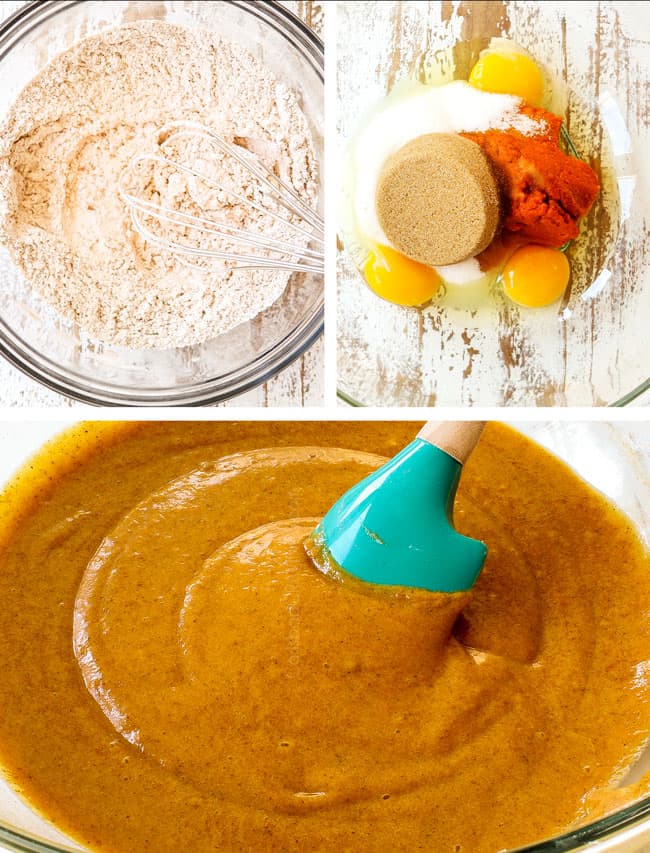
Step 2: Make the pumpkin cake batter
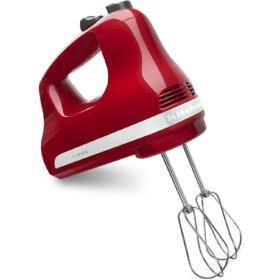
The pumpkin cake itself takes minutes to make. Simply whisk the dry ingredients together in a mixing bowl. In a separate bowl, add the wet ingredients. Beat with a handheld mixer then fold the dry ingredients into the wet ingredients with a rubber spatula, just until combined.
- Tip: Use room temperature eggs. Room temperature eggs bind together more easily and whisk to a higher volume. This promotes more even distribution into the batter resulting in a light, fluffy cake (because eggs trap air). Cold eggs result in a denser cake. Room temperature eggs also create a runnier batter which is easier to spread/not overwork so the cake has more lift and rises more evenly.
- Tip: How to quickly bring eggs to room temperature. Fill a bowl with warm water (not hot) and add eggs and let sit 10-20 minutes.
- Tip: Beat eggs for full three minutes. In most cake recipes, you don’t want to overbeat the eggs, but in this recipe, we want to beat the eggs with a handheld mixer for a full three minutes. This step is important because it is the only time we get to whip air into the cake batter to create a lighter, fluffier cake. Since the egg yolks contain fat, they are almost impossible to overwhip.
- Tip: Don’t overmix the batter. Once you combine the wet ingredients with the dry ingredients, stop mixing the batter as soon as you see the streaks of flour disappear. Folding the dry ingredients in with a spatula also helps to not overmix. Overmixing cake batter causes the gluten in the flour to form elastic gluten strands which result in a dense, chewy texture.
Step 3: Bake
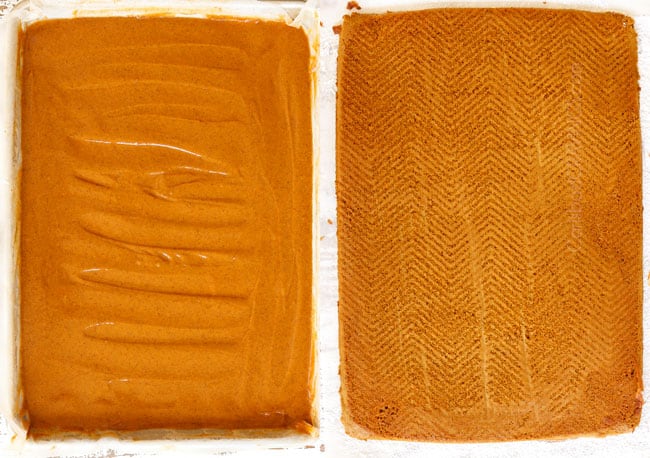
Pour the batter into the prepared pan, spread into an even layer then drop the pan on the counter a few times. This will level the cake and help to get rid of air bubbles. Bake at 375 degrees F for 13 to 15 minutes.
- Tip: Bake immediately. Don’t forget to preheat your oven before you start making the cake batter. Once the baking powder/baking soda are added to the wet ingredients, a chemical reaction begins. You need to take advantage of this reaction quickly before it passes otherwise your cake won’t rise as intended or be as tender.
- Tip: Don’t over-bake the cake. Start checking your cake at 13 minutes and only add time if needed because an overbaked cake is more dry, brittle and prone to cracking. You’ll know the cake is done when the edges begin to look dry and the middle of the cake springs back when touched.
- Tip: Don’t peak! Don’t open the oven doors until it is time to check your cake for doneness. Opening the doors early can cause your cake to cook unevenly and even fall; it also extends the baking time.
Step 4: Roll the cake
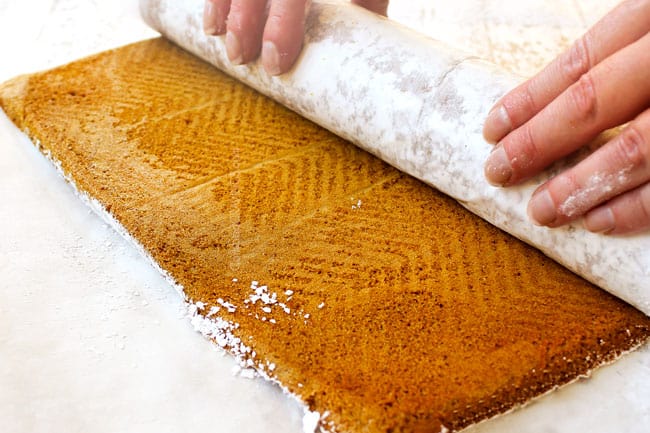
Working quickly, use the parchment overhang to lift the cake out of the pan and flip it over onto the new parchment. Peel off the old parchment paper. We don’t reuse and roll the cake up in the original parchment paper because the cake is more likely to stick to it as it cools. Slowly, tightly, roll the cake in the new parchment paper — working from short end to the short end.
- Tip: Roll the cake when it’s warm. Don’t let the cake cool any more than 3 minutes. A warm cake is more pliable, easier to roll and less likely to crack. In addition, rolling the cake while it’s warm allows it to cool in the rolled-up shape – our sole purpose of rolling up the cake in the first place!
- Tip: Roll the cake up tightly. You want the cake to be snug as you roll so when you re-roll it with the cream cheese filling, it will create beautiful, tight swirls and not sad, droopy ones.
Step 5: Cool the cake
Refrigerate the cake for 1 hour until cool or transfer the cake roll to a wire rack cool completely, about 2-3 hours.
- Tip: Don’t shortchange the chill time. The cake must be completely cooled before you unroll and frost. If you attempt to frost the cake while it is still warm, the frosting will melt and create a runny mess that’s impossible to roll up cleanly.
Step 6: Make the cream cheese frosting
While the cake is cooling, make the Nutella cream cheese frosting and refrigerate so it has time to thicken up. If you’re making the traditional Cream Cheese Filling, wait until you’re ready to frost the cake to make it.
- Tip: Do NOT over-microwave butter or cream cheese to soften. For the perfect filling consistency, let both the cream cheese and butter soften at room temperature to room temperature. If you must soften either in the microwave, take care to under do it or your filling will be runny – a big no-no for this filling. It is best to plan ahead and never microwave either.
- Tip: Freeze filling if runny. If your filling happens to be runny, stick it in the freezer until thickened, then give it a quick whisk before spreading. Just make sure not to forget about it in the freezer!
- Tip: Add the cream cheese at the end. Traditionally butter, sugar and cream cheese are blended together but America’s Test Kitchen’s method adds the cream cheese at the end of mixing. This technique produces filling/frosting that is far lighter because the creamed butter aerates the mix.
- Tip: Be patient. Using this method, the butter and sugar are mixed together first. It will seem like the are not blending, especially if your butter is a littler firmer (recommended) but be patient and continue to blend until they become creamy.
Step 7: Frost the cake
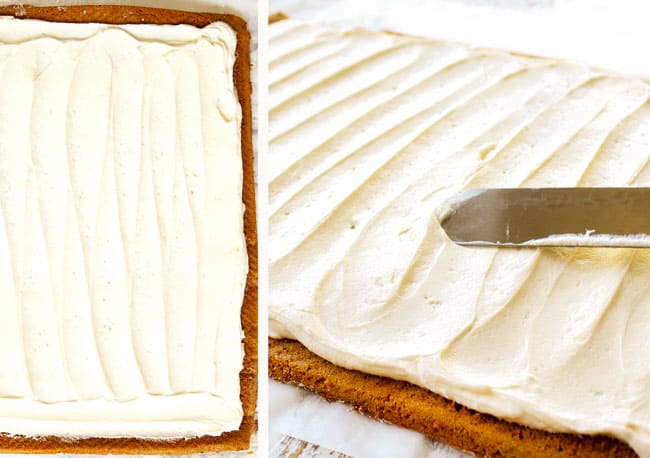
Once the cake has cooled, transfer it to a flat surface and carefully unroll it until it is flat. Spread the filling evenly over cake.
- Tip: Be gentle. Be gentle when unrolling the cake and don’t force it flat otherwise it can break. It’s okay if the edges curls up a bit.
- Tip: Leave a plain border: Don’t frost the cake all the way to the edges, rather leave a 1/2-inch plain border because the filling will compress when rolled so it needs a little spreading room so it doesn’t spill out the sides.
Step 8: Re-roll the cake
Carefully re-roll the cake, from short end to short end, gently peeling away the parchment paper as you roll.
- Tip: Snugly reroll the cake. The tighter you roll the cake, the more swirls your cake will boast.
- Tip: Roll small sections at a time. To roll the cake tighter, work with one section at a time by working from left to right, using the parchment to guide the cake on to itself, then peeling the parchment away before rolling the next section.
- Tip: Use a knife to help. The traditional pumpkin roll should be pretty easy to roll up, but the Nutella pumpkin roll can be a bit trickier due to the looser frosting. To help, use the side of a knife to press the rolling side of the cake down more tightly as you roll.
Step 9: Chill the pumpkin roll
Tightly wrap the pumpkin roll in plastic wrap and refrigerate at least four hours up to two days (best if overnight).
- Tip: Reshape the pumpkin roll. Chilling the pumpkin roll is the perfect time to workout any lopsided angles. Simply lay the pumpkin roll flat on the side that needs a little flattening.
- Tip: The longer the cake chills, the better. Not only does the cake filling become firmer and easier to slice without smooshing the pumpkin roll for prettier presentation, but the flavor of the cake builds.
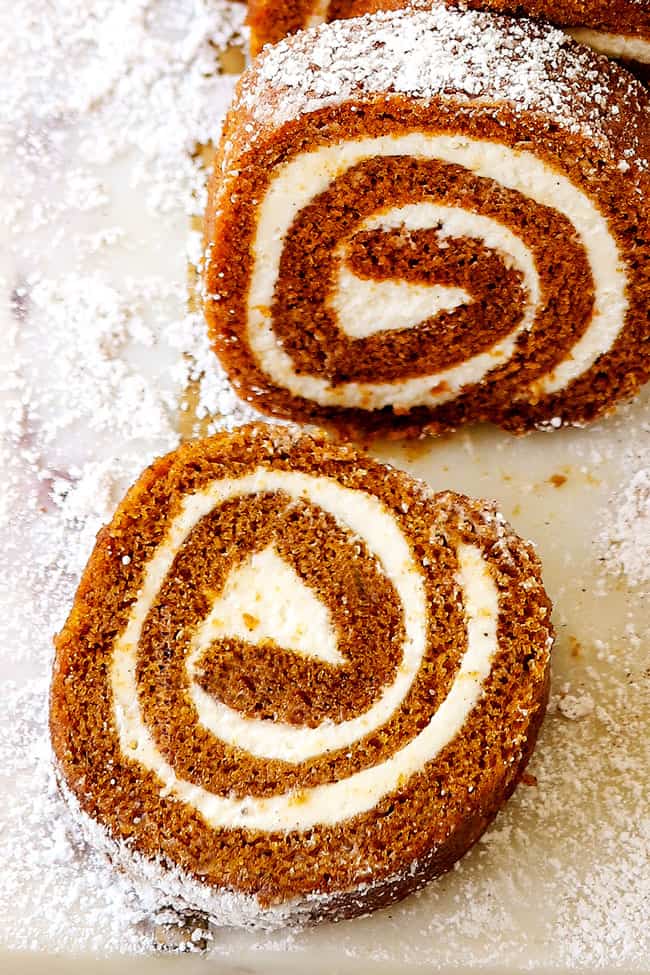
Step 10: Serve!
When ready to serve, remove the plastic wrap, lightly dust the pumpkin roll with powdered sugar, and slice into 1-inch slices.
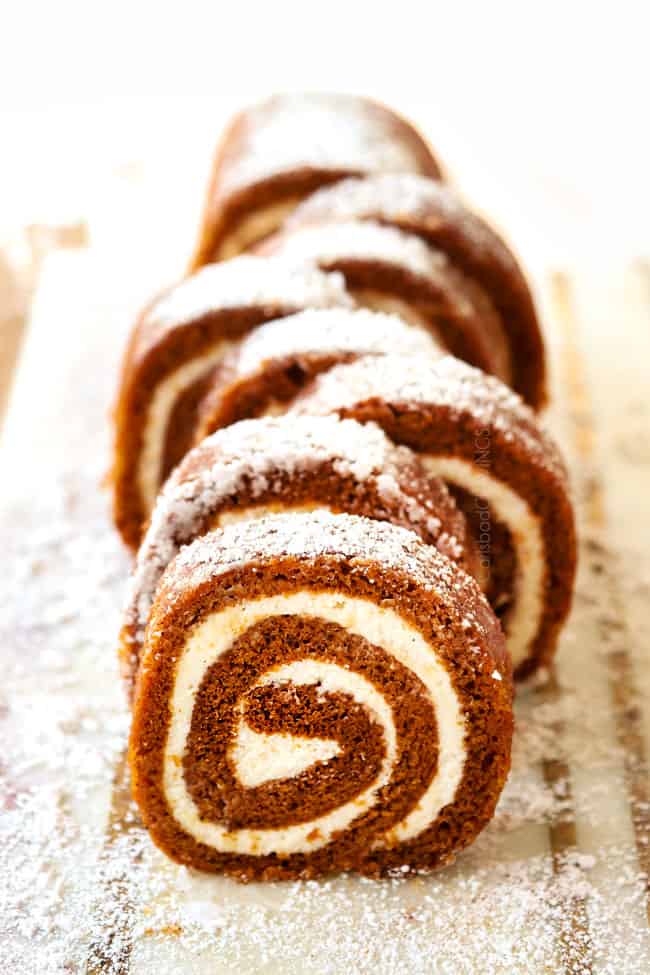
- Tip: Slice off the ends. For a prettier presentation, slice off both ends of the pumpkin roll to reveal beautiful, clean slices before serving.
- Tip: Use a serrated knife. A large serrated knife is the best for slicing the pumpkin roll. It makes for a nice, clean cut without smooshing the cake.
- Tip: Let the pumpkin roll sit at room temperature. I think the traditional Pumpkin Roll tastes best if removed from the refrigerator one hour before serving. The Nutella Pumpkin Roll tastes best removed from the refrigerator 30 minutes before serving, but not too much longer because the Nutella filling softens.
- Tip: Slice first, then let rest. With both pumpkin rolls, slice them first and then let them sit at room temperature because the cake will be firmer and easier to slice when it’s fresh from the fridge.
TO MAKE AHEAD:
This pumpkin roll recipe is fabulous dessert for stress free entertaining! Once the pumpkin roll is assembled, wrap it tightly in plastic wrap and refrigerate for up to 2 days before serving. It tastes just as good – or better – than freshly made!
TO store leftovers:
Line the pumpkin roll slices in a single layer on a plate/tray and cover tightly with plastic wrap. Refrigerate for up to 5 days. I like to microwave my slices for 10 seconds for moister leftovers.
DOES A PUMPKIN ROLL NEED TO BE REFRIGERATED?
Yes, a pumpkin roll should be refrigerated, not so much because of the danger of room temperature cream cheese, but because it holds its shape better.
Fun fact: According to Jan Moon, Cooking Light Test Kitchen expert, you do not need to refrigerate cake with cream cheese frosting (the sugar will act as a preservative) IF your house stays below 70 degrees F and you plan on eating it within 2 days. Still, refrigerate this pumpkin roll for the best texture and stability.
How to Freeze:
You can freeze pumpkin roll slices (leftovers) or the whole pumpkin roll for a make ahead dessert. In fact, I highly encourage you to make multiple pumpkin rolls and freeze them because one 15-ounce can of pumpkin puree will yield three pumpkin rolls. So, do the work once and have desserts ready for all your holiday festivities!
To freeze pumpkin roll slices:
- Line leftover slices on a baking sheet so they aren’t touching.
- Freeze for 1-2 hours until solid. Flash freezing prevents them from sticking together.
- Transfer frozen slices to a freezer safe plastic bag and squeeze out excess air.
- Label and freeze for up to two months.
- Thaw the slices (or slice) in the refrigerator overnight.
To freeze whole pumpkin roll:
- Double wrap the pumpkin roll tightly in plastic wrap, then double wrap in aluminum foil.
- Freeze for up to 2 months.
- Thaw overnight in the refrigerator.
Want to try this Pumpkin Roll RECIPE?
Pin it to your Dessert, holiday or Thanksgiving Board to SAVE for later!
Find me on Pinterest for more great recipes! I am always pinning :)!
©Carlsbad Cravings by CarlsbadCravings.com


Pumpkin Roll
Save This Recipe To Your Recipe Box
You can now create an account on our site and save your favorite recipes all in one place!
Ingredients
PUMPKIN ROLL DRY INGREDIENTS
- 3/4 cup all-purpose flour
- 1/2 teaspoon baking powder
- 1/2 teaspoon baking soda
- 2-3 teaspoons ground cinnamon 3 if you love cinnamon & recommended for Nutella filling
- 1/2 tsp EACH ground ginger, ground nutmeg, ground cloves
- 1/4 teaspoon salt
PUMPKIN ROLL WET INGREDIENTS
- 3 large eggs
- 1 teaspoon vanilla extract
- 1/2 cup granulated sugar
- 1/2 cup packed light brown sugar
- 2/3 cup pumpkin puree
FOR THE ROLL:
- Parchment paper
- 15 x 10-inch jelly roll pan
- 1/4 cup Powdered sugar plus more for dusting at the end
CREAM CHEESE FILLING INGREDIENTS:
- 6 tablespoons unsalted butter softened at room temperature**
- 1 cup powdered sugar sifted
- 1 teaspoon vanilla extract
- 8 oz. cream cheese cubed at room temperature**
NUTELLA CREAM CHEESE FILLING INGREDIENTS:
- 4 tablespoons unsalted butter softened at room temperature**
- 1 1/2 cups powdered sugar sifted
- 1/4 cup unsweetened cocoa powder
- 2-3 tablespoons milk
- 4 oz. cream cheese, cubed softened at room temperature**
- 1/2 cup Nutella
- 1 teaspoon vanilla extract
Instructions
PUMPKIN ROLL:
- Preheat the oven to 375 degrees F.
- Grease a 15 x 10-inch jelly roll pan with nonstick cooking spray then line with parchment paper, leaving about a 1-inch overhang on the short ends. Spray the top of the parchment with cooking spray; set aside.
- Whisk the dry ingredients together in a mixing bowl.
- In a separate large bowl, add the wet ingredients. Beat with a handheld mixer on medium-high speed for three minutes.
- Add the flour mixture to the wet ingredients and fold in with a rubber spatula just until combined.
- Pour the batter into the prepared pan and spread into an even layer. Drop the pan on the counter a few times to even and eliminate air bubbles.
- Bake at 375 degrees F for 13 to 15 minutes for or until the edges look dry and top of cake springs back when touched.
- Let the cake cool for 3 minutes. Meanwhile, line a clean, heatproof surface with new parchment paper and dust with ¼ cup powdered sugar.
- Loosen the edges of the cake with a knife. Working quickly, use the parchment overhang to lift the cake out of the pan and flip it over onto the new parchment. Peel off the old parchment paper. If needed, trim the edges of the new parchment on the short sides so they line up with the cake. Slowly, tightly, roll the cake in the parchment paper — working from short end to the short end.
- Refrigerate the cake for 1 hour until cool or transfer the cake roll to a wire rack to cool completely, about 2-3 hours.
- While the cake is cooling, make the Nutella Filling and refrigerate. For the traditional Cream Cheese Filling, wait until you’re ready to frost the cake to make it:
Option 1: Cream Cheese Filling
- Beat the butter and powdered sugar with a handled mixer at medium-high speed until the mixture is smooth (it will take a couple minutes to come together).
- Add cream cheese, 1 piece at a time, beating thoroughly after each addition. Add vanilla and beat to combine.
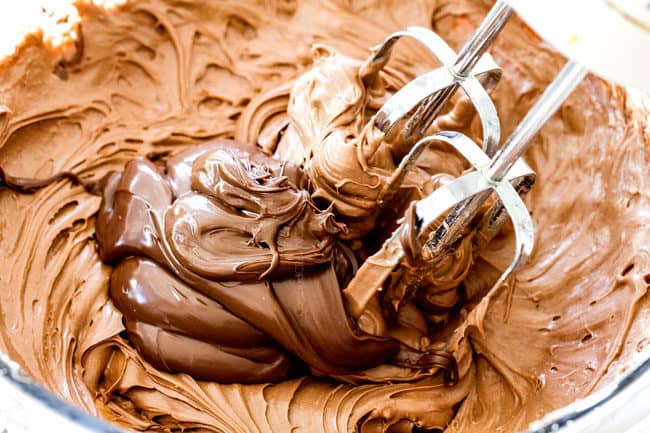
Option 2: Nutella Cream Cheese Filling
- Beat the butter, powdered sugar, cocoa powder and 2 tablespoons milk with handled mixer at medium-high speed until the mixture is smooth (it will take a couple minutes to come together).
- Add cream cheese, 1 piece at a time, beating thoroughly after each addition. Add Nutella and vanilla and beat to combine.
- Refrigerate while your Pumpkin Roll cools. (Note, the Nutella Filling is softer initially than the Cream Cheese Filling so it’s helpful to refrigerate; the Cream Cheese Filling should not be refrigerated before spreading unless it’s runny.)
FINISIH CAKE
- Once the cake has cooled, transfer it to a flat surface and carefully unroll until it is flat (it’s okay if the edges curl up a bit). Spread the filling evenly over cake, leaving a 1/2-inch border on all sides.
- Snuggly re-roll the cake, from short end to short end, gently peeling away the parchment paper as you roll. Tightly wrap the pumpkin roll in plastic wrap and refrigerate at least four hours up to two days (best if overnight).
- When ready to serve, remove the plastic wrap and slice off the ends (for prettier presentation). Lightly dust the pumpkin roll with powdered sugar (optional). Slice the cake into 1-inch slices with a serrated knife. At this point, I like to let the pumpkin slices sit at room temperature for 30-60 minutes so they aren’t cold (tastes way better!).
Video
Notes
Tips and Tricks
- Pumpkin: the most important part of this recipe is to use the right pumpkin! You will need pure pumpkin puree and NOT pumpkin pie filling.
- **Cream cheese and butter: soften them to room temperature at room temperature. Don’t microwave or your filling will be runny.
- If your filling is runny: place it in the freezer for 10 minutes or until it thickens up.
- Use room temperature eggs: for a lighter, fluffier cake.
- How to quickly bring eggs to room temperature: fill a bowl with warm water (not hot) and add eggs and let sit 10-20 minutes
- More tips and tricks: see the post for TONS of tips and tricks and step by step photos.
HOW TO MAKE AHEAD:
This pumpkin roll recipe is fabulous dessert for stress free entertaining! Once the pumpkin roll is assembled, wrap it tightly in plastic wrap and refrigerate for up to 2 days before serving. It tastes just as good – or better – than freshly made!How TO store leftovers:
Line the pumpkin roll slices in a single layer on a plate/tray and cover tightly with plastic wrap. Refrigerate for up to 5 days. I like to microwave my slices for 10 seconds for moister leftovers.How to Freeze:
You can freeze pumpkin roll slices (leftovers) or the whole pumpkin roll for a make ahead dessert. In fact, I highly encourage you to make multiple pumpkin rolls and freeze them because one 15-ounce can of pumpkin puree will yield three pumpkin rolls. So, do the work once and have desserts ready for all your holiday festivities!To freeze pumpkin roll slices:
- Line leftover slices on a baking sheet so they aren’t touching.
- Freeze for 1-2 hours until solid. Flash freezing prevents them from sticking together.
- Transfer frozen slices to a freezer safe plastic bag and squeeze out excess air.
- Label and freeze for up to two months.
- Thaw the slices (or slice) in the refrigerator overnight.
To freeze whole pumpkin roll:
- Double wrap the pumpkin roll tightly in plastic wrap, then double wrap in aluminum foil.
- Freeze for up to 2 months.
- Thaw overnight in the refrigerator.
Want To Make This Recipe?

Did You Make This Recipe?
Tag @CarlsbadCravings and Use #CarlsbadCravngs
Leave a Review, I Always Love Hearing From You!
Traditional Pumpkin Roll slightly adapted from Libby’s. Nutella Pumpkin Roll is a Carlsbad Cravings© Original


Spencer says
mmmm looks amazing! The perfect fall treat!
Jen says
Thank you Spencer! I’m excited for you to try it!
Richard Romanick says
Pumpkin roll absolutly delicious!!!!!
Jen says
Thanks so much Richard!
Sharice says
I just made this yesterday for my family and we all loved it! I’ve baked quite a bit over the years but for some reason a pumpkin roll has always intimidated me so I’d never tried. But I had such good success with the first recipe of yours that I tried from your site (your Beef Barbocoa) that when I saw this recipe I decided to give it a try too! The only tiny changes I made was reducing the ginger and cloves down to 1/4 tsp because sometimes those feel too overpowering to me, and I also did salted butter instead of unsalted butter in the cream cheese filling. Everything else I did exactly as written and it was a total success!! For my first go-around I wanted to make it with classic cream cheese filling, but next time I make it I want to try your Nutella one! Thanks for two great recipes so far 🙂
Jen says
Welcome to my site Sharice and thank you so much for taking the time to comment! I’m so pleased you conquered the Pumpkin Roll and that it was a huge hit! I’m excited to hear what you think of the Nutella as well!
Mariana Brawner says
Would this work with GF flour?
Jen says
Hi Mariana, I have not tested it with GF flour, but I am assuming a quality baking GF flour like Bob’s Red Mill 1 to 1 Baking Flour would work. Good luck!